Linux网络管理
一,简介
1,网络接口名称规则
Network interface names
Traditionally, network interfaces in Linux are enumerated as eth0, eth1, eth2, and so on. However, the mechanism which
sets these names can cause changes to which interface gets which name as devices are added and removed.
The default naming behavior in Red Hat Enterprise Linux 7 is to assign fixed names based on firmware, device topology,
and device type.
Interface names have the following characters:
Ethernet interfaces begin with en, WLAN interfaces begin with wl, and WWAN interfaces begin with ww.
The next character(s) represents the type of adapter with an o for on-board, s for hotplug slot, and p for PCI geographic location.
Not used by default but also available to administrators, an x is used to incorporate a MAC address.
Finally, a number N is used to represent an index, ID, or port.
If the fixed name cannot be determined, the traditional names such as ethN will be used.
For example, the first embedded network interface may be named eno1 and a PCI card network interface may be named enp2s0.
The new names make it easier to distinguish the relationship between a port and its name if the user knows both, but the
trade off is that users cannot assume a system with one interface calls that interface eth0.
en:eethernet 以太网-双绞线
wl:wirelessLAN:无线网卡
ww:WAN广域网:串行线缆
o:on-board板载网卡
s:hotplug热插拔
p:PCI接口
N:序号或者ID
示例:enp2s0
2,NetworkManager服务
网络管理器(NetworkManager)是一个动态网络的控制器与配置系统,它用于当网络设备可用时保持设备和连接开启并激活
默认情况下,CentOS/RHEL 7 已安装网络管理器,并处于启用状态。
systemctl status NetworkManager
systemctl status network
3,配置网络的工具
命令,字符,图形
配置文件:vim
命令行:nmcli
简易图形: nmtui
图形界面:nm-connection-editor
" class="reference-link">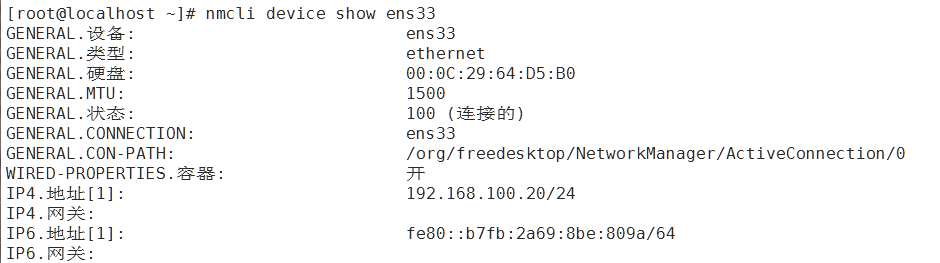
二,配置网络参数
1,配置IP(重点)
1.方法一(主要)
备份网卡配置文件
[root@tianyun ~]# vim /etc/sysconfig/network-scripts/ifcfg-enp2s0
NAME=”enp2s0”
DEVICE=”enp2s0”
ONBOOT=yes //是否启用该设备
BOOTPROTO=none //手动(none/static)还是自动(dhcp)
IPADDR=172.16.120.246 //地址
PREFIX=24 //掩码
IPADDR1=192.168.200.246 //额外地址
PREFIX1=24 //额外掩码,注意编号
GATEWAY=172.16.120.254 //网关
DNS1=8.8.8.8 //DNS
DNS2=114.114.114.114 //DNS2
[root@tianyun ~]# nmcli con reload
[root@tianyun ~]# nmcli con down enp2s0; nmcli con up enp2s0
注:删除自建的连接connection
- 方法二: 修改ip/netmask/dns/gateway[了解]
1 创建配置文件
nmcli connection add con-name eth0-1 autoconnect yes ifname eth0 type ethernet
2 设置IP地址
nmcli connection modify eth0-1 +ipv4.addresses 20.20.20.20/24
3 设置获取地址的方式为手动
nmcli connection modify eth0-1 ipv4.method m
4 启动该配置
nmcli connection up eth0-1
5 删除该配置
nmcli connection delete eth0-1
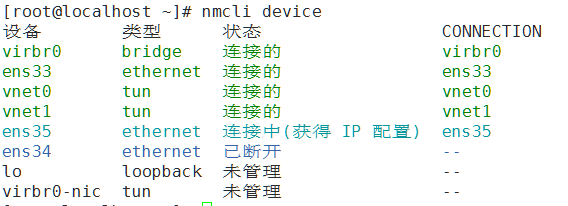
6 查看启动的设备和连接关系
nmcli device
- 特殊情况,不使用NetworkManager管理网络
aliyun
[root@aliyun ~]# nmcli connection delete enp2s0-auto
[root@aliyun ~]# systemctl disable NetworkManager
[root@aliyun ~]# systemctl stop NetworkManager
[root@aliyun ~]# systemctl status NetworkManager
● NetworkManager.service - Network Manager
Loaded: loaded (/usr/lib/systemd/system/NetworkManager.service; disabled; vendor preset: enabled)
Active: inactive (dead)
[root@aliyun ~]# vim /etc/sysconfig/network-scripts/ifcfg-eth0
NAME=eth0
DEVICE=eth0
ONBOOT=yes
NETBOOT=yes
BOOTPROTO=none
IPADDR=192.168.122.169
PREFIX=24
TYPE=Ethernet
[root@aliyun ~]# systemctl restart network.service
说明:以下配置跟NetworkManager无关:
2,主机名
修改主机名/etc/hostname
# hostnamectl set-hostname tianyun.example.com
# cat /etc/hostname //查看主机名
# reboot //重启
3,域名解析
a. hosts
a. hosts方法,在本地服务器设置域名和IP的对应关系。方便临时使用域名访问某台服务器。
[root@tianyun ~]# cat /etc/hosts
127.0.0.1 localhost localhost.localdomain localhost4 localhost4.localdomain4
::1 localhost localhost.localdomain localhost6 localhost6.localdomain6
119.75.218.70 www.baidu.com
[root@tianyun ~]# getent hosts www.baidu.com
119.75.218.70 www.baidu.com
b. resolv.conf DNS
b. resolv.conf 将域名解析请求转发给DNS服务器。
[root@tianyun ~]# cat /etc/resolv.conf
# Generated by NetworkManager
nameserver 114.114.114.114
4,网络测试工具
测试工具
基本的网络测试工具
[root@tianyun ~]# ip a //查看所有IP
[root@tianyun ~]# ip a s eth0 //查看一个网卡
[root@tianyun ~]# ip route //查看路由
[root@tianyun ~]# ip neigh //另一台主机ping通
[root@tianyun ~]# hostname //主机名
[root@tianyun ~]# ping www.baidu.com
[root@tianyun ~]# ping -c2 www.baidu.com
[root@tianyun ~]# ip -s link show eth0 //转发的数据字节
[root@tianyun ~]# traceroute www.sina.com //跟踪路由
[root@tianyun ~]# tracepath www.sina.com
ports and services
安装实例服务
以下为示例服务:
[root@aliyun ~]# yum -y install httpd vsftpd
[root@aliyun ~]# systemctl start httpd
[root@aliyun ~]# systemctl start vsftpd
http 80/tcp
ssh 22/tcp
ftp 21/tcp
Show TCP sockers
Show TCP sockets (LISTEN)
[root@aliyun ~]# ss -tnl
State Recv-Q Send-Q Local Address:Port Peer Address:Port
LISTEN 0 128 *:80 *:*
LISTEN 0 32 :::21 :::*
5,临时配置网络信息
目的:
当临时使用某个IP或者网关时,可以使用如下命令。重启服务失效
ip/netmask
# ip addr add dev ens33 3.3.3.3/24
# ip addr del dev ens33 3.3.3.3/24
# ip add s 查询
gateway
# ip route del default //先删除默认网关
# ip route add default via 192.168.122.3 //临时配置默认网关
hostname
hostname
# hostname QF.com
6,扩展-网卡改名
已经装好系统CentOS7修改网卡为eth0
- 修改网卡配置文件
[root@localhost ~]# mv /etc/sysconfig/network-scripts/ifcfg-ens33 /etc/sysconfig/network-scripts/ifcfg-eth0
[root@localhost ~]# vim /etc/sysconfig/network-scripts/ifcfg-e
th0
DEVICE=eth0
NAME=eth0
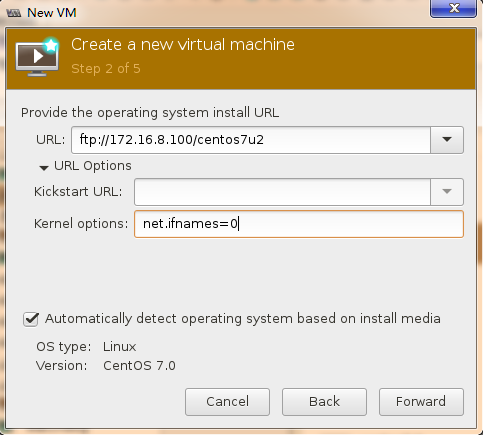
- GRUB添加kernel参数
# vim /etc/sysconfig/grub
GRUB_CMDLINE_LINUX=”…… net.ifnames=0”
3.重新装载配置文件
# grub2-mkconfig -o /boot/grub2/grub.cfg
- reboot
# reboot
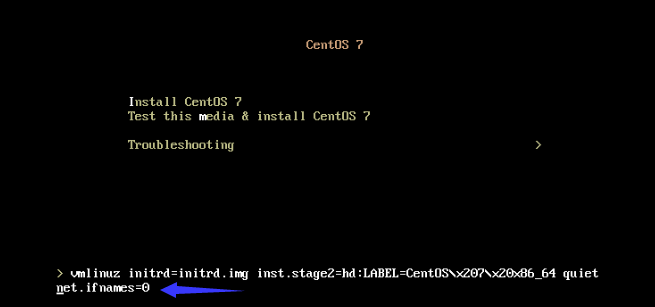
未装好系统CentOS7修改网卡为eth0
也可在安装系统时添加kernel参数 net.ifnames=0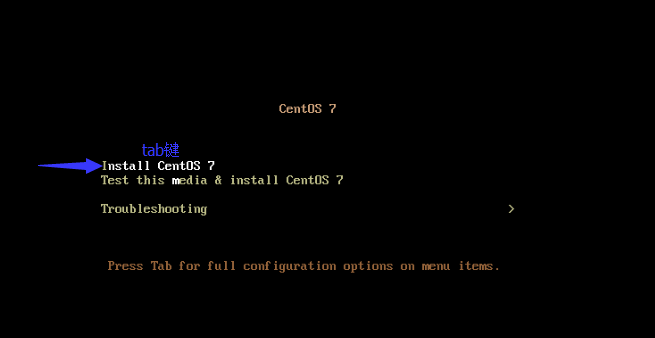
KVM安装Centos7时将网卡改为eth0:(略)
在KVM虚拟机添加全虚拟化的网卡(略)

半虚拟化的网卡命名为eth0,1
全虚拟化的是ens9,新规则
7,初始化服务器
1. 为你的服务器配置root密码。
2. 配置IP地址
3. 配置YUM源
自动挂载光驱/阿里YUM
配置YUM仓库
4. 关闭防火墙
systemctl stop firewalld
systemctl disable firewalld
systemctl status firewalld
5.selinux
临时关闭
setenfoce 0
永久关闭
[root@localhost ~]# vim /etc/sysconfig/selinux
SELINUX=disabled
6.安装常用程序
yum install -y lrzsz sysstat
7.关机快照
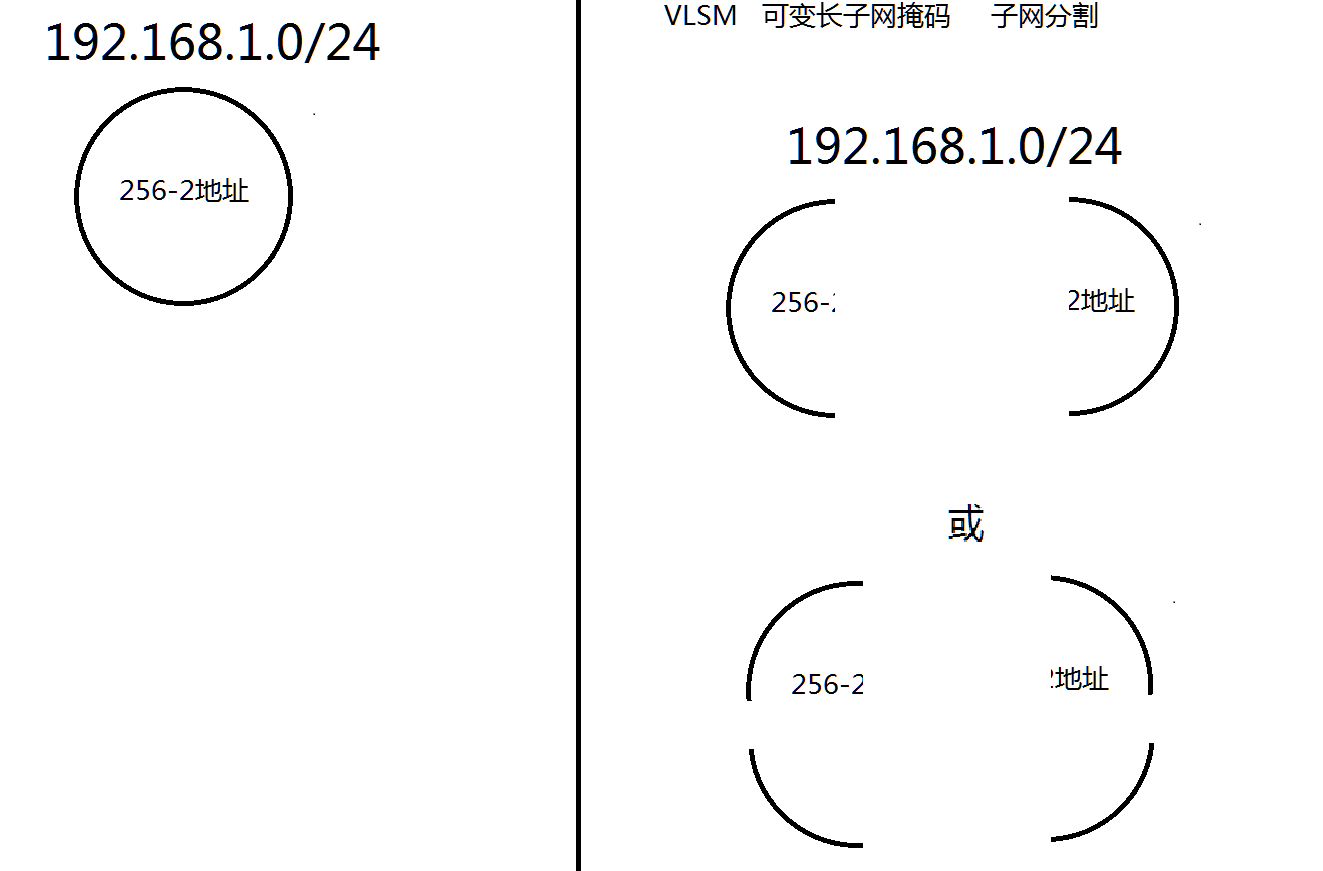
8,VLSM(了解)
可变长子网掩码
简介
IP地址枯竭,节约IP地址使用的一种方法。
图示
9,vlan/trunk(了解)
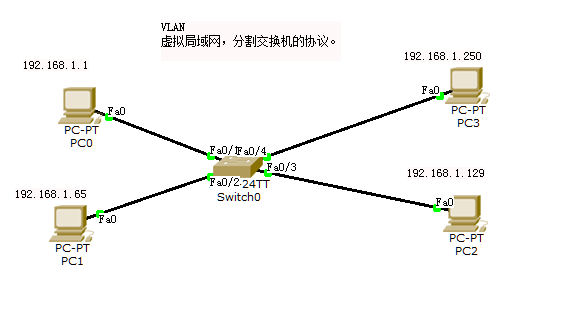
虚拟局域网
需求
目的:将交换机的F0/1-F0/2换分到VLAN10,财务部使用
目的:将交换机的F0/3-F0/4换分到VLAN20,技术部使用
图示
配置
Switch>enable 使交换机可以配置
Switch#config t 配置模式
Switch(config)#vlan 10 创建虚拟局域网10
Switch(config)#vlan 20 创建虚拟局域网20
Switch(config-vlan)#interface f0/1 进入1号端口
Switch(config-if)#switchport access vlan 10 将1号划分到虚拟网络10
Switch(config-vlan)#interface f0/2 进入2号端口
Switch(config-if)#switchport access vlan 10 将1号划分到虚拟网络10
Switch(config-vlan)#interface f0/3 进入3号端口
Switch(config-if)#switchport access vlan 20 将1号划分到虚拟网络20
Switch(config-vlan)#interface f0/4 进入4号端口
Switch(config-if)#switchport access vlan 20 将1号划分到虚拟网络20
测试
192.168.1.1 ping 192.168.1.65 互通
192.168.1.250 ping 192.168.1.129 互通
干道协议
目的
使不同交换机中相同VLAN,通过同一根线缆通信。
图示
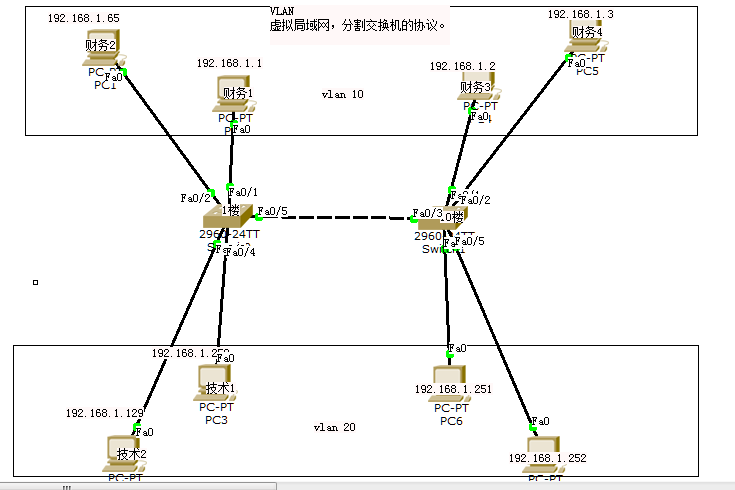
操作
SWITCH1交换机上配置
Switch(config)#interface f0/5
Switch(config-if)#switchport mode trunk
SWITCH2交换机上配置
Switch(config)#interface f0/3
Switch(config-if)#switchport mode trunk
验证
不同交换机上财务部主机是可以ping通
不同交换机上技术部主机是可以ping通


")


还没有评论,来说两句吧...