源码分析shiro认证授权流程
原文地址:
https://www.cnblogs.com/davidwang456/p/4428421.html
- shiro介绍
Apache Shiro是一个强大易用的Java安全框架,提供了认证、授权、加密和会话管理等功能:
- 认证 - 用户身份识别,常被称为用户“登录”;
- 授权 - 访问控制;
- 密码加密 - 保护或隐藏数据防止被偷窥;
- 会话管理 - 每用户相关的时间敏感的状态。
对于任何一个应用程序,Shiro都可以提供全面的安全管理服务。并且相对于其他安全框架,Shiro要简单的多。
先要了解shiro的基本框架(见http://www.cnblogs.com/davidwang456/p/4425145.html)。
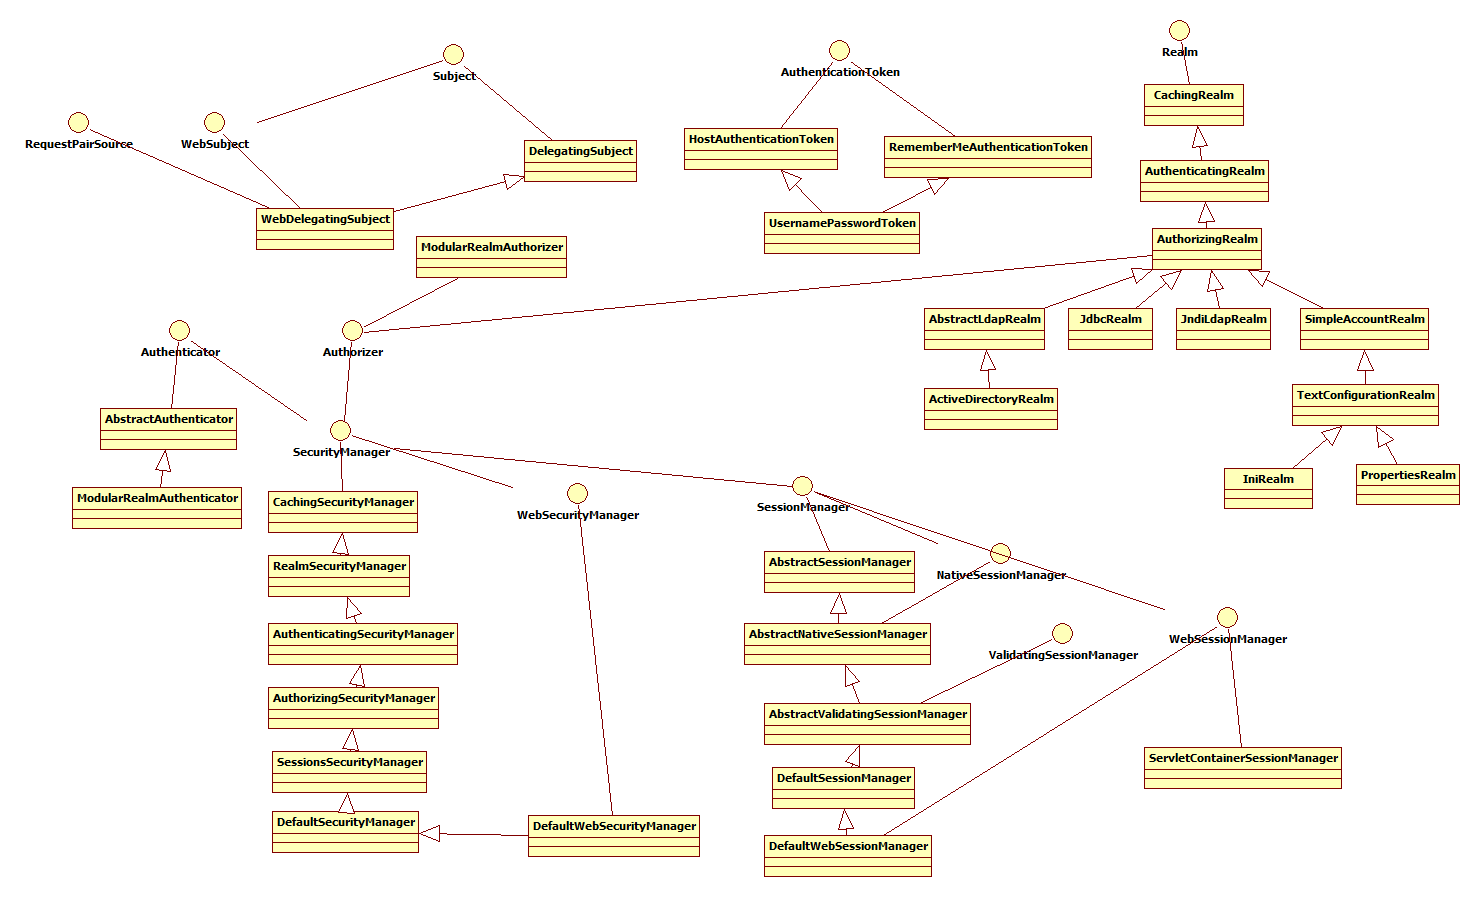
然后看一下各个组件之间的关系:
以下内容参考:http://kdboy.iteye.com/blog/1154644
Subject:即“当前操作用户”。但是,在Shiro中,Subject这一概念并不仅仅指人,也可以是第三方进程、后台帐户(Daemon Account)或其他类似事物。它仅仅意味着“当前跟软件交互的东西”。但考虑到大多数目的和用途,你可以把它认为是Shiro的“用户”概念。
Subject代表了当前用户的安全操作,SecurityManager则管理所有用户的安全操作。
SecurityManager:它是Shiro框架的核心,典型的Facade模式,Shiro通过SecurityManager来管理内部组件实例,并通过它来提供安全管理的各种服务。
Realm: Realm充当了Shiro与应用安全数据间的“桥梁”或者“连接器”。也就是说,当对用户执行认证(登录)和授权(访问控制)验证时,Shiro会从应用配置的Realm中查找用户及其权限信息。
从这个意义上讲,Realm实质上是一个安全相关的DAO:它封装了数据源的连接细节,并在需要时将相关数据提供给Shiro。当配置Shiro时,你必须至少指定一个Realm,用于认证和(或)授权。配置多个Realm是可以的,但是至少需要一个。
Shiro内置了可以连接大量安全数据源(又名目录)的Realm,如LDAP、关系数据库(JDBC)、类似INI的文本配置资源以及属性文件等。如果缺省的Realm不能满足需求,你还可以插入代表自定义数据源的自己的Realm实现。
Shiro主要组件还包括:
Authenticator :认证就是核实用户身份的过程。这个过程的常见例子是大家都熟悉的“用户/密码”组合。多数用户在登录软件系统时,通常提供自己的用户名(当事人)和支持他们的密码(证书)。如果存储在系统中的密码(或密码表示)与用户提供的匹配,他们就被认为通过认证。
Authorizer :授权实质上就是访问控制 - 控制用户能够访问应用中的哪些内容,比如资源、Web页面等等。
SessionManager :在安全框架领域,Apache Shiro提供了一些独特的东西:可在任何应用或架构层一致地使用Session API。即,Shiro为任何应用提供了一个会话编程范式 - 从小型后台独立应用到大型集群Web应用。这意味着,那些希望使用会话的应用开发者,不必被迫使用Servlet或EJB容器了。或者,如果正在使用这些容器,开发者现在也可以选择使用在任何层统一一致的会话API,取代Servlet或EJB机制。
CacheManager : 对Shiro的其他组件提供缓存支持。
- 做一个demo,跑shiro的源码,从login开始:
第一步:用户根据表单信息填写用户名和密码,然后调用登陆按钮。内部执行如下:
UsernamePasswordToken token = new UsernamePasswordToken(loginForm.getUsername(), loginForm.getPassphrase());token.setRememberMe(true);Subject currentUser = SecurityUtils.getSubject();currentUser.login(token);
第二步:代理DelegatingSubject继承Subject执行login
public void login(AuthenticationToken token) throws AuthenticationException {clearRunAsIdentitiesInternal();Subject subject = securityManager.login(this, token);PrincipalCollection principals;String host = null;if (subject instanceof DelegatingSubject) {DelegatingSubject delegating = (DelegatingSubject) subject;//we have to do this in case there are assumed identities - we don't want to lose the 'real' principals:principals = delegating.principals;host = delegating.host;} else {principals = subject.getPrincipals();}if (principals == null || principals.isEmpty()) {String msg = "Principals returned from securityManager.login( token ) returned a null or " +"empty value. This value must be non null and populated with one or more elements.";throw new IllegalStateException(msg);}this.principals = principals;this.authenticated = true;if (token instanceof HostAuthenticationToken) {host = ((HostAuthenticationToken) token).getHost();}if (host != null) {this.host = host;}Session session = subject.getSession(false);if (session != null) {this.session = decorate(session);} else {this.session = null;}}
第三步:调用DefaultSecurityManager继承SessionsSecurityManager执行login方法
public Subject login(Subject subject, AuthenticationToken token) throws AuthenticationException {AuthenticationInfo info;try {info = authenticate(token);} catch (AuthenticationException ae) {try {onFailedLogin(token, ae, subject);} catch (Exception e) {if (log.isInfoEnabled()) {log.info("onFailedLogin method threw an " +"exception. Logging and propagating original AuthenticationException.", e);}}throw ae; //propagate}Subject loggedIn = createSubject(token, info, subject);onSuccessfulLogin(token, info, loggedIn);return loggedIn;}
第四步:认证管理器AuthenticatingSecurityManager继承RealmSecurityManager执行authenticate方法:
/*** Delegates to the wrapped {@link org.apache.shiro.authc.Authenticator Authenticator} for authentication.*/public AuthenticationInfo authenticate(AuthenticationToken token) throws AuthenticationException {return this.authenticator.authenticate(token);}
第五步:抽象认证管理器AbstractAuthenticator继承Authenticator, LogoutAware 执行authenticate方法:
public final AuthenticationInfo authenticate(AuthenticationToken token) throws AuthenticationException {if (token == null) {throw new IllegalArgumentException("Method argumet (authentication token) cannot be null.");}log.trace("Authentication attempt received for token [{}]", token);AuthenticationInfo info;try {info = doAuthenticate(token);if (info == null) {String msg = "No account information found for authentication token [" + token + "] by this " +"Authenticator instance. Please check that it is configured correctly.";throw new AuthenticationException(msg);}} catch (Throwable t) {AuthenticationException ae = null;if (t instanceof AuthenticationException) {ae = (AuthenticationException) t;}if (ae == null) {//Exception thrown was not an expected AuthenticationException. Therefore it is probably a little more//severe or unexpected. So, wrap in an AuthenticationException, log to warn, and propagate:String msg = "Authentication failed for token submission [" + token + "]. Possible unexpected " +"error? (Typical or expected login exceptions should extend from AuthenticationException).";ae = new AuthenticationException(msg, t);}try {notifyFailure(token, ae);} catch (Throwable t2) {if (log.isWarnEnabled()) {String msg = "Unable to send notification for failed authentication attempt - listener error?. " +"Please check your AuthenticationListener implementation(s). Logging sending exception " +"and propagating original AuthenticationException instead...";log.warn(msg, t2);}}throw ae;}log.debug("Authentication successful for token [{}]. Returned account [{}]", token, info);notifySuccess(token, info);return info;}
第六步:ModularRealmAuthenticator继承AbstractAuthenticator执行doAuthenticate方法
protected AuthenticationInfo doAuthenticate(AuthenticationToken authenticationToken) throws AuthenticationException {assertRealmsConfigured();Collection<Realm> realms = getRealms();if (realms.size() == 1) {return doSingleRealmAuthentication(realms.iterator().next(), authenticationToken);} else {return doMultiRealmAuthentication(realms, authenticationToken);}}
接着调用:
/*** Performs the authentication attempt by interacting with the single configured realm, which is significantly* simpler than performing multi-realm logic.** @param realm the realm to consult for AuthenticationInfo.* @param token the submitted AuthenticationToken representing the subject's (user's) log-in principals and credentials.* @return the AuthenticationInfo associated with the user account corresponding to the specified {@code token}*/protected AuthenticationInfo doSingleRealmAuthentication(Realm realm, AuthenticationToken token) {if (!realm.supports(token)) {String msg = "Realm [" + realm + "] does not support authentication token [" +token + "]. Please ensure that the appropriate Realm implementation is " +"configured correctly or that the realm accepts AuthenticationTokens of this type.";throw new UnsupportedTokenException(msg);}AuthenticationInfo info = realm.getAuthenticationInfo(token);if (info == null) {String msg = "Realm [" + realm + "] was unable to find account data for the " +"submitted AuthenticationToken [" + token + "].";throw new UnknownAccountException(msg);}return info;}
第七步:AuthenticatingRealm继承CachingRealm执行getAuthenticationInfo方法
public final AuthenticationInfo getAuthenticationInfo(AuthenticationToken token) throws AuthenticationException {AuthenticationInfo info = getCachedAuthenticationInfo(token); //从缓存中读取if (info == null) {//otherwise not cached, perform the lookup:info = doGetAuthenticationInfo(token); //缓存中读不到,则到数据库或者ldap或者jndi等去读log.debug("Looked up AuthenticationInfo [{}] from doGetAuthenticationInfo", info);if (token != null && info != null) {cacheAuthenticationInfoIfPossible(token, info);}} else {log.debug("Using cached authentication info [{}] to perform credentials matching.", info);}if (info != null) {assertCredentialsMatch(token, info);} else {log.debug("No AuthenticationInfo found for submitted AuthenticationToken [{}]. Returning null.", token);}return info;}
- 从缓存中读取的方法:
private Cache<Object, AuthenticationInfo> getAuthenticationCacheLazy() {if (this.authenticationCache == null) {log.trace("No authenticationCache instance set. Checking for a cacheManager...");CacheManager cacheManager = getCacheManager();if (cacheManager != null) {String cacheName = getAuthenticationCacheName();log.debug("CacheManager [{}] configured. Building authentication cache '{}'", cacheManager, cacheName);this.authenticationCache = cacheManager.getCache(cacheName);}}return this.authenticationCache;}
- 从数据库中读取的方法:
JdbcRealm继承 AuthorizingRealm执行doGetAuthenticationInfo方法
protected AuthenticationInfo doGetAuthenticationInfo(AuthenticationToken token) throws AuthenticationException {UsernamePasswordToken upToken = (UsernamePasswordToken) token;String username = upToken.getUsername();// Null username is invalidif (username == null) {throw new AccountException("Null usernames are not allowed by this realm.");}Connection conn = null;SimpleAuthenticationInfo info = null;try {conn = dataSource.getConnection();String password = null;String salt = null;switch (saltStyle) {case NO_SALT:password = getPasswordForUser(conn, username)[0];break;case CRYPT:// TODO: separate password and hash from getPasswordForUser[0]throw new ConfigurationException("Not implemented yet");//break;case COLUMN:String[] queryResults = getPasswordForUser(conn, username);password = queryResults[0];salt = queryResults[1];break;case EXTERNAL:password = getPasswordForUser(conn, username)[0];salt = getSaltForUser(username);}if (password == null) {throw new UnknownAccountException("No account found for user [" + username + "]");}info = new SimpleAuthenticationInfo(username, password.toCharArray(), getName());if (salt != null) {info.setCredentialsSalt(ByteSource.Util.bytes(salt));}} catch (SQLException e) {final String message = "There was a SQL error while authenticating user [" + username + "]";if (log.isErrorEnabled()) {log.error(message, e);}// Rethrow any SQL errors as an authentication exceptionthrow new AuthenticationException(message, e);} finally {JdbcUtils.closeConnection(conn);}return info;}
接着调用sql语句:
private String[] getPasswordForUser(Connection conn, String username) throws SQLException {String[] result;boolean returningSeparatedSalt = false;switch (saltStyle) {case NO_SALT:case CRYPT:case EXTERNAL:result = new String[1];break;default:result = new String[2];returningSeparatedSalt = true;}PreparedStatement ps = null;ResultSet rs = null;try {ps = conn.prepareStatement(authenticationQuery);ps.setString(1, username);// Execute queryrs = ps.executeQuery();// Loop over results - although we are only expecting one result, since usernames should be uniqueboolean foundResult = false;while (rs.next()) {// Check to ensure only one row is processedif (foundResult) {throw new AuthenticationException("More than one user row found for user [" + username + "]. Usernames must be unique.");}result[0] = rs.getString(1);if (returningSeparatedSalt) {result[1] = rs.getString(2);}foundResult = true;}} finally {JdbcUtils.closeResultSet(rs);JdbcUtils.closeStatement(ps);}return result;}
其中authenticationQuery定义如下:
protected String authenticationQuery = DEFAULT_AUTHENTICATION_QUERY;protected static final String DEFAULT_AUTHENTICATION_QUERY = "select password from users where username = ?";
- 小结
Apache Shiro 是功能强大并且容易集成的开源权限框架,它能够完成认证、授权、加密、会话管理等功能。认证和授权为权限控制的核心,简单来说,“认证”就是证明你是谁? Web 应用程序一般做法通过表单提交用户名及密码达到认证目的。“授权”即是否允许已认证用户访问受保护资源。


")


还没有评论,来说两句吧...