Spring JdbcTemplate使用
该篇博客主要阐述关于Spring中jdbcTemplate,jdbcTemplate大大方便了jdbc的一些重复性操作
一、jdbcTemplate更新数据库常用方法
- update (更新数据)
- batchUpdate (批量更新数据库)
- queryForObject (查询单行)
- query (查询多行)
- queryForObject (单值查询)不同的
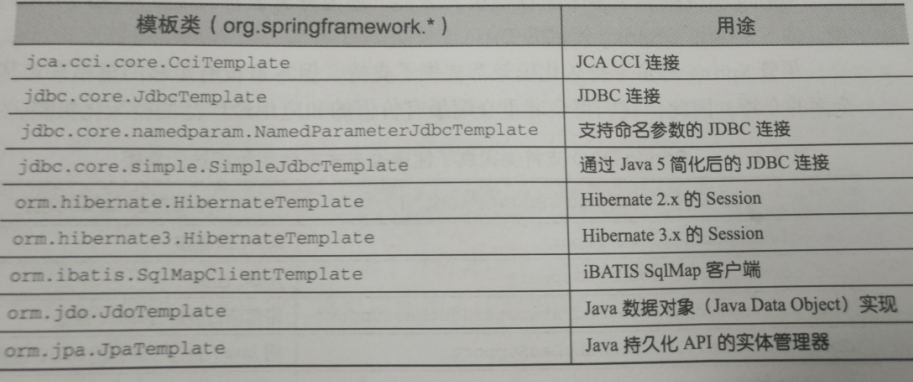
二、Spring提供的数据访问模板,分别适用于不同的持久化机制
其中就包含了该篇博客要阐述的jdbcTemplate
三、了解Spring数据访问过程
Spring将数据访问过程中固定的和可变的部分明确划分为两个不同的类
- 模板(template) :模板管理过程中固定的部分
- 回调(callback) :回调处理自定义的数据访问代码
四、了解jdbcTemplate
Spring对数据库的操作在jdbc上面做了深层次的封装,使用Spring的注入功能,可以把DataSource(数据库连接池)注册到jdbcTemplate中
五、了解数据库连接池的重要性
1、普通的JDBC连接数据库每次向数据库建立连接的时候都将connection加载到内存,再验证用户名等信息,这样会消耗一定的时间,每次的数据库连接,使用完后再断开,这样的方式会消耗大量的资源和时间。同时上千人访问的话将占用很多系统资源,导致服务器崩溃
2、数据库连接池其实就是一个为数据库连接建立的一个“缓存池”,预先在数据库连接池中放入一定数量的连接。当需要数据库连接时,从连接池中拿就是了,用完再放回。数据库连接池负责分配、管理、释放数据库连接,它允许应用程序重复使用一个现有的数据库连接,而不是重新建立
3、数据库连接池在初始化时将创建一定数量的数据库连接放到连接池中(initialPoolSize).无论这些数据库连接是否被使用,连接池都将一直保证至少拥有这么多的连接数量
4、连接池的最大数据库连接数量限定了这个连接池占有的最大连接数(maxPoolSize)。当应用程序向连接池请求的连接数超过最大连接数时,这些请求将加入到等待队列中
5、数据库连接池相对于无连接池的优点
- 资源重用,避免频繁创建
- 更快的系统反应速度
- 实现某一应用最大可用数据库连接数的限制避免某一应用独占所有的数据库资源
- 统一的连接管理,避免数据库连接泄露
6、常用的数据库连接池
- c3p0(常用)
- dbcp
- proxool
六、Spring中实现jdbcTemplate对数据库操作(采用c3p0连接池)
1、首先导入JAR
主要是不要忘了c3p0连接池的jar和数据库的jar
2、src下创建属性配置文件db.properties
基本信息配置
- jdbc.user=root- jdbc.password=1111- jdbc.driverClass=com.mysql.jdbc.Driver- jdbc.jdbcUrl=jdbc ///sms
其他信息配置
initialPoolSize:初始化连接数量minPoolSize:最小连接数量maxPoolSize:最大连接数量acquireIncrement: 当连接池用完之后一次性获取的连接数量idleConnectionTestPeriod:根据一定的时间间隔检查连接池的连接数量 单位为秒maxIdleTime:最大空闲时间 单位为秒maxStatements:最大的maxStatements连接数量maxStatementsPerConnection:最大语句缓存
db.properties
jdbc.user=rootjdbc.password=1111jdbc.driverClass=com.mysql.jdbc.Driverjdbc.jdbcUrl=jdbc:mysql:///smsjdbc.initPoolSize=5jdbc.maxPoolSize=10
3、配置XML(已经写注释了,就不多解释了)
<?xml version="1.0" encoding="UTF-8"?><beans xmlns="http://www.springframework.org/schema/beans"xmlns:xsi="http://www.w3.org/2001/XMLSchema-instance"xmlns:context="http://www.springframework.org/schema/context"xsi:schemaLocation="http://www.springframework.org/schema/beans http://www.springframework.org/schema/beans/spring-beans-4.3.xsdhttp://www.springframework.org/schema/context http://www.springframework.org/schema/context/spring-context-4.3.xsd"><!-- 导入资源文件读取db.properties文件中的数据 --><context:property-placeholder location="classpath:db.properties"/><!-- 配置C3P0数据源 --><bean id="dataSource"class="com.mchange.v2.c3p0.ComboPooledDataSource"><property name="user" value="${jdbc.user}"></property><property name="password" value="${jdbc.password}"></property><property name="jdbcUrl" value="${jdbc.jdbcUrl}"></property><property name="driverClass" value="${jdbc.driverClass}"></property><property name="initialPoolSize" value="${jdbc.initPoolSize}"></property><property name="maxPoolSize" value="${jdbc.maxPoolSize}"></property></bean><!-- 配置Spring的jdbcTemplate并注入一个dataSource数据源--><bean id="jdbcTemplate"class="org.springframework.jdbc.core.JdbcTemplate"><property name="dataSource" ref="dataSource"></property></bean></beans>
4、测试是否已经连接数据库
package com.linjie.jdbctemplate;/*** @author LinJie E-mail:ash-ali@163.com* @version 创建时间:2018年5月11日 下午4:42:55* 测试*/import java.sql.SQLException;import javax.sql.DataSource;import org.junit.Test;import org.springframework.context.ApplicationContext;import org.springframework.context.support.ClassPathXmlApplicationContext;import org.springframework.jdbc.core.JdbcTemplate;public class testJDBC {private JdbcTemplate jdbcTemplate;private ApplicationContext context = null;//初始化连接池{context = new ClassPathXmlApplicationContext("applicationContext.xml");jdbcTemplate = (JdbcTemplate) context.getBean("jdbcTemplate");}//测试是否连接数据库@Testpublic void testIsConnect() throws SQLException {DataSource dataSource = context.getBean(DataSource.class);System.out.println("连接成功"+dataSource.getConnection());}}
结果(连接成功)

七、更新查询操作
既然已经可以连接了,那就进行一些常规操作吧
1、采用的数据库sms,表student
+----+------+----------+--------+------+-------+| id | num | password | name | age | score |+----+------+----------+--------+------+-------+| 1 | 0001 | 111 | pink | 21 | 99 || 2 | 11 | 11 | ee | 12 | 55 || 3 | 0004 | 123 | linjie | 20 | 99 || 4 | 11 | 11 | ww | 11 | 11 || 5 | 007 | 123 | pojp | 23 | 99 || 6 | 008 | 123 | trtp | 23 | 99 || 7 | 009 | 123 | QQQp | 23 | 99 || 8 | 007 | 123 | pojp | 23 | 99 || 9 | 008 | 123 | trtp | 23 | 99 || 10 | 009 | 123 | QQQp | 23 | 99 || 11 | 007 | 123 | pojp | 23 | 99 || 12 | 008 | 123 | trtp | 23 | 99 || 13 | 009 | 123 | QQQp | 23 | 99 |+----+------+----------+--------+------+-------+
2、update
//修改指定num的name@Testpublic void testUpdate() {String sql = "update student set name = ? where num = ?";jdbcTemplate.update(sql, "pink",0001);System.out.println("success");}
3、batchUpdate批量更新
/**批量更新:批量 insert,update,delete*/@Testpublic void testBatechUpdate() {String sql = "insert into student(num,password,name,age,score) value(?,?,?,?,?)";List<Object[]> batchArgs = new ArrayList<Object[]>();batchArgs.add(new Object[] {"007","123","pojp",23,99});batchArgs.add(new Object[] {"008","123","trtp",23,99});batchArgs.add(new Object[] {"009","123","QQQp",23,99});jdbcTemplate.batchUpdate(sql, batchArgs);}
4、queryForObject查询单行
查询将查询值返回给对象,创建stu.java
package com.linjie.jdbctemplate;/*** @author LinJie E-mail:ash-ali@163.com* @version 创建时间:2018年5月10日 下午3:34:59*/public class stu {private String num;private String name;private Integer age;/*** @return the num*/public String getNum() {return num;}/*** @param num the num to set*/public void setNum(String num) {this.num = num;}/*** @return the name*/public String getName() {return name;}/*** @param name the name to set*/public void setName(String name) {this.name = name;}/*** @return the age*/public Integer getAge() {return age;}/*** @param age the age to set*/public void setAge(Integer age) {this.age = age;}/* (non-Javadoc)* @see java.lang.Object#toString()*/@Overridepublic String toString() {return "stu [num=" + num + ", name=" + name + ", age=" + age + "]";}}
修改初始化连接池代码块
//初始化连接池代码块{context = new ClassPathXmlApplicationContext("applicationContext.xml");jdbcTemplate = (JdbcTemplate) context.getBean("jdbcTemplate");studao = (stuDao) context.getBean("stuDao");}/**从数据库中获取一条记录,实际是得到对应的一个对象*RowMapper:行的映射*Spring 2.5 提供了一个便利的RowMapper实现-----BeanPropertyRowMapper*它可自动将一行数据映射到指定类的实例中 它首先将这个类实例化,然后通过名称匹配的方式,映射到属性中去。*字段 bean属性*USER_NAME --> userName*USER_ID --> userId*/@Testpublic void testQueryForObject() {String sql = "select num,name,age from student where id = ?";RowMapper<stu> rowMapper = new BeanPropertyRowMapper<stu>(stu.class);stu s = jdbcTemplate.queryForObject(sql, rowMapper,5);//最后一个参数为id值System.out.println(s);}
5、query查询多行
/**查询实体类的集合*/@Testpublic void testQueryForList() {String sql = "select num,name,age from student where id > ?";RowMapper<stu> rowMapper = new BeanPropertyRowMapper<stu>(stu.class);List<stu> s = jdbcTemplate.query(sql, rowMapper,0);//最后一个参数为id值System.out.println(s);}
6、queryForObject单值查询
/*** 获取单个列的值,或统计*/@Testpublic void testQueryObjectqqq() {String sql = "select count(name) from student";Long count = jdbcTemplate.queryForObject(sql, Long.class);System.out.println(count);}
七、实际应用
stuDao.java(注意:stu类引用上文的)
package com.linjie.jdbctemplate;import org.springframework.beans.factory.annotation.Autowired;import org.springframework.jdbc.core.BeanPropertyRowMapper;import org.springframework.jdbc.core.JdbcTemplate;import org.springframework.jdbc.core.RowMapper;import org.springframework.stereotype.Repository;/*** @author LinJie E-mail:ash-ali@163.com* @version 创建时间:2018年5月10日 下午7:24:51*/@Repository("stuDao")public class stuDao {@Autowiredprivate JdbcTemplate jdbcTemplate;public stu get(Integer id) {String sql = "select num,name,age from student where id = ?";RowMapper<stu> rowMapper = new BeanPropertyRowMapper(stu.class);stu s = jdbcTemplate.queryForObject(sql, rowMapper,id);return s;}}
db.properties
jdbc.user=rootjdbc.password=1111jdbc.driverClass=com.mysql.jdbc.Driverjdbc.jdbcUrl=jdbc:mysql:///smsjdbc.initPoolSize=5jdbc.maxPoolSize=10
applicationContext.xml
<?xml version="1.0" encoding="UTF-8"?><beans xmlns="http://www.springframework.org/schema/beans"xmlns:xsi="http://www.w3.org/2001/XMLSchema-instance"xmlns:context="http://www.springframework.org/schema/context"xsi:schemaLocation="http://www.springframework.org/schema/beans http://www.springframework.org/schema/beans/spring-beans-4.3.xsdhttp://www.springframework.org/schema/context http://www.springframework.org/schema/context/spring-context-4.3.xsd"><context:component-scan base-package="com.linjie.jdbctemplate"></context:component-scan><!-- 导入资源文件读取db.properties文件中的数据 --><context:property-placeholder location="classpath:db.properties"/><!-- 配置C3P0数据源 --><bean id="dataSource"class="com.mchange.v2.c3p0.ComboPooledDataSource"><property name="user" value="${jdbc.user}"></property><property name="password" value="${jdbc.password}"></property><property name="jdbcUrl" value="${jdbc.jdbcUrl}"></property><property name="driverClass" value="${jdbc.driverClass}"></property><property name="initialPoolSize" value="${jdbc.initPoolSize}"></property><property name="maxPoolSize" value="${jdbc.maxPoolSize}"></property></bean><!-- 配置Spring的jdbcTemplate并注入一个dataSource数据源--><bean id="jdbcTemplate"class="org.springframework.jdbc.core.JdbcTemplate"><property name="dataSource" ref="dataSource"></property></bean></beans>
test测试类
package com.linjie.jdbctemplate;/*** @author LinJie E-mail:ash-ali@163.com* @version 创建时间:2018年5月10日 上午8:49:38* 测试*/import org.junit.Test;import org.springframework.context.ApplicationContext;import org.springframework.context.support.ClassPathXmlApplicationContext;import org.springframework.jdbc.core.JdbcTemplate;public class JDBCTest {private ApplicationContext context= null;private JdbcTemplate jdbcTemplate;private stuDao studao;//初始化连接池代码块{context = new ClassPathXmlApplicationContext("applicationContext.xml");jdbcTemplate = (JdbcTemplate) context.getBean("jdbcTemplate");studao = (stuDao) context.getBean("stuDao");}@Testpublic void testsss() {System.out.println(studao.get(1));}}
结果

参考
《Spring IN ACTION》
数据库连接池作用及c3p0详解


")

")


还没有评论,来说两句吧...