Python基础知识之二
- 几个小作业
时间下一秒:
timeStart = input()
timeList = timeStart.split(“:”)
h = int(timeList[0])
m = int(timeList[1])
s = int(timeList[2])
if h > 23 or m > 59 or s > 59:print("Input Error")
else:
s += 1if s == 60:m += 1s = 0if m == 60:h += 1m = 0if h == 24:h = 0print("%.2d:%.2d:%.2d" %(h, m, s))
简单的歌词处理
musicLrc = “””[00:00.08]传奇
[02:05.00][00:01.74]只因为在人群中多看了你一眼
[02:12.47][00:08.86]再也没能忘掉你的容颜
[02:19.97][00:16.53]梦想着偶然能有一天再相见
[02:27.36][00:23.89]从此我开始孤单思念
[02:32.40][00:29.51][02:34.45][00:31.58]想你时你在天边
[02:42.00][00:38.30]想你时你在眼前
[02:49.63][00:46.24]想你时你在脑海
[02:57.56][00:53.78]想你时你在心田
[03:04.94][01:01.28]宁愿相信我们前世有约
[03:11.37][01:07.75]今生的爱情故事不会再改变
[03:19.85][01:16.25]愿用这一生等你发现
[03:29.26][01:22.79]我一直在你身旁从未走远
[03:38.08]只是因为在人群中多看了你一眼
[01:33.38]
[01:35.85]
[01:40.22]
[01:49.25]
“””musicLrcList = musicLrc.splitlines()
lrcDict = {}
for lrcLine in musicLrcList:
lrcLineList = lrcLine.split("]")for index in range(len(lrcLineList) -1 ):timeStart = lrcLineList[index][1:]timeList = timeStart.split(":")time = float(timeList[0]) * 60 + float(timeList[1])# print(time)lrcDict[time] = lrcLineList[-1]
print(lrcDict)
allTimeList = []
for t in lrcDict:allTimeList.append(t)
allTimeList.sort()
print(allTimeList)while 1:
getTime = float(input("Please input a time "))for n in range(len(allTimeList)):tempTime = allTimeList[n]if getTime < tempTime:breakprint(lrcDict[allTimeList[n - 1]])
尝试着,使上面能够自动播放
- set
- 类似于
dict,是一组key的集合,但是不存储value,表示的是无序并且无重复的集合; 创建,需要借助于
list或者tuple或者dict作为输入的集合//列表创建
s1 = set([1, 2, 3, 4, 5, 5, 5])print(s1) //对于重复元素在
set中会被自动过滤//元组创建
s1 = set([1, 2, 3, 4, 5, 5, 5])print(s1)
//字典创建
s1 = set({1:”good”, 2:”hello”, 3:”hi”})
print(s1)set的添加s1 = set({1:”good”, 2:”hello”, 3:”hi”})
s1.add(3)允许添加重复元素,但是会自动去重,不支持添加列表,因为
list里面的内存是可变对象;所以不允许添加s1.add([7, 8, 9])
s1.add({1:”1”})但是允许添加
s1.add((7, 8, 9))
插入整个
list tuple string插入s1.update([6, 7, 8, 9, 10])
s1.update((9, 10))
s1.update(“kali”)
print(s1)//输出
{1, 2, 3, 4, 5, 6, 7, 8, 9, 10, ‘i’, ‘a’, ‘k’, ‘l’}删除:删除是不能够通过下标进行删除的,也就是不存在索引的
s1.remove(3)
可以通过循环遍历得到里面的元素
for value in s1:
print(value)
可以通过
enumerate来查找里面的数据for index, data in enumerate(s1):
print(index, data)
set的运算交集
s1 = set([1,2,3,4,5])
s2 = set([3,4,5,6,7,8])s3 = s1 & s2
print(s3)
print(type(s3)){3, 4, 5}
并集
s1 = set([1,2,3,4,5])
s2 = set([3,4,5,6,7,8])s3 = s1 | s2
print(s3)
print(type(s3)){1, 2, 3, 4, 5, 6, 7, 8}
set多用于类型转换,以及去重操作;l1 = [1, 2, 3, 4, 5, 6]
s1 = set(l1)l2 = list(s1)
t1 = (1, 2, 3, 4, 5, 6)
s2 = set(t1)t1 = tuple(s2)
快速去重操作
list = list(set(list1))
迭代器:
- 可迭代对象:表示可以直接作用于
for循环的对象成为可迭代对象,(Iterable)可以使用isinstance()来判断是否是Iterable; 可以作用于
for的数据类型一般分为两种:- 1.集合数据类型,例如
list tuple dict set string - 2.是
generator,包括生成器和yeid的generator function
- 1.集合数据类型,例如
from collections import Iterable
print(isinstance([],Iterable))
print(isinstance({},Iterable))
print(isinstance((),Iterable))
print(isinstance(“”,Iterable))
print(isinstance((x for x in range(10)),Iterable))True
True
True
True
True- 可迭代对象:表示可以直接作用于
迭代器:不但可以作用于
for循环,还可以被next()函数不断地调用,并且返回下一个值;迭代器最后会抛出一个StopIteration错误,表示无法继续返回下一个值;迭代器就是可以被
next()函数调用并且不断的返回下一个值的对象成为迭代器,同样可以使用isinstance()函数判断一个对象是否是Iteratior对象,print(isinstance([],Iterator))
print(isinstance({},Iterator))
print(isinstance((),Iterator))
print(isinstance(“”,Iterator))
print(isinstance((x for x in range(10)),Iterator))False
False
False
False
True迭代器的例子
value = (x for x in [1, 2, 3, 4, 5])
print(next(value))
print(next(value))
print(next(value))1
2
3将
list tuple dict string都可以转换成iterlist1 = [1, 2, 3, 4, 5, 6]
a = iter(list1)
print(next(a))print(isinstance(iter([]),Iterator))
print(isinstance(iter({}),Iterator))
print(isinstance(iter(()),Iterator))
print(isinstance(iter(“”),Iterator))True
True
True
True对于指定的换行符
endstr = “end”
str = “”for line in iter(input, endstr):
str += line + "\n"
print(str)
函数
- 函数概述:在一个完整的项目中,某些功能会反复的使用,可以通过将这个功能封装起来,当需要使用这个功能的时候,直接调用这个函数就可以了;
- 函数本质上就是对于功能的封装;
- 1.函数简化了代码结构,增加了代码的复用度;
- 2.如果需要修改某些功能,或者修改某个
BUG,只要修改对应的函数; 定义函数:
def function name(arg, arg,…)
对于函数名需要遵循标识符规则,传入函数的参数必须和参数列表对应;
():表示的参数列表的开始和结束;- 函数功能使用
:进行封装; - 语句:表示的函数封装的功能
return:一般用于结束函数,并且返回信息给函数的调用者,如果省略,返回值就是None;return后面的代码是不会被打印的;- 函数的调用:格式: 函数名(参数列表)
- 函数调用本质上就是实参给形参复制的过程;
函数的参数
def newPrint(str,age):
print(str,age)
newPrint(“today is a new day”, 18)
形参:在定义函数时,
()里面的变量,本质上是变量;- 实参:调用函数时,给函数传递的参数;
- 形参和实参个数不匹配时,就会出错;
参数传递的分类:
- 值传递:传递的是不可变类型,也就是常量类型,
string tuple number
def newprint(value):
print(id(value))value = 10print(id(value))
temp = 20
print(id(temp))newprint(temp)
print(temp)- 值传递:传递的是不可变类型,也就是常量类型,
94471953863072944719538630729447195386275220
- 这种操作并不会改变,变量的值;
引用传递:传递的是可变类型,例如
list dict set
def func2(lis):
lis[0] = 100
list1 = [1, 2, 3, 4, 5]
func2(list1)
print(list1)
[100, 2, 3, 4, 5]
查看变量这样的一个过程
a = 10
b = 10print(id(a), id(b))
b = 20
print(id(a), id(b))
a = 20
print(id(a), id(b))
94036689133664 9403668913366494036689133664 9403668913398494036689133984 94036689133984
- 关键字参数
如果定义的是关键字参数,那么允许函数调用时的参数和定义时不一致
def newPrint(str, age):
print(str, age)
newPrint(age = 10, str = “today is a new day”)
today is a new day 10
默认参数:调用函数时,如果没有传递参数,就是用默认参数,在使用默认参数时,应该将默认参数放在最后;
def newPrint(str = “hello”, age = “12”):
print(str, age)
newPrint()
hello 12
不定长参数:传递的实参格式是不确定的,使用
*变量的方式存放所有未命名的变量参数,如果在函数调用时,没有指定参数,就是一个空元素;def func(name, *arr):
print(name)for x in arr:print(x)
func(“xiaoxiao”, “tiaodao”, “handsom”)
传参多使用这种方式
def sumnum(*value):
sum = 0for x in value:sum += xreturn sum
print(sumnum(1,2,3,4,5))
15
如果需要传递字典关键字参数
def func(**kwargs): //表示的键值对的参数字典;
print(kwargs)print(type(kwargs))
func(x=1, y=2, z=3)
{‘z’: 3, ‘y’: 2, ‘x’: 1}
匿名函数
- 不适用
def这样的语句定义函数,使用lambda来创建匿名函数,lambda只是一个表达式,函数体比def简单; lambda的主体是一个表达式,而不是代码块,仅仅只能在lambda表达式中封装简单的逻辑;lambda函数有自己的命名空间,并且不能够访问自有参数列表之外的或者全局命名空间的参数;lambda和c和c++函数的内联函数不同;lambda格式lambda 参数1,参数2,…. :expression
sum = lambda num1, num2:num1 + num2
print(sum(1, 2))
3
装饰器
- 装饰器本质上就是一个闭包,把函数当做参数返回一个替代版本的函数,本质上就是一个返回函数的函数;
底下这个是一个最简单的装饰器
def func1():
print("sunck is a good man")
def func2(func):
def inner():print("**********")func()return inner()
f = func2(func1)
f()带有变量传参的装饰器
def say(age):
print("the number is %d" %(age))
def outter(func):def inner(age):if age < 0:age = 0func(age)return innersay = outter(say)say(-10)the number is 0
对于上面装饰器规范的写法
def outter(func):
def inner(age):if age < 0:age = 0func(age)return inner
@outter //使用@将装饰器应用到函数
def say(age):print("the number is %d" %(age))
say(-10)
通用装饰器
对于函数的参数是没有限制的,但是不建议超过
6 7个def outter(func):
def inner(*args, **kwargs):func(*args, **kwargs)return inner
@outter
def say(name, age):print("the number is %d, the name is %s" %(age, name))
say(“hello”, 10)
偏函数
偏函数是用于实现对于某些参数值上面进行的一些控制
def intTranslate2(str, base = 2):
return int(str, base)print(intTranslate2(“10010”))
偏函数是不需要自己进行定义的,通过使用内置的模块进行定义
import functools
intTranslate = functools.partial(int, base = 3)
value = intTranslate(“10101”)
print(value)变量的作用域
- 作用域表示变量可以使用的范围,变量并不是在在所有位置都能够使用的,访问的权限决定于变量的位置
- 局部作用域:
- 函数作用域:
- 全局作用域:
- 內建作用域:
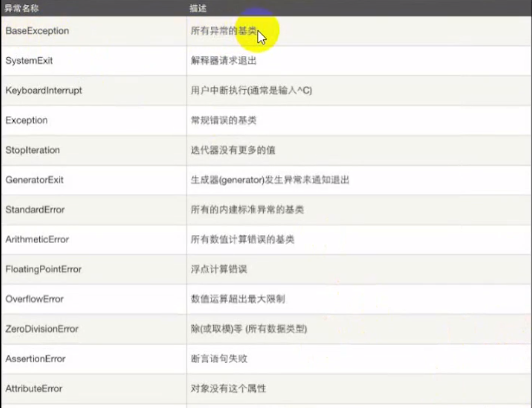
- 异常处理
- 异常表示的是对于某些特殊情况导致的程序有可能不能够正常执行,需要处理这些异常,使程序能够顺利的执行下去,不至于因为异常崩溃;
try.......except.....elsetry
语句
except 错误码 as e:
语句2
.
.
else:语句
else语句可有可无;用于检测try语句中的错误,从而让except语句来进行捕获,从而进行处理;当程序执行到
try-except-else时:- 1.如果当
try 语句执行出错时,会匹配第一个错误码,如果匹配上就会执行对应的语句; - 2.如果当错误码都没有匹配到,就会向上抛异常;
- 3.如果没有出现异常,就不会匹配异常,但是会执行
else异常
- 1.如果当
- 常见的异常处理,是不使用错误类型的,都是希望跳过异常
使用
except处理多个异常try:
pass
except (NameError,ZeroDivisionError):
print("this is error")
异常的另一种方式
try:
pass
except NameError as e:
print("this is NameError")
except ZeroDivisionError as e:
print("this is zero number")
else:
print("Success")
上面都是常见的异常处理
- 常见的异常
对于下面这种异常捕获
try:
print(5 / 0)
except BaseException as e:
print("Base error")
except ZeroDivisionError as e:
print("Zero error")
else:
print("success")
异常在实现上面就是类,所有的错误都继承自
BaseException,所以在捕获的时候,它捕获了该类型的所有错误;- 对于内存异常必须进行捕获,并且进行处理;
- 在跨越多层函数进行调用时,在调用时,应该捕获异常
异常的另一种格式
try....except....finally,也就是说无论如何,都会执行finally对应的语句,这种情况下,多用于捕获,多用于文件处理;try:
print(1 / 0)
except ZeroDivisionError as e:
print("Zero number")
finally:
print("do this")
断言
这些机制都使用与程序的调试
def func(num, div):
assert (div != 0),"Div is not 0"return num / div
print(func(10, 9))
文件的操作
- 对于文件的操作一般是通过文件描述符来完成的
读文件的过程:
- 打开文件
open(path, flag, encoding, Errors) path:表示打开文件的路径;flag:表示打开文件的方式;r:表示以只读的方式打开文件,文件的描述符在文件的开头;rb:以二进制文件格式打开,并且只读,文件描述符在开头;r+:表示可以进行读写,文件描述符在开头;w:打开一个文件,只用于写入操作,文件描述符在开头,如果文件存在,写入的内容覆盖原有的内容;如果不存在,创建一个文件;wb:打开一个文件,只用于写入二进制,如果文件存在,写入的内容覆盖原有的内容;如果不存在,创建一个文件;w+:打开文件用于读写,果文件存在,写入的内容覆盖原有的内容;如果不存在,创建一个文件;a+:打开一个文件用于追加,如果文件存在,文件描述符会放在末尾;
encoding:表示编码格式,常见的为UTF-8
- 打开文件
- 文件内容的读取
1.读取文件的全部内容
filestr = fileopen.read() //适合于小文件的读取
print(filestr)//控制文件读写的大小
filestr = fileopen.read(20)
print(filestr)
filestr = fileopen.read(20)
print(filestr)USER PID %CPU
%MEM VSZ RSS TT//读取整行,包括”\n”字符
filestr1 = fileopen.readline()
print(filestr1)
USER PID %CPU %MEM VSZ RSS TTY STAT START TIME COMMAND//读取指定的字符数
filestr1 = fileopen.readline(20)
print(filestr1)
USER PID %CPU//读取所有行,并且返回列表
filestr1 = fileopen.readlines()
print(filestr1)//如果给定的数值与0 返回实际某行大小的字节数
filestr1 = fileopen.readlines(10)
print(filestr1)[‘USER PID %CPU %MEM VSZ RSS TTY STAT START TIME COMMAND\n’]
//修改描述符的位置
fileopen.seek(0)关闭文件
一个完整的过程
try:
fileopen = open(path, "r", encoding="utf-8")fileopen.read()
finally:
if fileopen:fileopen.close()
//建议使用下面这种方法,文件时会自动关闭的with open(path, "r", encoding="utf-8") as f2:print(f2.read())
- 文件的写操作
- 文件的写操作,一般首先是写入内存的缓存区,然后刷新缓冲区,就可以进行文件的写入;
- 文件在文件描述符关闭,缓冲区溢出,以及手动刷新缓冲区,里面的内容会同步到文件的里面;在遇到
\n时,也会自动刷新缓冲区 关于二进制文件的读写
path = “/root/PycharmProjects/test/file1.txt”
with open(path, “wb”) as fileopen:str = "today is a good day"fileopen.write(str.encode("utf-8"))
with open(path,”rb”) as fileread:
readdata = fileread.read()print(readdata)print(type(readdata))//对上面读取的数据进行解码dataprint = readdata.decode("utf-8")print(type(dataprint))print(dataprint)
b’today is a good day’ //表示是二进制格式的文件
today is a good day关于
list tuple dict set等文件的操作需要导入一个模块
pickle,表示的是数据持久性模块,也就是将数据存储在磁盘path = “/root/PycharmProjects/test/file2.txt”
NewList = [1, 2, 3, 4, 5, “Today is a goo day”]
fileopen = open(path,”wb”)pickle.dump(NewList,fileopen)
fileopen.close()
fileopenList = open(path,”rb”)
tempList = pickle.load(fileopenList)
print(tempList)fileopenList.close()
[1, 2, 3, 4, 5, ‘Today is a goo day’]
当然
list也可以更改为其他的数据类型path = “/root/PycharmProjects/test/file2.txt”
NewList = (1, 2, 3, 4, 5, “Today is a goo day”)
fileopen = open(path,”wb”)pickle.dump(NewList,fileopen)
fileopen.close()
fileopenList = open(path,”rb”)
tempList = pickle.load(fileopenList)
print(tempList)fileopenList.close()
(1, 2, 3, 4, 5, ‘Today is a goo day’)
关于OS模块
- 包含了普遍的操作系统的功能;
系统类型的打印
print(os.name)
posix //unix类型或者Linux
nt //Windows获取操作系统详细的信息
print(os.uname())
posix.uname_result(sysname=’Linux’, nodename=’westos’, release=’4.14.0-deepin2-amd64’, version=’#1 SMP PREEMPT Deepin 4.14.12-2 (2018-01-06)’, machine=’x86_64’)
用于获取操作系统中的环境变量
print(os.environ)
environ({‘PATH’: ‘/root/PycharmProjects/hello/venv/bin:/usr/local/sbin:/usr/local/bin:/usr/sbin:/usr/bin:/sbin:/bin’, ‘LSOPTIONS’: ‘—color=auto’, ‘PS1’: ‘(venv) ‘, ‘PYTHONUNBUFFERED’: ‘1’, ‘COLORTERM’: ‘truecolor’, ‘SHELL’: ‘/bin/bash’, ‘TERM’: ‘xterm-256color’, ‘PYTHONIOENCODING’: ‘UTF-8’, ‘XAUTHORITY’: ‘/home/westos/.Xauthority’, ‘_JAVA_OPTIONS’: ‘ -Dawt.useSystemAAFontSettings=gasp’, ‘S_COLORS’: ‘auto’, ‘HOME’: ‘/root’, ‘LOGNAME’: ‘root’, ‘‘: ‘./bin/pycharm.sh’, ‘VIRTUAL_ENV’: ‘/root/PycharmProjects/hello/venv’, ‘MAIL’: ‘/var/mail/root’, ‘LANGUAGE’: ‘zh_CN’, ‘USER’: ‘root’, ‘LANG’: ‘zh_CN.UTF-8’, ‘OLDPWD’: ‘/usr/local/pycharm-community-2018.1.4/bin’, ‘PYCHARM_HOSTED’: ‘1’, ‘PWD’: ‘/root/PycharmProjects/test’, ‘SHLVL’: ‘1’, ‘DISPLAY’: ‘:0’, ‘XDG_DATA_DIRS’: ‘/root/.local/share/flatpak/exports/share:/var/lib/flatpak/exports/share:/usr/local/share:/usr/share’, ‘PYTHONPATH’: ‘/root/PycharmProjects/test’})
获取指定环境变量
print(os.environ.get(“_JAVA_OPTIONS”))
-Dawt.useSystemAAFontSettings=gasp当前目录名
print(os.curdir)
print(os.getcwd())返回指定列表中的文件
print(os.listdir())
[‘first.py’, ‘.idea’, ‘file.txt’, ‘file2.txt’, ‘file1.txt’]在当前目录下面创建新的目录
os.mkdir(“test”) //可以指定绝对路径
删除目录
os.rmdir(“test”)
获取文件属性
print(os.stat(“first.py”))
os.stat_result(st_mode=33188, st_ino=1593548, st_dev=2065, st_nlink=1, st_uid=0, st_gid=0, st_size=252, st_atime=1528903986, st_mtime=1528903985, st_ctime=1528903985)
文件的重命名
os.remove(“file.txt”, “hello.txt”)
删除文件
os.remove(“filename”)
运行
shell命令os.system(“ls”)
查看当前的绝对路径
print(os.path.abspath(“.”))
/root/PycharmProjects/test
路径拼接
path1 = “/root/PycharmProjects/test”
path2 = “today” //这个参数里面开始不要存在/print(os.path.join(path1,path2))
/root/PycharmProjects/test/today
拆分路径
print(os.path.split(“/root/PycharmProjects/test/today”))
//拆分的结果是一个元组
(‘/root/PycharmProjects/test’, ‘today’)
//用于获取文件的扩展名
print(os.path.splitext(“root/PycharmProjects/test/today.txt”))(‘root/PycharmProjects/test/today’, ‘.txt’)
判断是否是目录
print(os.path.isdir(“/root/PycharmProjects/test/“))
True
判断文件是否存在
print(os.path.isfile(“/root/PycharmProjects/test/file1.txt”))
True
判断目录是否存在
os.path.exists(“path”)
获得文件大小
print(os.path.getsize(“/root/PycharmProjects/test/file1.txt”))
19用于获取目录名或者文件名
print(os.path.dirname(“/root/PycharmProjects/test/file1.txt”))
print(os.path.basename(“/root/PycharmProjects/test/file1.txt”))/root/PycharmProjects/test
file1.txt关于递归的知识
- 递归表示函数调用函数自己本身,凡是循环能够干的事,递归都是可以完成的;
- 首先确定了临界条件
- 找出这一个次和上一次的关系
- 假设当前函数已经能用,调用自身计算上一次的结果,在求出本次的结果;
一个最简单的递归
def sum(n):
if n == 1:return 1else:return n + sum(n - 1)
print(sum(5))
数据结构之栈
关于栈的基本操作
stack = []
stack.append(“A”)
print(stack)
stack.append(“B”)
print(stack)
stack.append(“C”)
print(stack)
res = stack.pop()
print(res)
print(stack)特点是先进,后出;
- 数据结构之队列
- 队列是先进先出,存数据在一段,取数据在另一端;
简单的代码
import collections
queue = collections.deque()
print(queue)
queue.append(“A”)
print(queue)
queue.append(“B”)
queue.append(“C”)res = queue.popleft()
print(res)
print(queue)递归遍历目录底下的所有文件
import os
def getDirrRecur(path, printForamt = “”):
fileList = os.listdir(path)printForamt += "-"for FileName in fileList:nextFilePath = os.path.join(path, FileName)if os.path.isdir(nextFilePath):print(printForamt, "dir ", FileName)getDirr(nextFilePath, printForamt)else:print(printForamt, "file ", FileName)
path = “/root/temp/“
getDirr(path)使用栈模拟递归深层遍历目录
import os
def getDirDeep(path):
stack = []stack.append(path)while len(stack) != 0:dirPath = stack.pop()fileList = os.listdir(dirPath)for fileName in fileList:filePath = os.path.join(dirPath, fileName)if os.path.isdir(filePath):stack.append(filePath)print("dir ", fileName)else:print("file ", fileName)
path = “/root/temp/“
getDirDeep(path)广度遍历
使用队列模拟遍历目录,队列的特性是先进先出,实现的是广度遍历;
import os
import collections
def getAllDirWidth(path):queue = collections.deque()queue.append(path)while len(queue) != 0:dirpath = queue.popleft()filelist = os.listdir(dirpath)for filename in filelist:filecompath = os.path.join(dirpath, filename)if os.path.isdir(filecompath):print("Dir " + filename)queue.append(filecompath)else:print("file " + filename)path = "/root/temp/"getAllDirWidth(path)
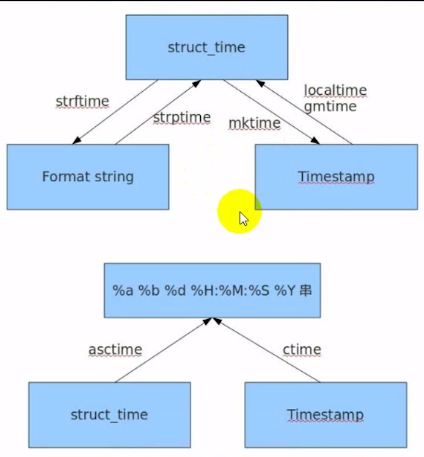
time模块UTC:世界协调时间,格林尼治天文时间;DST:表示夏令时,是一种节约能源,人为规定的时间制度,在夏季调快一个小时;- 时间的表现形式:
- 时间戳:使用整型或者浮点型表示时间的一个以秒为单位的时间间隔,基础时间为
1970 1 1凌晨的时间的秒; - 元组:是
Python的数据结构,这个元组存在9个整型依次是:year, month, day, hours, minutes, seconds, weekday, Julia day flag[1 | -1 | 0]; 格式化字符串:
%% 一个文字的 %
%a 当前locale 的星期名缩写(例如: 日,代表星期日)
%A 当前locale 的星期名全称 (如:星期日)
%b 当前locale 的月名缩写 (如:一,代表一月)
%B 当前locale 的月名全称 (如:一月)
%c 当前locale 的日期和时间 (如:2005年3月3日 星期四 23:05:25)
%C 世纪;比如 %Y,通常为省略当前年份的后两位数字(例如:20)
%d 按月计的日期(例如:01)
%D 按月计的日期;等于%m/%d/%y
%e 按月计的日期,添加空格,等于%_d
%F 完整日期格式,等价于 %Y-%m-%d
%g ISO-8601 格式年份的最后两位 (参见%G)
%G ISO-8601 格式年份 (参见%V),一般只和 %V 结合使用
%h 等于%b
%H 小时(00-23)
%I 小时(00-12)
%j 按年计的日期(001-366)
%k hour, space padded ( 0..23); same as %_H
%l hour, space padded ( 1..12); same as %_I
%m month (01..12)
%M minute (00..59)
%n a newline
%N nanoseconds (000000000..999999999)
%p locale’s equivalent of either AM or PM; blank if not known
%P like %p, but lower case
%q quarter of year (1..4)
%r locale’s 12-hour clock time (e.g., 11:11:04 PM)
%R 24-hour hour and minute; same as %H:%M
%s seconds since 1970-01-01 00:00:00 UTC
%S 秒(00-60)
%t 输出制表符 Tab
%T 时间,等于%H:%M:%S
%u 星期,1 代表星期一
%U 一年中的第几周,以周日为每星期第一天(00-53)
%V ISO-8601 格式规范下的一年中第几周,以周一为每星期第一天(01-53)
%w 一星期中的第几日(0-6),0 代表周一
%W 一年中的第几周,以周一为每星期第一天(00-53)
%x 当前locale 下的日期描述 (如:12/31/99)
%X 当前locale 下的时间描述 (如:23:13:48)
%y 年份最后两位数位 (00-99)
%Y 年份
%z +hhmm 数字时区(例如,-0400)
%:z +hh:mm 数字时区(例如,-04:00)
%::z +hh ss 数字时区(例如,-04:00:00)
%:::z 数字时区带有必要的精度 (例如,-04,+05:30)
%Z 按字母表排序的时区缩写 (例如,EDT)关于时间的操作
获取当前时间戳
c = time.time()
print(c)
1529041196.717221
将时间戳,转为
UTC时间元组t = time.gmtime(c)
time.struct_time(tm_year=2018, tm_mon=6, tm_mday=15, tm_hour=5, tm_min=41, tm_sec=23, tm_wday=4, tm_yday=166, tm_isdst=0)
t转换为当地时间
b = time.localtime(c)
print(b)
time.struct_time(tm_year=2018, tm_mon=6, tm_mday=15, tm_hour=13, tm_min=41, tm_sec=23, tm_wday=4, tm_yday=166, tm_isdst=0)
将本地时间转换为时间戳
m = time.mktime(b)
print(m)将时间元组转换成字符串
s = time.asctime(b)
print(s)Fri Jun 15 13:44:20 2018
将时间戳转换为字符串
p = time.ctime(c)
print(p)Fri Jun 15 13:45:54 2018
限定字符串的格式
print(time.strftime(“%Y-%m-%d %H:%M:%S”))
2018-06-15 13:47:58
将时间元组转换成给定格式的字符串,参数2为时间元组,默认转换当前时间
b = time.localtime(c)
print(time.strftime(“%Y-%m-%d %X”, b))2018-06-15 13:50:23
将时间字符串转换成时间元组
w = time.strptime(q, “%Y-%m-%d %X”)
print(w)time.struct_time(tm_year=2018, tm_mon=6, tm_mday=15, tm_hour=13, tm_min=53, tm_sec=31, tm_wday=4, tm_yday=166, tm_isdst=-1)
一张图说明字符串的使用
延迟一段时间,支持整型,浮点型
time.sleep(4.0)
返回当前程序的
CPU时间,unix始终返回全部的运行时间,Windows从第二次开始,都是以第一个调用此函数的开始的时间戳作为基数;print(time.clock())
0.062498
时间测试的完整代码
import time
import datetimec = time.time()
print(c)
t = time.gmtime(c)
print(t)b = time.localtime(c)
print(b)
m = time.mktime(b)
print(m)s = time.asctime(b)
print(s)
p = time.ctime(c)
print(p)q = time.strftime(“%Y-%m-%d %H:%M:%S”)
print(q)
print(type(q))print(time.strftime(“%Y-%m-%d %X”, b))
w = time.strptime(q, “%Y-%m-%d %X”)
print(w)time.sleep(4.0)
print(time.clock())time.clock()
sum = 0
for i in range(100000000):
sum += i
print(time.clock())
datetime相比time高级了不少,提供了更加实用的函数,提供的接口更加直观,更加容易调用;里面包含了常见的五个类:datetime:包含时间和日期;timedelta:主要用于计算时间的跨度;time:表示只关注于时间date:只关注于日期获取当前时间完整时间
timenow = datetime.datetime.now()
print(timenow)获取指定时间
datetimeformat = datetime.datetime(2018, 6, 15, 14, 22, 23, 123456)
print(datetimeformat)datetimestr = datetimeformat.strftime(“%Y-%m-%d %X”)
print(datetimestr)
print(type(datetimestr))2018-06-15 14:22:23.123456
2018-06-15 14:22:23将格式化字符串转换为
datetime对象datetimestr = datetimeformat.strftime(“%Y-%m-%d %X”)
print(datetimestr)
print(type(datetimestr))datetimeformat1 = datetime.datetime.strptime(datetimestr, “%Y-%m-%d %X”)
print(datetimeformat1)
2018-06-15 14:22:23
时间的加减
nowdate1 = datetime.datetime(2018, 6, 14, 17, 25, 43, 123456)
nowdate = datetime.datetime.now()print(datetime.datetime.now())
date = nowdate - nowdate1print(date)
print(type(date))2018-06-15 17:17:26.013561
23:51:42.890086同样的还可以提取到间隔的天数
print(date.days)
3
提取间隔的秒数
print(date.seconds)
86046


还没有评论,来说两句吧...