深入探究Java动态代理
深入探究Java动态代理
文章目录
- 深入探究Java动态代理
- Spring实现AOP
- JDK动态代理
- 动态代理详解
- Proxy
- InvocationHandler
- 深入探究代理类
- 4.1 代理类的代码
- 4.2 invoke方法的第一个参数
- 题外话
提起Java的动态代理,大家首先就会想到Spring的AOP,Spring在实现AOP的时候,确实有时候是使用Java动态代理机制来实现的,当使用的接口来生成Bean,并且开启了AOP之后,使用的就是动态代理来实现的AOP
1. Spring实现AOP
创建一个项目,并配置SpringAOP:
Bean:
package com.aaa;/*** If there are no bugs, it was created by Chen FengYao on 18-7-8;* Otherwise, Inter don't know who created it either*/public class Foo implements Inter {@Overridepublic void fun(String name) {System.out.println(name);}}
接口:
package com.aaa;public interface Inter {void fun(String name);}
前置通知类:
public class AS {public void befor(){System.out.println("before");}}
在Spring的配置文件中配置Bean和AOP
<?xml version="1.0" encoding="UTF-8"?><beans xmlns="http://www.springframework.org/schema/beans"xmlns:xsi="http://www.w3.org/2001/XMLSchema-instance"xmlns:aop="http://www.springframework.org/schema/aop"xsi:schemaLocation="http://www.springframework.org/schema/beanshttp://www.springframework.org/schema/beans/spring-beans-4.1.xsdhttp://www.springframework.org/schema/aophttp://www.springframework.org/schema/aop/spring-aop-4.1.xsd"><bean class="com.aaa.Foo" id="foo"/><bean class="com.aaa.AS" id="as"/><aop:config><!-- 定义切面 --><aop:aspect id="aspect1" ref="as"><aop:pointcut id="pt" expression="execution(* com.aaa.*.*(..))"/><aop:before method="befor" pointcut-ref="pt"/></aop:aspect></aop:config></beans>
最后来一个Main函数来测试运行
package com.aaa;import org.springframework.context.ApplicationContext;import org.springframework.context.support.ClassPathXmlApplicationContext;public class Main {public static void main(String[] args) {ApplicationContext context = new ClassPathXmlApplicationContext("spring-config.xml");Inter i = (Inter) context.getBean("foo");i.fun("input");}}
运行结果:
可以看到我们切点已经正常执行了,那么这个时候我们来看一下生成的Inter对象的类型,修改代码如下:
import org.springframework.context.ApplicationContext;import org.springframework.context.support.ClassPathXmlApplicationContext;public class Main {public static void main(String[] args) {ApplicationContext context = new ClassPathXmlApplicationContext("spring-config.xml");Inter i = (Inter) context.getBean("foo");i.fun("input");System.out.println("-------------------");System.out.println(i.getClass().getName());}}
运行结果:

我们看到,实际上Spring为我们生成的对象并不是我们写的Foo类,当我们使用Spring并配置了AOP的时候,Spring就会为我们生成代理类型,这个com.sun.proxy.$Proxy2,就是JDK动态代理所生成的类型
2. JDK动态代理
那么就用JVM动态代理来实现一下切面的功能,保持Foo不变,先看代码:
import java.lang.reflect.InvocationHandler;import java.lang.reflect.Method;import java.lang.reflect.Proxy;/*** If there are no bugs, it was created by Chen FengYao on 18-7-12;* Otherwise, I don't know who created it either*/public class InvocationHandlerImpl implements InvocationHandler {private Object target;private InvocationHandlerImpl(Object target) {this.target = target;}public static Object getProxy(Object target){InvocationHandlerImpl invocationHandler = new InvocationHandlerImpl(target);return Proxy.newProxyInstance(target.getClass().getClassLoader(),target.getClass().getInterfaces(),invocationHandler);}@Overridepublic Object invoke(Object proxy, Method method, Object[] args) throws Throwable {System.out.println("before");Object result = method.invoke(target, args);System.out.println("after");return result;}}
然后是Main方法,运行一下,看看效果:
public class Main {public static void main(String[] args) {Foo foo = new Foo();Inter proxy = (Inter) InvocationHandlerImpl.getProxy(foo);proxy.fun("input");System.out.println("------------------");System.out.println(proxy.getClass().getName());}}
运行效果: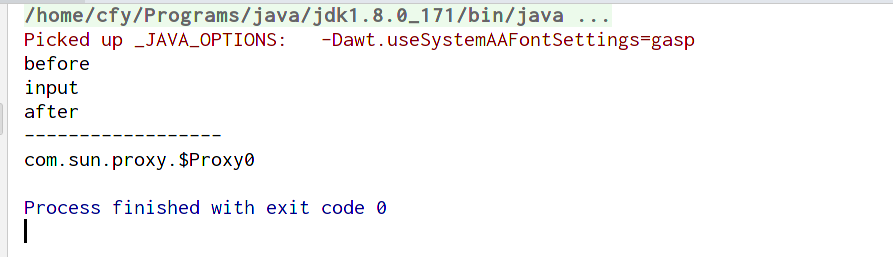
发现和刚刚Sping实现的效果是一样的
3. 动态代理详解
要实现JDK动态代理,我们需要两个关键性的类:
- import java.lang.reflect.Proxy
- import java.lang.reflect.InvocationHandler
我们一个一个的详细来说明:
Proxy
Proxy就是我们生成动态代理使用的类,在需要生成代理对象的时候,我们需要以下几个东西:
- classLoader
- 接口
- invocationHandler对象
classLoader就不需要多说了,大多数 情况下,都可以从目标类获得
第二个参数是你要生成的代理对象所实现的接口类型,这个参数是一个Class类型的数组,如果你不想手动设置进去也可以,只要放入接口类型.class进去就好了,我们生成的代理对象就会去实现这个参数中的接口
第三个参数是一个InvocationHandler对象,也就是我们这个类的对象
InvocationHandler
这个接口可以认为是代理类型与原始类型之间的桥梁因为是动态代理,如何理解这个动态,对应到上面的代码就是InvocationHandlerImpl这个类写好了之后,无论传入什么对象,都能够给他生成对应的代理对象,而这些代理对象又会在调用原始对象的方法(即fun()方法)的时候都能够统一的执行AOP方法,那么为了实现这个目标,就需要有这么一个方法,就是invoke方法,无论调用代理对象的什么方法,都会执行一次invoke方法,这样,我们就可以在这个方法中加入前置通知,和后置通知了,
看这个方法中的代码:
@Overridepublic Object invoke(Object proxy, Method method, Object[] args) throws Throwable {System.out.println("before");Object result = method.invoke(target, args);System.out.println("after");return result;}
这里有3个参数,第一个参数proxy是代理对象,我们几乎是用不上它的,甚至可以说完全用不上它。。。
第二个参数是一个Method对象,用过反射的同学应当对这个对象不会感觉陌生,它就是要执行的目标方法,当我们调用代理对象的中的任何方法,都会把这个方法作为method参数传入invoke方法中
而最后一个参数就是这个方法的实参们了
那么这个方法的返回值,就是目标方法的返回值啦
在invoke方法中我们就可以决定我们的逻辑了:
输出的befor就相当于前置通知,在调用目标方法前执行的代码,在这里我们有机会去对参数进行修改
method.invoke就是真正的去执行目标方法,返回值就是result
最后的after就相当与后置通知,在这个里,我们有机会去修改目标方法的返回值
最后将返回值返回给调用方
整个调用过程的流程图如下: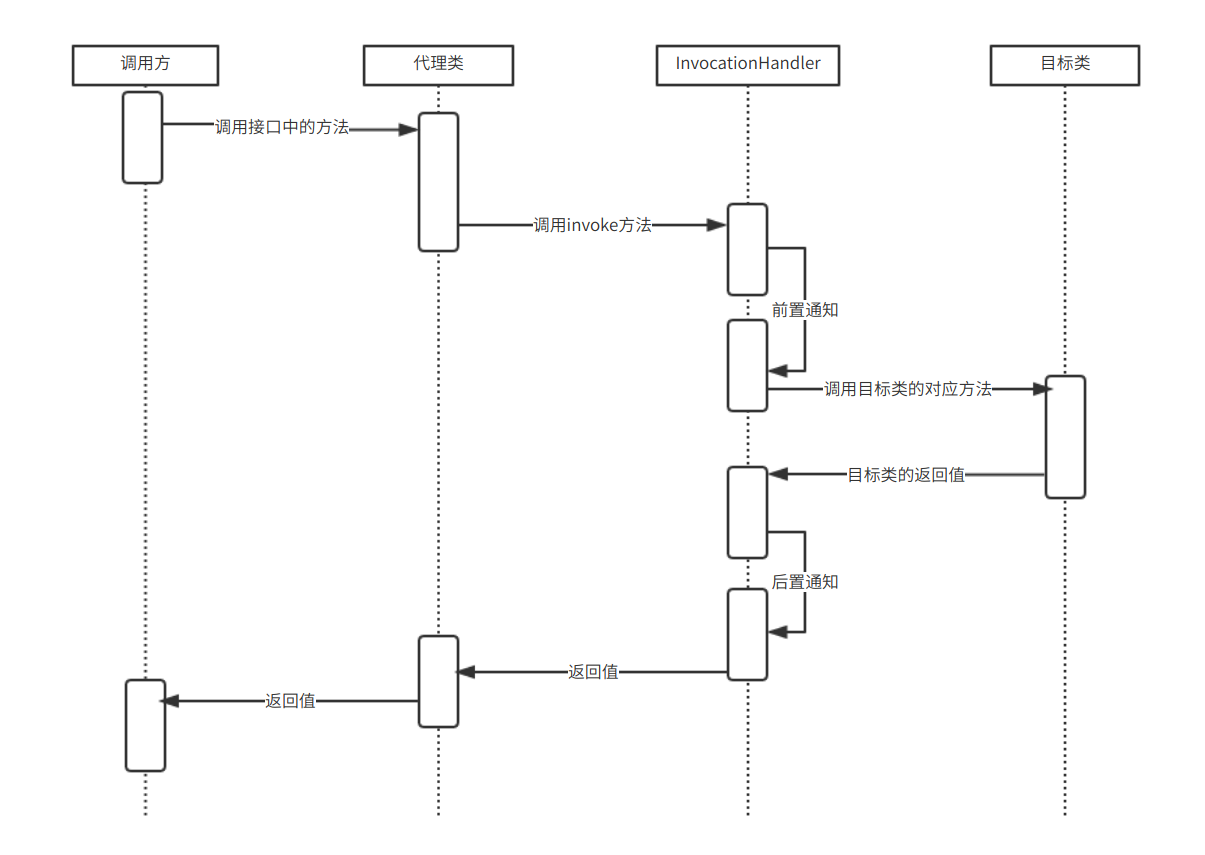
4. 深入探究代理类
4.1 代理类的代码
其实写到这我们就已经可以使用JDK的动态代理了,但是有一个小缺陷,我们根本就不知道JDK给我们生成的代理类是什么样子的,所以我们需要想办法知道这个代理类究竟是什么样子的
动态代理类的具体实现在ProxyGenerator.java这个类中,我们要想看到生成的代理类究竟是个什么样子的,就需要使用这个类,使用ProxyGenerator手动生成一个代理类的字节码:
import sun.misc.ProxyGenerator;import java.io.FileNotFoundException;import java.io.FileOutputStream;import java.io.IOException;/*** If there are no bugs, it was created by Chen FengYao on 18-7-14;* Otherwise, I don't know who created it either*/public class Generator {public static void generator(Object target){byte[] b= ProxyGenerator.generateProxyClass(target.getClass().getSimpleName(),target.getClass().getInterfaces());try (FileOutputStream out = new FileOutputStream("./"+target.getClass().getSimpleName()+".class")){out.write(b);} catch (FileNotFoundException e) {e.printStackTrace();} catch (IOException e) {e.printStackTrace();}}}
我们将生成传入对象的代理类,并且将它存在项目的根路径下,文件名就是代理类的名字,运行:
public class Main {public static void main(String[] args) {Foo foo = new Foo();Generator.generator(foo);}}

反编译字节码,让我们看看它里面究竟写了什么,当然我用的开发工具是idea,双击打开看到的就是反编译之后的java代码了。。。。
反编译之后的结果:
//// Source code recreated from a .class file by IntelliJ IDEA// (powered by Fernflower decompiler)//import com.aaa.Inter;import java.lang.reflect.InvocationHandler;import java.lang.reflect.Method;import java.lang.reflect.Proxy;import java.lang.reflect.UndeclaredThrowableException;public final class Foo extends Proxy implements Inter {private static Method m1;private static Method m3;private static Method m2;private static Method m0;public Foo(InvocationHandler var1) throws {super(var1);}public final boolean equals(Object var1) throws {try {return (Boolean)super.h.invoke(this, m1, new Object[]{var1});} catch (RuntimeException | Error var3) {throw var3;} catch (Throwable var4) {throw new UndeclaredThrowableException(var4);}}public final void fun(String var1) throws {try {super.h.invoke(this, m3, new Object[]{var1});} catch (RuntimeException | Error var3) {throw var3;} catch (Throwable var4) {throw new UndeclaredThrowableException(var4);}}public final String toString() throws {try {return (String)super.h.invoke(this, m2, (Object[])null);} catch (RuntimeException | Error var2) {throw var2;} catch (Throwable var3) {throw new UndeclaredThrowableException(var3);}}public final int hashCode() throws {try {return (Integer)super.h.invoke(this, m0, (Object[])null);} catch (RuntimeException | Error var2) {throw var2;} catch (Throwable var3) {throw new UndeclaredThrowableException(var3);}}static {try {m1 = Class.forName("java.lang.Object").getMethod("equals", Class.forName("java.lang.Object"));m3 = Class.forName("com.aaa.Inter").getMethod("fun", Class.forName("java.lang.String"));m2 = Class.forName("java.lang.Object").getMethod("toString");m0 = Class.forName("java.lang.Object").getMethod("hashCode");} catch (NoSuchMethodException var2) {throw new NoSuchMethodError(var2.getMessage());} catch (ClassNotFoundException var3) {throw new NoClassDefFoundError(var3.getMessage());}}}
一点一点的看,首先这个代理继承了Proxy实现了Inter接口,这个接口就是我们在生成代理类时传递进去的接口,然后这个代理类有4个Method类型的全局变量,这4个全局变量就是我们这个类中的各个方法,在最下方的静态代码块中进行赋值的,equals,fun和toString方法是默认会重写的方法,fun方法是我们从接口那继承来的,这些方法的逻辑都是一样的,本质上就一行代码:
super.h.invoke(this, m3, new Object[]{var1});
就是调用父类中h对象的invoke方法,去到他的父类中,发现这个如下代码:
/*** the invocation handler for this proxy instance.* @serial*/protected InvocationHandler h;
其实就是我们自己写的InvocationHandler,那么也就是说这个代理类啥也不干,就是在从接口那拿来的方法中去调用invocation方法,在这里我们能清晰的看到invoke方法的第一个参数其实就是这个代理类自己
4.2 invoke方法的第一个参数
实际上,我们绝大多数情况下都用不到这个对象,但是如果我们使用链式编程的话,就有可能需要用到这个对象了,例如我们的接口是这样的:
public interface Inter {void fun(String name);//链式编程示例Inter step1();Inter step2();}
Foo类实现Inter接口,是这样的:
public class Foo implements Inter {@Overridepublic void fun(String name) {System.out.println(name);}@Overridepublic Inter step1() {System.out.println("第一步");return this;}@Overridepublic Inter step2() {System.out.println("第二步");return this;}}
保持我们的InvocationHandlerImpl不变,来调用一下代理对象看看会发生什么:
public class Main {public static void main(String[] args) {Foo foo = new Foo();Inter inter = (Inter) InvocationHandlerImpl.getProxy(foo);inter.step1().step2();}}

发现结果只有第一个方法能执行我们的before和after,后面的都不生效了,这是因为在invoke方法中我们返回的对象是执行目标类的目标方法的返回值,在执行第一次之后就被替换成了目标对象了,再也不是代理类型了,如果我们想让我们的动态代理正确的被执行,就需要返回代理类型的对象:
@Overridepublic Object invoke(Object proxy, Method method, Object[] args) throws Throwable {System.out.println("before");Object result = method.invoke(target, args);Class<?>[] interfaces = result.getClass().getInterfaces();System.out.println("after");if (result == target){return proxy;}return result;}
重点是返回值前的判断,result==target其实就是判断这个方法是否返回的是this,如果返回的是this,就证明这里需要链式编程,这个方法就需要返回代理类型的对象了,运行结果如下:

可以看到两个方法都能正常执行before和after
题外话
在调查invoke方法的第一个参数究竟有什么用的时候,看到了stackoverflow上的一篇帖子:这里面的意思与我上述表示的差不多,但是它的示例代码是这样写的:
接口:
private interface Account {public Account deposit (double value);public double getBalance ();}
handler:
private class ExampleInvocationHandler implements InvocationHandler {private double balance;@Overridepublic Object invoke (Object proxy, Method method, Object[] args) throws Throwable {// simplified method checks, would need to check the parameter count and types tooif ("deposit".equals(method.getName())) {Double value = (Double) args[0];System.out.println("deposit: " + value);balance += value;return proxy; // here we use the proxy to return 'this'}if ("getBalance".equals(method.getName())) {return balance;}return null;}}
注意他在invoke方法中是通过判断接口中的方法名来选择是返回代理对象,还是常规对象,我觉得这是不合理的,因为我们之所以用动态代理而不用静态代理,很大程度上是因为我们要织入的方法是不希望和实际的对象绑定在一起的,就像我们在实际中,很多时候代理都是来开启事物,关闭事物的,就是说无论是实现了什么接口的代理对象,它应当都按照统一的逻辑去执行AOP,但是按照这个写法,我们的Handler就与一个固定的接口绑定在一起了,要是这样的话,我们直接写一个代理类岂不是更方便,直接使用静态代理就行了,没必要再去使用动态代理了


还没有评论,来说两句吧...