maven学习手记+nexus配置+更换中央仓库为阿里云仓库
本地环境搭建
熟悉基础命令
- mvn:compile
- mvn:test
- mvn:clean
- mvn:install
- mvn:package
迁移本地仓库
* 熟悉创建mvn archetype:generate -D….创建maven骨架*
pom.xml|-src|—main|—-java|——package|—-resource|—test|—-java|——package|—-resource|-target 通过compile或者带有compile目标任务的命令 就会编译源文件到target—>classes中(如果真的目标任务,就去看一下maven的生命周期管理,这个有时间再写)|—classes
- 1
- 2
- 3
- 4
- 5
- 6
- 7
- 8
- 9
- 10
- 11
- 12
maven的生命周期
大概说一下,重点关注compile
maven生命周期分三套
- clean
- compile
- site
当执行mvn:clean 的时候的过程是
- pre-clean 执行一些需要再clean之前完成的工作
- clean 移除所有上次构建生成的文件
post-clean 执行clean之后的工作
当执行mvn:compile的过程(plugins插件中的目标)是validate
generate-sources
process-sources
generate-resource
process-resource 复制并处理资源文件,至目标目录,准备打包
compile 编译源代码 (如果mvn:compile相当于就执行到这里终止)
process-classes
generate-test-source
process-test-source
generate-test-resource
process-test-resource 复制并处理资源文件至目标测试目录
test-compile 编译测试源代码 (如果mvn:test就执行到这里终止)
process-test-classes
test 使用合适的单元框架运行测试,这些测试不会打包和部署。
prepare-package
package 接收编译好的源代码,打包成可发布的文件,如jar (如果mvn:package就执行到这里终止)
pre-integration-test
integration-test
post-integration-test
verify
install 将包安装到本地仓库,供其他项目依赖 (如果mvn:install就执行到这里终止)
deploy 将最终到包复制到远程仓库,让其他开发人员于项目共享 (如果mvn:deploy就执行到这里终止)- 1
- 2
- 3
- 4
- 5
- 6
- 7
- 8
- 9
- 10
- 11
- 12
- 13
- 14
- 15
- 16
- 17
- 18
- 19
- 20
- 21
- 22
当执行mvn:site时会生成一个站点,具体没研究
***eclipse集成maven插件
解决一些配置小问题(更新包结构,让eclipse认识maven项目为java项目,更新pom.xml中maven compile错误,更新idk警告)*
依赖
测试依赖传递
- eg: service模块需要依赖dao模块,那么dao模块首先需要mvn install到repository,service依赖的时候才能有效
dependency中scope元素属性
- test 测试范围有效,编译和打包失效,需要注意的是如果src/main下的类依赖scope为test的包,打包和运行时会报错,找不到设置为test的依赖。还有如果是test,那么不会将依赖传递到。(eg: unit等)
- compile 打包,编译有效,测试失效 (eg: log)
- provided 编译 测试有效,打包不加进去(eg: servlet api包,编译测试时需要,但是不需要打包,因为web应用服务器中就包含了)
- runtime 运行时有效,编译时失效(eg: mysql驱动)
关于同样的jar不同版本的依赖原理
- 直接依赖 优于 间接依赖
- 依赖层级越小 优于 依赖层级越多
1. 间接依赖 eg: 项目A直接依赖log4j且版本为1.0.4,假设依赖于spring,而spring也依赖log4j 1.2.9。那么A间接依赖log4j 1.2.9,但是如果A直接在pom中配置了直接依赖log4j 1.0.4,那么A项目就依赖1.0.42. 同层级间接依赖 eg: 如果项目A依赖B其中B依赖 log4j 1.0.4,A依赖C其中C依赖 log4j1.0.9 ,那么A依赖log4j哪个版本?答案是 在A项目中如果先写C的依赖再写B的依赖,那么久依赖C的log4j1.0.9
排除依赖
* eg:排除xxxxxx,dependency节点增加exclusions*
<exclusions><exclusion><groupId>xxxxxx</groupId><artifactId>xxxxx</artifactId></exclusion></exclusions>
- 1
- 2
- 3
- 4
- 5
- 6
聚合modules和继承parent
通过new pom类型的maven项目,管理聚合和继承
这个聚合和继承功能的project的pom.xml如下<?xml ………….?>
4.0.0
org.jm.test
jm-parent
0.0.1-SNAPSHOT
pom <!--提取module中公共部分url-->
http://maven.apache.org <!--提取module中公共部分properties-->
UTF-8
<!--聚合 地址是模块的位置--><modules><module>../项目1</module><module>../项目2</module><module>../项目3</module></modules><!--依赖管理,设置但是不起作用,只有在被依赖的项目中写明才能生效(只写groupid和artifactid,其他均继承parent中底pom.xml),这样的好处是可以防止被依赖的模块包冲突。被依赖的项目也可以自由选择依赖包(但是版本和其他信息是继承的)。--><dependencyManagement><dependencies><dependency><groupId>junit</groupId><artifactId>junit</artifactId><version>4.10</version><scope>test</scope><exclusions><exclusion><groupId>xxxxxx</groupId><artifactId>xxxxx</artifactId></exclusion></exclusions></dependency><dependency>……</dependency><dependency>……</dependency><dependency>……</dependency></dependencies>
1
- 2
- 3
- 4
- 5
- 6
- 7
- 8
- 9
- 10
- 11
- 12
- 13
- 14
- 15
- 16
- 17
- 18
- 19
- 20
- 21
- 22
- 23
- 24
- 25
- 26
- 27
- 28
- 29
- 30
- 31
- 32
- 33
- 34
- 35
- 36
- 37
- 38
- 39
- 40
- 41
- 42
其他继承的项目pom.xml如下
<?xml ………….?><modelVersion>4.0.0</modelVersion><groupId>org.jm.test</groupId><artifactId>mvntest</artifactId><version>0.0.1-SNAPSHOT</version><!--注意一定要找到所继承的项目pom文件的相对路径--><relativePath>../jm-parent/pom.xml</relativePath><packaging>jar</packaging><name>mvntest</name><!-- url可以不需要--><!-- properties可以不需要--><dependencies><dependency><groupId>junit</groupId><artifactId>junit</artifactId><!--版本可以不需要<version>4.10</version> --><!--范围可以不需要<scope>test</scope>--><!--排除依赖可以不需要--></dependency></dependencies>
- 1
- 2
- 3
- 4
- 5
- 6
- 7
- 8
- 9
- 10
- 11
- 12
- 13
- 14
- 15
- 16
- 17
- 18
- 19
- 20
- 21
- 22
- 23
- 24
- 25
- 26
- 27
- 28
version版本命名规则
eg:a.b.c-XXX
* a : 大修改,重构或者产品重定位灯
* b : 分支
* c : 分支中的小迭代更新
* XXX : 里程碑(SNAPSHOT开发中,alpha内测,beta公测,Release(RC)发行版 , General Available(GA)正常稳定版)
例如:
0.0.1-SNAPSHOT 意思就是开始开发的第一个版本
插件plugins
插件直接上例子了。具体有哪些插件怎么用,可以去官网上的plugins里查看,使用plugins前提最好要了解maven生命周期管理。
在jm-parent项目pom.xml中加入
org.apache.maven.plugins
maven-source-plugin
2.4
compile
jar
org.apache.maven.plugins
maven-compiler-plugin
3.0
1.6
1.6
1
- 2
- 3
- 4
- 5
- 6
- 7
- 8
- 9
- 10
- 11
- 12
- 13
- 14
- 15
- 16
- 17
- 18
- 19
- 20
- 21
- 22
- 23
- 24
- 25
- 26
- 27
- 28
- 29
- 30
- 31
- 32
- 33
- 34
在被依赖的modules中加入
<build><plugins><plugin><groupId>org.apache.maven.plugins</groupId><artifactId>maven-compiler-plugin</artifactId></plugin></plugins></build>
- 1
- 2
- 3
- 4
- 5
- 6
- 7
- 8
发布web项目
- 新建maven项目–选择artifactId选择maven-archetype-webapp
pom.xml中的packaging中就是<packaging>war</packaging> - cargo插件可以发布多种web服务器应用
推荐使用jetty插件
- 使用方式参考上面plugin,以及官方文档
执行方式mvn:clean compile jettyrun
就可以执行了。在plugin中的configuration可以配置监听时间,端口,上下文地址等等。。。
- 使用方式参考上面plugin,以及官方文档
中间仓库nexus
nexus 是通过jetty容器运行的,所以提前需要安装jre运行环境并配置好了环境变量
STEP1下载安装
目前免费版是2.x,所以下载个免费版
https://sonatype-download.global.ssl.fastly.net/nexus/oss/nexus-2.13.0-01-bundle.tar.gz
[root@localhost ~]# tar -zxvf nexus-2.13.0-01-bundle.tar.gz[root@localhost download]# lltotal 70780drwxr-xr-x. 8 1001 1001 4096 Apr 12 16:11 nexus-2.13.0-01 #nexus 服务-rw-r--r--. 1 root root 72466664 Jun 23 08:28 nexus-2.13.0-01-bundle.tar.gzdrwxr-xr-x. 3 1001 1001 4096 Apr 12 16:21 sonatype-work #私有库目录
- 1
- 2
- 3
- 4
- 5
- 6
STEP2 配置
nexus.properties配置文件
[root@localhost conf]# pwd/root/download/nexus-2.13.0-01/conf[root@localhost conf]# vim nexus.properties# Jetty sectionapplication-port=8081 #默认访问端口,可以修改为自己需要的端口,并加入到iptables链application-host=0.0.0.0nexus-webapp=${bundleBasedir}/nexusnexus-webapp-context-path=/nexus# Nexus sectionnexus-work=${bundleBasedir}/../sonatype-work/nexusruntime=${bundleBasedir}/nexus/WEB-INF
- 1
- 2
- 3
- 4
- 5
- 6
- 7
- 8
- 9
- 10
- 11
nexus执行文件
[root@localhost conf]# vi /root/download/nexus-2.13.0-01/bin/nexus#RUN_AS_USER=改为:RUN_AS_USER=root
- 1
- 2
- 3
- 4
防火墙中打开 8081 端口
# vi /etc/sysconfig/iptables添加:-A INPUT -m state --state NEW -m tcp -p tcp --dport 8081 -j ACCEPT 保存后重启防火墙# service iptables restart
- 1
- 2
- 3
- 4
STEP3 启动 nexus
[root@localhost conf]# /root/download/nexus-2.13.0-01/bin/nexus start****************************************WARNING - NOT RECOMMENDED TO RUN AS ROOT****************************************Starting Nexus OSS...Started Nexus OSS.
- 1
- 2
- 3
- 4
- 5
- 6
关于如何使用nexus
网上资料很多,参考几篇就搞定了。
http://www.cnblogs.com/luotaoyeah/p/3791966.html
http://blog.csdn.net/ichsonx/article/details/14642897
其他关键配置项
切换中央仓库为阿里云仓库,修复索引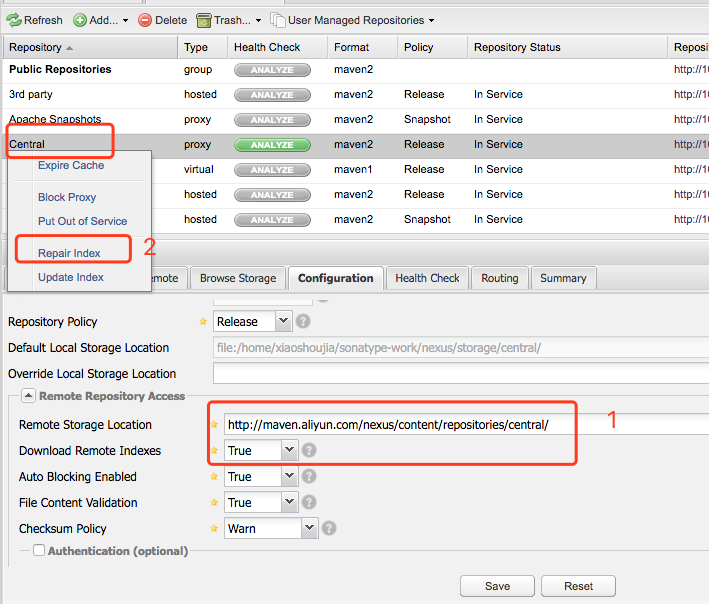
加入central到public仓库地址,这样才能正常下载到依赖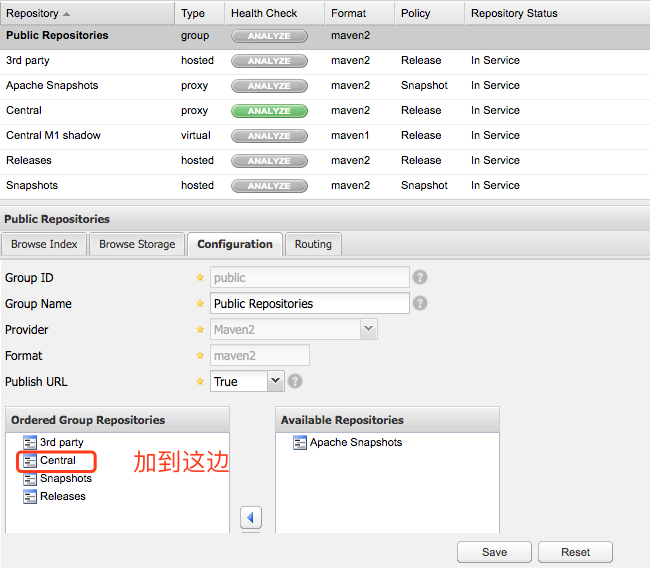
项目配置
Maven配置
首先需要配置是的maven的setting.xml文件,我直接全部放上来,具体看注释
<?xml version="1.0" encoding="UTF-8"?><settings xmlns="http://maven.apache.org/SETTINGS/1.0.0" xmlns:xsi="http://www.w3.org/2001/XMLSchema-instance" xsi:schemaLocation="http://maven.apache.org/SETTINGS/1.0.0 http://maven.apache.org/xsd/settings-1.0.0.xsd"><!--设置自己的maven本地仓库--><localRepository>/Users/jm/Documents/work/mrepository</localRepository><pluginGroups/><proxies/><servers><server><id>nexus-rs</id> <!--这个ID要与下面的repository中的ID一致--><username>deployment</username> <!--nexus中配置的用户名密码--><password>xiaoshoujia123</password></server><server><id>nexus-snapshots</id><username>deployment</username><password>xiaoshoujia123</password></server></servers><mirrors><!--从nexus下载依赖地址--><mirror><id>nexus-public</id><mirrorOf>central</mirrorOf><name>central repository</name><url>http://192.168.199.146:8081/nexus/content/groups/public/</url></mirror></mirrors><profiles><profile><id>nexus</id><repositories><repository><id>nexus-rs</id> <!--正式仓库id--><!--name随便--><name>Nexus Release Snapshot Repository</name><!--地址是nexus中repository(Releases/Snapshots)中对应的地址--><url>http://192.168.199.146:8081/nexus/content/repositories/releases</url><releases><enabled>true</enabled></releases><snapshots><enabled>true</enabled></snapshots></repository><repository><id>nexus-snapshots</id><url>http://192.168.199.146:8081/nexus/content/repositories/snapshots</url><releases><enabled>true</enabled></releases><snapshots><enabled>true</enabled></snapshots></repository></repositories><pluginRepositories> <!--插件仓库地址,各节点的含义和上面是一样的--><pluginRepository><id>nexus-rs</id><name>Nexus Release Snapshot Repository</name><url>http://192.168.199.146:8081/nexus/content/repositories/releases</url><releases><enabled>true</enabled></releases><snapshots><enabled>true</enabled></snapshots></pluginRepository><pluginRepository><id>nexus-snapshots</id><url>http://192.168.199.146:8081/nexus/content/repositories/snapshots</url><releases><enabled>true</enabled></releases><snapshots><enabled>true</enabled></snapshots></pluginRepository></pluginRepositories></profile><!--另一个profile,可以忽略了--><profile><id>sonar</id><activation><activeByDefault>true</activeByDefault></activation><properties><!-- Example for MySQL--><sonar.jdbc.url>jdbc:mysql://127.0.0.1:3306/sonar?useUnicode=true&characterEncoding=utf8</sonar.jdbc.url><sonar.jdbc.username>root</sonar.jdbc.username><sonar.jdbc.password>root</sonar.jdbc.password><!-- Optional URL to server. Default value is http://localhost:9000 --><sonar.host.url>http://127.0.0.1:9000/sonar</sonar.host.url></properties></profile></profiles><!--激活配置--><activeProfiles><activeProfile>nexus</activeProfile> <!--profile下的id--></activeProfiles></settings>
- 1
- 2
- 3
- 4
- 5
- 6
- 7
- 8
- 9
- 10
- 11
- 12
- 13
- 14
- 15
- 16
- 17
- 18
- 19
- 20
- 21
- 22
- 23
- 24
- 25
- 26
- 27
- 28
- 29
- 30
- 31
- 32
- 33
- 34
- 35
- 36
- 37
- 38
- 39
- 40
- 41
- 42
- 43
- 44
- 45
- 46
- 47
- 48
- 49
- 50
- 51
- 52
- 53
- 54
- 55
- 56
- 57
- 58
- 59
- 60
- 61
- 62
- 63
- 64
- 65
- 66
- 67
- 68
- 69
- 70
- 71
- 72
- 73
- 74
- 75
- 76
- 77
- 78
- 79
- 80
- 81
- 82
- 83
- 84
- 85
- 86
- 87
- 88
- 89
- 90
- 91
- 92
- 93
- 94
- 95
- 96
- 97
- 98
- 99
- 100
- 101
- 102
- 103
- 104
- 105
- 106
pom.xml配置
根节点project中增加
<distributionManagement><!-- 两个ID必须与 setting.xml中的<server><id>nexus-rs</id></server>保持一致--><repository><id>nexus-rs</id><name>Nexus Release Repository</name><url>http://192.168.199.146:8081/nexus/content/repositories/releases/</url></repository><snapshotRepository><id>nexus-snapshots</id><name>Nexus Snapshot Repository</name><url>http://192.168.199.146:8081/nexus/content/repositories/snapshots/</url></snapshotRepository></distributionManagement>
- 1
- 2
- 3
- 4
- 5
- 6
- 7
- 8
- 9
- 10
- 11
- 12
- 13
到此,nexus就可以和项目结合使用了。
测试覆盖率报告
- 建议用cobertura——
* 通过plugin绑定到test目标中就可以完成test后自动生成测试报告。
- 最后如果分模块单元测试的话可以使用如下工具
* 持久层测试可用dbunit* service和持久层联调可以用easy mock具体操作有空写
原文链接


拓扑排序")

")


还没有评论,来说两句吧...