nginx-haproxy实现7层负载均衡
LB负载均衡集群分两类: LVS (四层)和 nginx或haproxy (七层)。LVS是基于IP的,而nginx和haproxy是基于应用的。
客户端通过访问分发器的IP来访问网站。分发器根据请求的类型,将请求转发到后端相应的机器上。
使用nginx实现动静分离的负载均衡集群
拓扑图:
分发器的IP是192.168.226.81。其他几种在后端,处理实际访问的相应类型的服务器各两台。这里默认每台机器的处理服务器均已装好。其中分发器是安装的nginx,另外的机器可以是apache也可以是nginx。下面只需要讲解实际是如何配置的。
分发器配置
修改nginx的配置文件nginx.conf。找到配置文件中server段中的location配置段,在location配置段中增加:匹配到html的请求,就转发到htmlservers
if ($request_uri ~* .html$){
proxy_pass http://htmlservers;
}
匹配到php的请求,就转发到phpservers
if ($request_uri ~* .php$){
proxy_pass http://phpservers;
}
非上面两种请求,就转发到picservers
proxy_pass http://picservers;
- 1
- 2
- 3
- 4
- 5
- 6
- 7
- 8
- 9
- 10
然后再在http段的末端加入:
upstream htmlservers {#定义负载均衡服务器组名称server 192.168.226.50:80;server 192.168.226.51:80;}upstream phpservers{server 192.168.226.81:80;server 192.168.226.83:80;}upstream picservers {server 192.168.226.90:80;server 192.168.226.91:80;}
- 1
- 2
- 3
- 4
- 5
- 6
- 7
- 8
- 9
- 10
- 11
- 12
- 13
如果要为每个服务器增加轮询的权重,就在每个转发IP后添加weight权重值即可。即:
upstream htmlservers {#定义负载均衡服务器组名称server 192.168.226.50:80 weight=1;server 192.168.226.51:80 weight=2;}upstream phpservers{server 192.168.226.81:80 weight=1;server 192.168.226.83:80 weight=2;}upstream picservers {server 192.168.226.90:80 weight=1;server 192.168.226.91:80 weight=2;}
- 1
- 2
- 3
- 4
- 5
- 6
- 7
- 8
- 9
- 10
- 11
- 12
- 13
最后,将nginx配置文件中解析php的部分注释掉,否则会在访问php文件的时候,分发器就直接解析了php,而不是转发给后端的php服务器。
# location ~ \.php$ {# root html;# fastcgi_pass 127.0.0.1:9000;# fastcgi_index index.php;# #fastcgi_param SCRIPT_FILENAME /scripts$fastcgi_script_name;# fastcgi_param SCRIPT_FILENAME /usr/local/nginx/html$fastcgi_script_name;# include fastcgi_params;# }
- 1
- 2
- 3
- 4
- 5
- 6
- 7
- 8
PS:
* 其中htmlservers、phpservers、picservers都是自己命的名,只要满足一个要求:添加到两个地方的相应名称一致即可。即添加到proxy_pass后的服务器名称和添加到upstream后的服务器名称对应。
重启nginx
[root@cos-7 nginx]# /usr/local/nginx/sbin/nginx -t
nginx: the configuration file /usr/local/nginx/conf/nginx.conf syntax is ok
nginx: configuration file /usr/local/nginx/conf/nginx.conf test is successful
[root@cos-7 nginx]# /usr/local/nginx/sbin/nginx -s reload- 1
- 2
- 3
- 4
ok,配置完成。要测试的话,可以在相应的服务器中添加内容可识别的文件,然后访问分发器的ip即可。
这里我的nginx版本是1.12.2。这里附上我配置完成后的nginx完整配置文件
user nginx nginx;worker_processes 1;#error_log logs/error.log;#error_log logs/error.log notice;#error_log logs/error.log info;#pid logs/nginx.pid;events {worker_connections 1024;}http {include mime.types;default_type application/octet-stream;#log_format main '$remote_addr - $remote_user [$time_local] "$request" '# '$status $body_bytes_sent "$http_referer" '# '"$http_user_agent" "$http_x_forwarded_for"';#access_log logs/access.log main;sendfile on;#tcp_nopush on;#keepalive_timeout 0;keepalive_timeout 65;#gzip on;server {listen 80;server_name localhost;#charset koi8-r;#access_log logs/host.access.log main;location / {root html;index index.html index.htm index.php;# 添加转发配置if ($request_uri ~* \.html$){proxy_pass http://htmlserver;}if ($request_uri ~* \.php$){proxy_pass http://phpserver;}proxy_pass http://picserver;}#error_page 404 /404.html;# redirect server error pages to the static page /50x.html#error_page 500 502 503 504 /50x.html;location = /50x.html {root html;}# proxy the PHP scripts to Apache listening on 127.0.0.1:80##location ~ \.php$ {# proxy_pass http://127.0.0.1;#}# pass the PHP scripts to FastCGI server listening on 127.0.0.1:9000## location ~ \.php$ {# root html;# fastcgi_pass 127.0.0.1:9000;# fastcgi_index index.php;# #fastcgi_param SCRIPT_FILENAME /scripts$fastcgi_script_name;# fastcgi_param SCRIPT_FILENAME /usr/local/nginx/html$fastcgi_script_name;# include fastcgi_params;# }# deny access to .htaccess files, if Apache's document root# concurs with nginx's one##location ~ /\.ht {# deny all;#}}# another virtual host using mix of IP-, name-, and port-based configuration##server {# listen 8000;# listen somename:8080;# server_name somename alias another.alias;# location / {# root html;# index index.html index.htm;# }#}# HTTPS server##server {# listen 443 ssl;# server_name localhost;# ssl_certificate cert.pem;# ssl_certificate_key cert.key;# ssl_session_cache shared:SSL:1m;# ssl_session_timeout 5m;# ssl_ciphers HIGH:!aNULL:!MD5;# ssl_prefer_server_ciphers on;# location / {# root html;# index index.html index.htm;# }#}# 添加转发服务器,这里采用权重轮询的方式upstream htmlserver {#定义负载均衡服务器组名称server 192.168.226.50:80 weight=1;server 192.168.226.51:80 weight=2;}upstream phpserver{server 192.168.226.81:80 weight=1;server 192.168.226.83:80 weight=2;}upstream picserver{server 192.168.226.90:80 weight=1;server 192.168.226.91:80 weight=2;}}
- 1
- 2
- 3
- 4
- 5
- 6
- 7
- 8
- 9
- 10
- 11
- 12
- 13
- 14
- 15
- 16
- 17
- 18
- 19
- 20
- 21
- 22
- 23
- 24
- 25
- 26
- 27
- 28
- 29
- 30
- 31
- 32
- 33
- 34
- 35
- 36
- 37
- 38
- 39
- 40
- 41
- 42
- 43
- 44
- 45
- 46
- 47
- 48
- 49
- 50
- 51
- 52
- 53
- 54
- 55
- 56
- 57
- 58
- 59
- 60
- 61
- 62
- 63
- 64
- 65
- 66
- 67
- 68
- 69
- 70
- 71
- 72
- 73
- 74
- 75
- 76
- 77
- 78
- 79
- 80
- 81
- 82
- 83
- 84
- 85
- 86
- 87
- 88
- 89
- 90
- 91
- 92
- 93
- 94
- 95
- 96
- 97
- 98
- 99
- 100
- 101
- 102
- 103
- 104
- 105
- 106
- 107
- 108
- 109
- 110
- 111
- 112
- 113
- 114
- 115
- 116
- 117
- 118
- 119
- 120
- 121
- 122
- 123
- 124
- 125
- 126
- 127
- 128
- 129
- 130
- 131
- 132
- 133
- 134
- 135
- 136
- 137
- 138
- 139
使用haproxy实现负载均衡
HAProxy提供高可用性、负载均衡以及基于TCP和HTTP应用的代理,支持虚拟主机,它是免费、快速并且可靠的一种解决方案。根据官方数据,其最高极限支持10G的并发。
HAProxy特别适用于那些负载特大的web站点, 这些站点通常又需要会话保持或七层处理。HAProxy运行在当前的硬件上,完全可以支持数以万计的并发连接。并且它的运行模式使得它可以很简单安全的整合进您当前的架构中, 同时可以保护你的web服务器不被暴露到网络上。
其支持从4层至7层的网络交换,即覆盖所有的TCP协议。就是说,Haproxy 甚至还支持 Mysql的均衡负载。
相同点: 在功能上,haproxy通过反向代理方式实现 WEB均衡负载。和 Nginx,ApacheProxy,lighttpd,Cheroke 等一样。
不同点: Haproxy 并不是 web 服务器。以上提到所有带反向代理均衡负载的产品,都是 WEB 服务器。简单说,就是他们能处理解析页面。而Haproxy 仅仅是一款的用于均衡负载的应用代理。其自身并不能提供web服务。但其配置简单,拥有非常不错的服务器健康检查功能还有专门的系统状态监控页面,当其代理的后端服务器出现故障, HAProxy会自动将该服务器摘除,故障恢复后再自动将该服务器加入。
haproxy官网
这里安装的版本是1.7.10
拓扑图: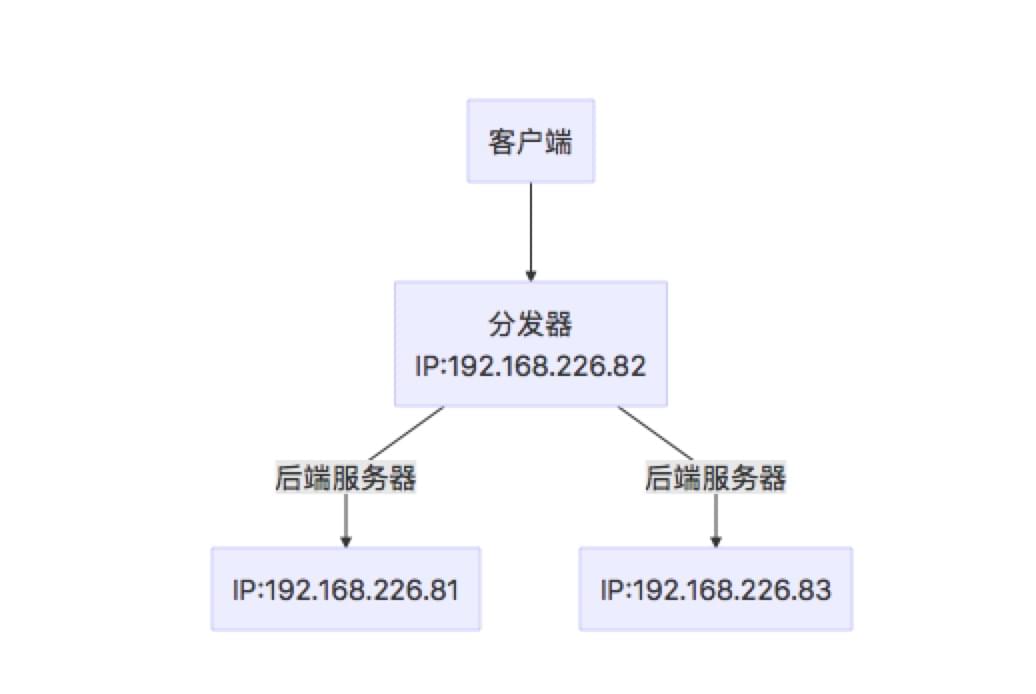
查看系统版本(haproxy安装是需要根据系统内核版本的不同来输入不同的make参数的)
[root@cos-7 soft]# uname -a
Linux cos-7.4-90 3.10.0-693.el7.x86_64 #1 SMP Tue Aug 22 21:09:27 UTC 2017 x86_64 x86_64 x86_64 GNU/Linux- 1
- 2
参数列表: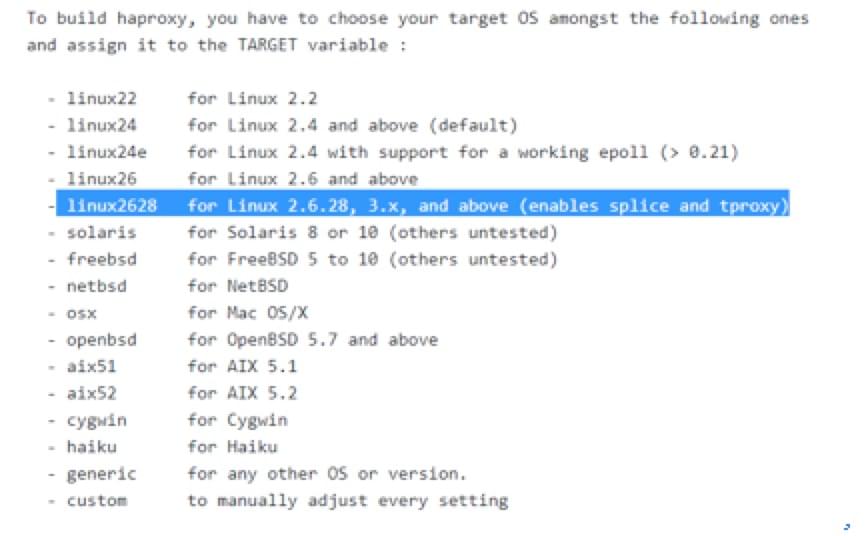
解压并安装(安装前需要查看系统的版本)
[root@cos-7 soft]# tar xf haproxy-1.7.10.tar.gz -C /usr/local/src/
[root@cos-7 soft]# cd /usr/local/src/haproxy-1.7.10
[root@cos-7 soft]# make TARGET=linux2628 PREFIX=/usr/local/haproxy
[root@cos-7 soft]# make install PREFIX=/usr/local/haproxy- 1
- 2
- 3
- 4
PS: 如果不想在make的时候,后面输入参数,也可以直接修改源码包中的Makefile文件。将其中的PREFIX的值改为你的安装路径。TARGET的值改为相应的内核版本。
为
haproxy生成配置文件haproxy.cfg[root@cos-7 ~]# mkdir -p /usr/local/haproxy/etc
[root@cos-7 etc]# cd /usr/local/haproxy/etc
[root@cos-7 etc]# vim haproxy.cfg- 1
- 2
- 3
haproxy.cfg文件内容是
globallog 127.0.0.1 local0#log 127.0.0.1 local1 notice#log loghost local0 infomaxconn 4096chroot /usr/local/haproxyuid 99 #所属运行的用户uidgid 99 #所属运行的用户组daemon #以后台形式运行haproxynbproc 1 #启动1个haproxy实例。# #工作进程数量(CPU数量) ,实际工作中,应该设置成和CPU核心数一样。 这样可以发挥出最大的性能。pidfile /usr/local/haproxy/run/haproxy.pid #将所有进程写入pid文件#debug #调试错误时用#quiet #安静defaultslog globallog 127.0.0.1 local3 #日志文件的输出定向。产生的日志级别为local3. 系统中local1-7,用户自己定义mode http #工作模式,所处理的类别,默认采用http模式,可配置成tcp作4层消息转发option httplog #日志类别,记载http日志option httpclose #每次请求完毕后主动关闭http通道,haproxy不支持keep-alive,只能模拟这种模式的实现option dontlognull #不记录空连接,产生的日志option forwardfor #如果后端服务器需要获得客户端真实ip需要配置的参数,可以从Http Header中获得客户端ipoption redispatch #当serverid对应的服务器挂掉后,强制定向到其他健康服务器retries 2 #2次连接失败就认为服务器不可用,主要通过后面的check检查maxconn 2000 #最大连接数balance roundrobin #负载均衡算法stats uri /haproxy-stats #haproxy 监控页面的访问地址 # 可通过 http://localhost:80/haproxy-stats 访问timeout connect 5000 #连接超时时间。 单位:ms 毫秒timeout client 50000 #客户端连接超时时间timeout server 50000 #服务器端连接超时时间mode httpoption httpchk GET /index.html #健康检测#注意实际工作中测试时,应该下载某一个页面来进行测试,因此这个页面应该是个小页面,而不要用首页面。这里是每隔一秒检查一次页面。frontend http #前端配置,http名称可自定义bind 0.0.0.0:80 #发起http请求80端口,会被转发到设置的ip及端口default_backend http_back #转发到后端 写上后端名称backend http_back #后端配置,名称上下关联server s1 192.168.226.81:80 weight 3 check #后端的主机 IP &权衡server s2 192.168.226.83:80 weight 3 check #后端的主机 IP &权衡#server node1 192.168.179.131:8081 check inter 2000 rise 3 fall 3 weight 30# inter 2000 健康检查时间间隔2秒# rise 3 检测多少次才认为是正常的# fall 3 失败多少次才认为是不可用的# weight 30 权重
- 1
- 2
- 3
- 4
- 5
- 6
- 7
- 8
- 9
- 10
- 11
- 12
- 13
- 14
- 15
- 16
- 17
- 18
- 19
- 20
- 21
- 22
- 23
- 24
- 25
- 26
- 27
- 28
- 29
- 30
- 31
- 32
- 33
- 34
- 35
- 36
- 37
- 38
- 39
- 40
- 41
- 42
- 43
- 44
- 45
PS:关于负载均衡算法
* source 根据请求源IP
* static-rr 根据权重
* leastconn 最少连接者先处理
* uri 根据请求的uri
* url_param 根据请求的url参数
* rdp-cookie 据据cookie(name)来锁定并哈希每一次请求
* hdr(name) 根据HTTP请求头来锁定每一次HTTP请求
* roundrobin 轮询方式
赋值
haproxy启动脚本到/etc/init.d/目录下[root@cos-7 ~]# cp /usr/local/src/haproxy-1.7.10/examples/haproxy.init /etc/init.d/haproxy
[root@cos-7 ~]# chmod 755 /etc/init.d/haproxy
[root@cos-7 ~]# mkdir -p /usr/local/haproxy/run
[root@cos-7 ~]# cp /usr/local/haproxy/sbin/haproxy /usr/sbin/
[root@cos-7 ~]# chown nobody /usr/local/haproxy- 1
- 2
- 3
- 4
- 5
haproxy启动脚本赋值过来后,还有一些地方需要修改。
* 将BASENAME的值改为haproxy
* BIN的值改为/usr/sbin/haproxy
* CFG的值改为/usr/local/haproxy/etc/haproxy.cfg
* PIDFILE的值改为/usr/local/haproxy/run/haproxy.pid
* LOCKFILE的值改为/usr/local/haproxy/run/haproxy
修改后的文件内容
#!/bin/sh## chkconfig: - 85 15# description: HA-Proxy is a TCP/HTTP reverse proxy which is particularly suited \# for high availability environments.# processname: haproxy# config: /etc/haproxy/haproxy.cfg# pidfile: /var/run/haproxy.pid# Script Author: Simon Matter <simon.matter@invoca.ch># Version: 2004060600# Source function library.if [ -f /etc/init.d/functions ]; then. /etc/init.d/functionselif [ -f /etc/rc.d/init.d/functions ] ; then. /etc/rc.d/init.d/functionselseexit 0fi# Source networking configuration.. /etc/sysconfig/network# Check that networking is up.[ ${NETWORKING} = "no" ] && exit 0# This is our service nameBASENAME=`haproxy`#if [ -L $0 ]; then# BASENAME=`find $0 -name $BASENAME -printf %l`# BASENAME=`basename $BASENAME`#fiBIN=/usr/sbin/haproxyCFG=/usr/local/haproxy/etc/haproxy.cfg[ -f $CFG ] || exit 1PIDFILE=/usr/local/haproxy/run/haproxy.pidLOCKFILE=/usr/local/haproxy/run/haproxyRETVAL=0start() {quiet_checkif [ $? -ne 0 ]; thenecho "Errors found in configuration file, check it with '$BASENAME check'."return 1fiecho -n "Starting $BASENAME: "daemon $BIN -D -f $CFG -p $PIDFILERETVAL=$?echo[ $RETVAL -eq 0 ] && touch $LOCKFILEreturn $RETVAL}stop() {echo -n "Shutting down $BASENAME: "killproc $BASENAME -USR1RETVAL=$?echo[ $RETVAL -eq 0 ] && rm -f $LOCKFILE[ $RETVAL -eq 0 ] && rm -f $PIDFILEreturn $RETVAL}restart() {quiet_checkif [ $? -ne 0 ]; thenecho "Errors found in configuration file, check it with '$BASENAME check'."return 1fistopstart}reload() {if ! [ -s $PIDFILE ]; thenreturn 0fiquiet_checkif [ $? -ne 0 ]; thenecho "Errors found in configuration file, check it with '$BASENAME check'."return 1fi$BIN -D -f $CFG -p $PIDFILE -sf $(cat $PIDFILE)}check() {$BIN -c -q -V -f $CFG}quiet_check() {$BIN -c -q -f $CFG}rhstatus() {status $BASENAME}condrestart() {[ -e $LOCKFILE ] && restart || :}# See how we were called.case "$1" instart)start;;stop)stop;;restart)restart;;reload)reload;;condrestart)condrestart;;status)rhstatus;;check)check;;*)echo $"Usage: $BASENAME {start|stop|restart|reload|condrestart|status|check}"exit 1esacexit $?
- 1
- 2
- 3
- 4
- 5
- 6
- 7
- 8
- 9
- 10
- 11
- 12
- 13
- 14
- 15
- 16
- 17
- 18
- 19
- 20
- 21
- 22
- 23
- 24
- 25
- 26
- 27
- 28
- 29
- 30
- 31
- 32
- 33
- 34
- 35
- 36
- 37
- 38
- 39
- 40
- 41
- 42
- 43
- 44
- 45
- 46
- 47
- 48
- 49
- 50
- 51
- 52
- 53
- 54
- 55
- 56
- 57
- 58
- 59
- 60
- 61
- 62
- 63
- 64
- 65
- 66
- 67
- 68
- 69
- 70
- 71
- 72
- 73
- 74
- 75
- 76
- 77
- 78
- 79
- 80
- 81
- 82
- 83
- 84
- 85
- 86
- 87
- 88
- 89
- 90
- 91
- 92
- 93
- 94
- 95
- 96
- 97
- 98
- 99
- 100
- 101
- 102
- 103
- 104
- 105
- 106
- 107
- 108
- 109
- 110
- 111
- 112
- 113
- 114
- 115
- 116
- 117
- 118
- 119
- 120
- 121
- 122
- 123
- 124
- 125
- 126
- 127
- 128
- 129
- 130
- 131
- 132
- 133
- 134
- 135
- 136
- 137
配置日志收集
[root@cos-7 ~]# vim /etc/rsyslog.conf
- 1
将#$ModLoad imudp和#$UDPServerRun 514两行的注释打开。然后在local7.*这一行下面添加两行
local3.* /var/log/haproxy.loglocal0.* /var/log/haproxy.log
- 1
- 2
重启系统日志服务
[root@cos-7 ~]# systemctl restart rsyslog
- 1
启动
haproxy[root@cos-7 ~]# /etc/init.d/haproxy start
- 1
启动方法2
[root@cos-7 ~]# systemctl start haproxy
- 1
启动方法3
[root@cos-7 ~]# /usr/local/haproxy/sbin/haproxy -f /usr/local/haproxy/etc/haproxy.cfg
- 1
这种方法没有start、restart、stop的参数。要重启只能先杀进程,然后在开启。
此时haproxy就配置完成了(后端的两台服务器默认已经配置好了)。可以访问分发器的ip来测试。
另外haproxy能通过web页面来监控后端服务器。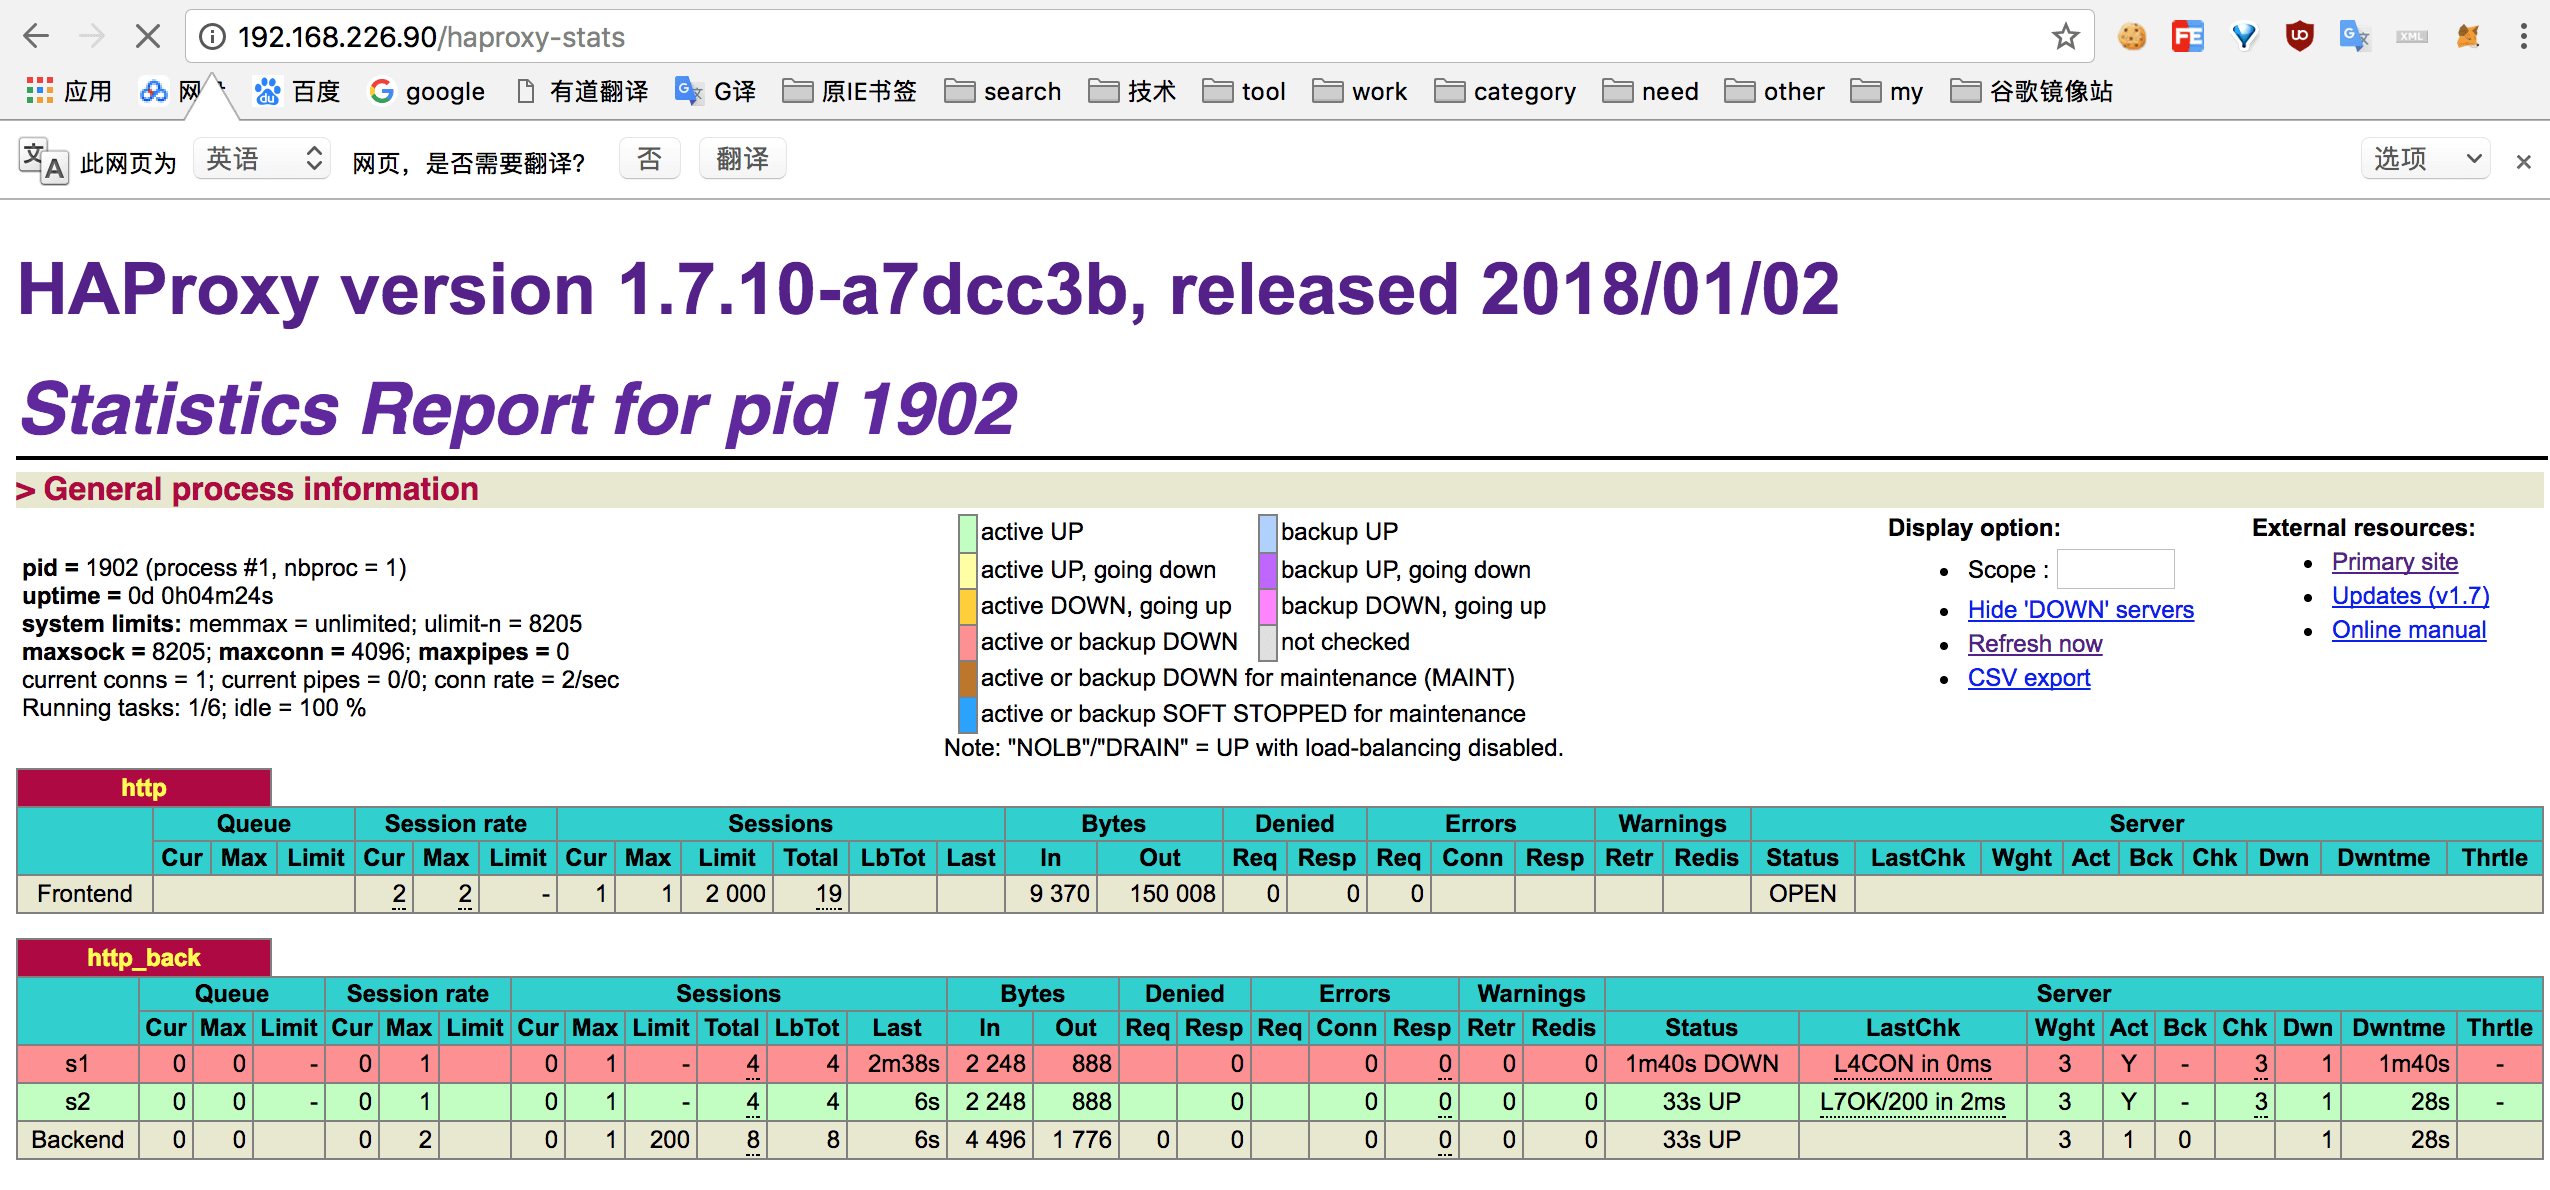
PS: 如果启动过程中报错Starting haproxy (via systemctl): Warning: haproxy.service changed on disk. Run 'systemctl daemon-reload' to reload units.。就按照提示内容,直接执行一下systemctl daemon-reload命令即可
原文 //blog.csdn.net/yz_yangzhi/article/details/79150148


还没有评论,来说两句吧...