springboot配置文件yml使用
SpringBoot项目属性配置
如果使用IDEA创建Springboot项目,默认会在resource目录下创建application.properties文件,在SpringBoot项目中,也可以使用yml类型的配置文件代替properties文件,下面我们具体介绍:
1.应用配置文件(.properties或.yml):
1.在resource目录下创建application.properties文件,并添加一些配置:
server.port=8081server.context-path=/girl
2.在resource目录下创建application.yml文件,并添加一些配置:
#注意:在yml文件中添加value值时,value前面需要加一个空格server:port: 8081context-path: /girl #使用localhost:8081/girl/hellocupSize :B
2.单个的获取配置文件中的内容:
在字段上使用@Value("${配置文件中的key}")的方式获取单个的内容
1.在resource目录下创建application.yml文件,并添加一些配置,在yml文件中,key:后面需要添加一个空格,然后是value值,假设配置如下:
#注意:在yml文件中添加value值时,value前面需要加一个空格ip: 127.0.0.0port: 8080
2.创建一个ConfigController类,获取配置文件中的内容并赋值给相应的字段:
@RestControllerpublic class ConfigController {@Value("${ip}")//获取application.yml文件中名为ip的value值private String ip;@Value("${port}")//获取application.yml文件中名为port的value值,并且自动完成数据类型转换private Integer port;@RequestMapping("/config")public String config() {return "ip:"+ip+",port:"+port;}}
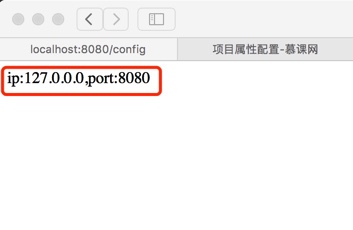
3.在浏览器中输入http://localhost:8080/config,可以看到输出了配置文件中配置的内容:
4.当然也可以在配置里面使用当前配置,如下:
ip: 127.0.0.0port: 8080content: "ip:${ip},port:${port}"@Value("${content}")private String content;
3.使用Bean自动注入获取配置文件中的内容:
假如配置文件中有很多内容,一个一个获取将会很麻烦,那么我们另外一种方式去获取配置文件中的信息
1.在配置文件中添加以下信息(注意格式),此处我们使用了一个名为devconfig的前缀:
devconfig:ip: 127.0.0.0port: 8080
2.创建ConfigBean,在类中添加@Componet和@ConfigurationProperties注解,其prefix设置为devconfig,将获取yml中前缀为devconfig下的配置信息:
@Component@ConfigurationProperties(prefix = "devconfig")//获取前缀为devconfig下的配置信息public class ConfigBean {private String ip;//名字与配置文件中一致private Integer port;public String getIp() {return ip;}public void setIp(String ip) {this.ip = ip;}public Integer getPort() {return port;}public void setPort(Integer port) {this.port = port;}}
3.在ConfigController中使用@Autowrite对bean自动注入,实例化bean:
@RestControllerpublic class ConfigController {//自动注入,实例化bean@Autowiredprivate ConfigBean configBean;@RequestMapping("/config")public String config() {return "另一种方式: ip:"+configBean.getIp()+",port:"+configBean.getPort();}}
4.多个配置文件切换的使用:
1.假设开发环境使用ip为:127.0.0.0,使用端口为:8080,生产环境使用ip为:127.0.0.1,使用端口为:8081
下面来修改配置文件,在resource目录下创建application-produce.yml和生产环境配置文件application-dev.yml:
config:ip: 127.0.0.0port: 8080config:ip: 127.0.0.1port: 8081
application.yml中配置生效的配置文件,此处设为produce,也就是使用application-produce.yml文件:
spring:profiles:active: produce
2.也可通过启动jar包时添加参数来更改生效的配置文件,命令为:java -jar XXX.jar –spring.profiles.active=poduce(这样就可以多环境下同时使用了)


")
实现")

算法")
之python实现")


还没有评论,来说两句吧...