SpringMVC和Mybatis整合(前端控制器、处理器映射器、处理器适配器、视图解析器学习)
什么是SpringMVC ?
springmvc是spring框架的一个模块,springmvc和spring无需通过中间整合层进行整合。springmvc是一个基于mvc的web框架。下面通过一张图来了解springmvc框架.
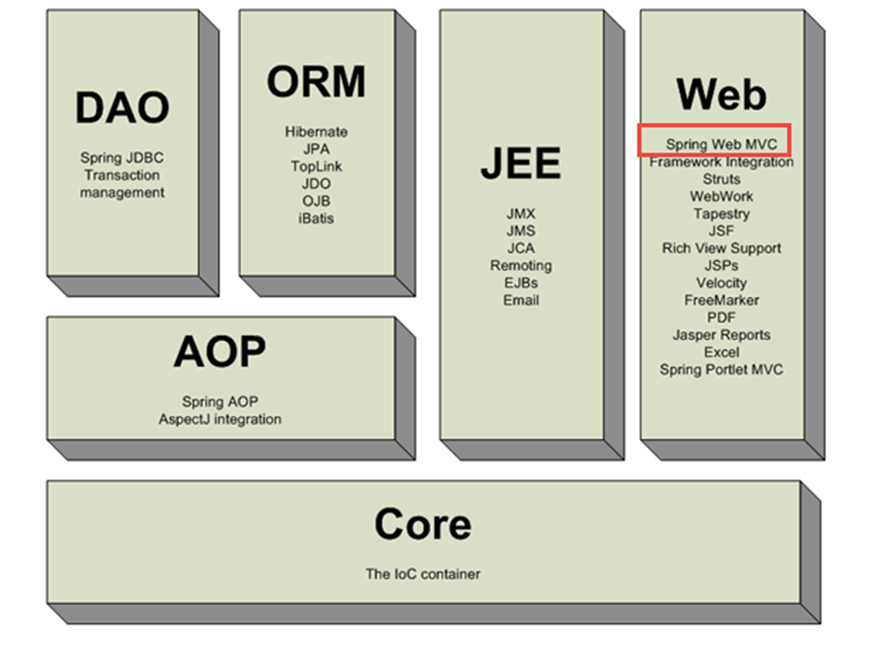
图源: 《传智播客》
SpringMVC**的工作原理**
· 发起请求到前端控制器(DispatcherServlet)
· 前端控制器请求HandlerMapping查找 Handler。可以根据xml配置、注解进行查找
· 处理器映射器HandlerMapping向前端控制器返回Handler
· 前端控制器调用处理器适配器去执行Handler
· 处理器适配器去执行Handler
· Handler执行完成给适配器返回ModelAndView
· 处理器适配器向前端控制器返回ModelAndView。ModelAndView是springmvc框架的一个底层对象,包括 Model和view
· 前端控制器请求视图解析器去进行视图解析。根据逻辑视图名解析成真正的视图(jsp)
· 视图解析器向前端控制器返回View
· 前端控制器进行视图渲染。视图渲染将模型数据(在ModelAndView对象中)填充到request域
· 前端控制器向用户响应结果
下面通过SpringMVC和Mybatis整合的一个入门程序,了解springmvc框架原理,对前端控制器、处理器映射器、处理器适配器、视图解析器学习。区别非注解的处理器映射器、处理器适配器与注解,的处理器映射器、处理器适配器(要求掌握)。在实际开发中建议使用后者注解开发,简化代码,降低程序维护难度。
Springmvc+Mybatis整合思路
Springmvc+Mybatis系统架构
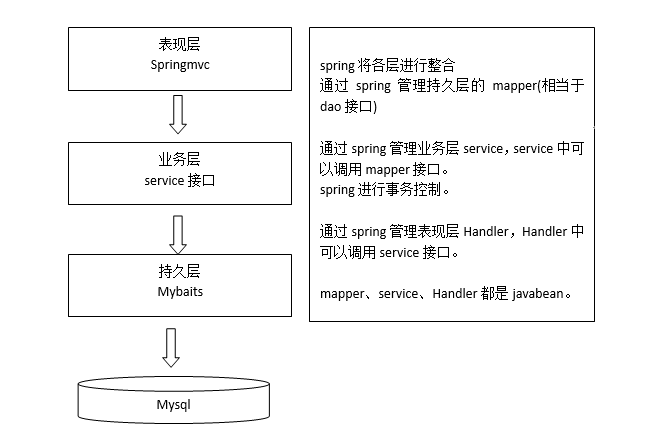
图源:《传智播客》
简单解释一下上图:
第一步:整合dao层
·mybatis和spring整合,通过spring管理mapper接口。·使用mapper的扫描器自动扫描mapper接口在spring中进行注册。
第二步:整合service层
·通过spring管理 service接口。·使用配置方式将service接口配置在spring配置文件中。·实现事务控制。
第三步:整合springmvc
·由于springmvc是spring的模块,不需要整合。
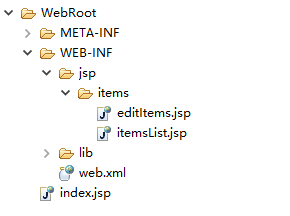
搭建工程结构
1.在src下创建4个空包
·cn.ssm.xhchen.controller 放置业务逻辑控制
·cn.ssm.xhchen.mapper 放置mapper接口和映射文件
·cn.ssm.xhchen.po 放置Java实体类
·cn.ssm.xhchen.service 放置业务逻辑管理
2.创建资源文件夹config与src同级
·【config/mybatis】 创建名为“SqlMapContext.xml”的mybatis全局配置文件
·【config/spring】 创建名为“applicationContext-dao.xml”全局数据源配置文件
·【config/spring】 创建名为“applicationContext-service.xml”全局业务逻辑管理配置文件
·【config/spring】 创建名为“applicationContext-transaction.xml”全局事务管理配置文件
·【config/spring】 创建名为“springmvc.xml”mvc核心配置文件
·【config】创建名为db.properties数据源文件和log4j.properties日志文件
3.创建两个jsp页面
·【WEB-INF/jsp/items】创建名为“itemsList.jsp”的商品列表
·【WEB-INF/jsp/items】创建名为“editItems.jsp”的更新商品列表

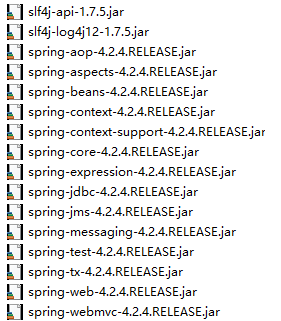
工程环境搭建

整合dao
mybatis配置文件
<?xml version="1.0" encoding="UTF-8" ?><!DOCTYPE configuration PUBLIC "-//mybatis.org//DTD Config 3.0//EN" "http://mybatis.org/dtd/mybatis-3-config.dtd"><configuration><!-- 数据源交给spring配置 --><!-- settings --><settings><!-- 打开延迟加载的开关 --><setting name="lazyLoadingEnabled" value="true" /><!-- 将积极加载改为消极加载 --><setting name="aggressiveLazyLoading" value="false" /><!-- 打开全局缓存开关(二级缓存)默认值就是 true --><setting name="cacheEnabled" value="true" /></settings><!-- 配置别名 --><typeAliases><package name="cn.ssm.xhchen.po"/></typeAliases><!-- mapper配置交给spring包扫描 --></configuration>
配置数据源(applicationContext-dao.xml)
配置:数据源、SqlSessionFactory、mapper扫描器
<?xml version="1.0" encoding="UTF-8"?><beans xmlns="http://www.springframework.org/schema/beans"xmlns:xsi="http://www.w3.org/2001/XMLSchema-instance" xmlns:context="http://www.springframework.org/schema/context"xmlns:aop="http://www.springframework.org/schema/aop" xmlns:tx="http://www.springframework.org/schema/tx"xsi:schemaLocation="http://www.springframework.org/schema/beanshttp://www.springframework.org/schema/beans/spring-beans.xsdhttp://www.springframework.org/schema/txhttp://www.springframework.org/schema/tx/spring-tx.xsdhttp://www.springframework.org/schema/aophttp://www.springframework.org/schema/aop/spring-aop.xsdhttp://www.springframework.org/schema/contexthttp://www.springframework.org/schema/context/spring-context.xsd"><!-- 加载db.properties数据原文件 --><context:property-placeholder location="classpath:db.properties" /><!-- 配置数据源 --><bean id="dataSource" class="org.springframework.jdbc.datasource.DriverManagerDataSource"><property name="driverClassName" value=" ${jdbc.driver}" /><property name="url" value="${jdbc.url}" /><property name="username" value="${jdbc.username}" /><property name="password" value="${jdbc.password}" /></bean><!-- 配置sqlSessionFactory --><bean id="sqlSessionFactory" class="org.mybatis.spring.SqlSessionFactoryBean"><!-- 数据连接池 --><property name="dataSource" ref="dataSource"></property><!-- 加载 SqlMapConfig 的全局配置文件--><property name="configLocation" value="classpath:mybatis/SqlMapConfig.xml"></property></bean><!-- 配置mapper扫描器 --><bean class="org.mybatis.spring.mapper.MapperScannerConfigurer"><!-- 扫描包路径 --><property name="basePackage" value="cn.ssm.xhchen.mapper"></property><property name="sqlSessionFactoryBeanName" value="sqlSessionFactory"></property></bean></beans>
cn.ssm.xhchen.po
创建商品实体类Items.java
创建商品信息po拓展类ItemsCustomer.java
创建商品信息包装类ItemsQueryVo.java
Items.java
package cn.ssm.xhchen.po;/**** ClassName: Items** @Description: 商品实体类* @author XHChen* @date 2018年10月17日 下午5:09:14*/public class Items {private Integer id; // 商品主键private String items_name; // 商品名称private String items_detail; // 商品明细private Double items_price; // 商品价格public Integer getId() {return id;}public void setId(Integer id) {this.id = id;}public String getItems_name() {return items_name;}public void setItems_name(String items_name) {this.items_name = items_name;}public String getItems_detail() {return items_detail;}public void setItems_detail(String items_detail) {this.items_detail = items_detail;}public Double getItems_price() {return items_price;}public void setItems_price(Double items_price) {this.items_price = items_price;}@Overridepublic String toString() {return "Items [id=" + id + ", items_name=" + items_name+ ", items_detail=" + items_detail + ", items_price="+ items_price + "]";}}
ItemsCustomer.java
package cn.ssm.xhchen.po;import java.util.Date;/**** ClassName: Items** @Description: 商品信息po拓展类* @author XHChen* @date 2018年10月17日 下午5:09:14*/public class ItemsCustomer extends Items {// 添加拓展属性private Date items_creattime; // 商品生产时间public Date getItems_creattime() {return items_creattime;}public void setItems_creattime(Date items_creattime) {this.items_creattime = items_creattime;}@Overridepublic String toString() {return "ItemsCustomer [toString()=" + super.toString()+ ", items_creattime=" + items_creattime + "]";}}
ItemsQueryVo.java
package cn.ssm.xhchen.po;/**** ClassName: ItemsQueryVo** @Description: 商品信息包装类* @author XHChen* @date 2018年10月17日 下午8:03:46*/public class ItemsQueryVo {// 商品信息private Items items;// 系统拓展性,对原始po进行拓展private ItemsCustomer itemsCustomer;public Items getItems() {return items;}public void setItems(Items items) {this.items = items;}public ItemsCustomer getItemsCustomer() {return itemsCustomer;}public void setItemsCustomer(ItemsCustomer itemsCustomer) {this.itemsCustomer = itemsCustomer;}@Overridepublic String toString() {return "ItemsQueryVo [items=" + items + ", itemsCustomer="+ itemsCustomer + "]";}}
cn.ssm.xhchen.mapper
创建Items的mapper.xml配置文件ItemsMapper.xml
创建ItemsMapper的拓展mapper.xml配置文件ItemsMapperCustomer.xml
创建Items的mapper接口ItemsMapper.java
创建ItemsMapper的拓展mapper接口ItemsMapperCustomer.java
ItemsMapper.xml
<?xml version="1.0" encoding="UTF-8"?><!DOCTYPE mapper PUBLIC "-//mybatis.org//DTD Mapper 3.0//EN" "http://mybatis.org/dtd/mybatis-3-mapper.dtd"><mapper namespace="cn.ssm.xhchen.mapper.ItemsMapper"><!-- 添加数据 --><insert id="insertItems" parameterType="cn.ssm.xhchen.po.Items"><!-- id自动增长 --><selectKey keyProperty="id" order="AFTER" resultType="java.lang.Integer">SELECTLAST_INSERT_ID()</selectKey><!-- 插入sql语句 -->insert into items(items_name,items_detail,items_price) values(#{items_name},#{items_detail},#{items_price})</insert><!-- 修改数据 --><update id="updateItems" parameterType="cn.ssm.xhchen.po.Items"><!-- 插入修改sql语句 -->update items set items_name=#{items_name}, items_detail=#{items_detail}, items_price=#{items_price} where id=#{id}</update><!-- 删除数据 --><delete id="deleteItems" parameterType="cn.ssm.xhchen.po.Items"><!-- 插入删除语句 -->delete from items where id=#{id}</delete><!-- 通过id查询 --><select id="findItemsById" parameterType="java.lang.Integer" resultType="cn.ssm.xhchen.po.Items"><!-- 插入查询语句 -->select * from items where id=#{id}</select></mapper>
ItemsMapperCustomer.xml
<?xml version="1.0" encoding="UTF-8"?><!DOCTYPE mapper PUBLIC "-//mybatis.org//DTD Mapper 3.0//EN" "http://mybatis.org/dtd/mybatis-3-mapper.dtd"><!-- ItemsMapper的拓展mapper --><mapper namespace="cn.ssm.xhchen.mapper.ItemsMapperCustomer"><!-- sql片段 --><sql id="where_query_Items"><!-- 使用动态sql,满足条件进行sql拼接 --><!-- 商品信息通过 ItemsQueryVo包装类中的ItemsCustomer传递 --><if test="itemsCustomer != null"><if test="itemsCustomer.items_name != null and itemsCustomer.items_name != ''">items_name like '%${itemsCustomer.items_name}%';</if></if></sql><!-- 商品列表查询 parameterType:商品信息包装类 resultType:商品信息po拓展类 --><select id="findItemsList" parameterType="cn.ssm.xhchen.po.ItemsQueryVo" resultType="cn.ssm.xhchen.po.ItemsCustomer">select * from items<where><include refid="where_query_Items"></include></where></select></mapper>
ItemsMapper.java
package cn.ssm.xhchen.mapper;import cn.ssm.xhchen.po.Items;/**** ClassName: ItemsMapper** @Description: Items的mapper接口* @author XHChen* @date 2018年10月17日 下午5:11:51*/public interface ItemsMapper {// 添加public void insertItems(Items items) throws Exception;// 修改public void updateItems(Items items) throws Exception;// 删除public void deleteItems(int id) throws Exception;// 通过id查询public Items findItemsById(int id) throws Exception;}
ItemsMapperCustomer.java
package cn.ssm.xhchen.mapper;import java.util.List;import cn.ssm.xhchen.po.ItemsCustomer;import cn.ssm.xhchen.po.ItemsQueryVo;/**** ClassName: ItemsMapper** @Description: ItemsMapper的拓展mapper接口* @author XHChen* @date 2018年10月17日 下午5:11:51*/public interface ItemsMapperCustomer {// 商品列表查询public List<ItemsCustomer> findItemsList(ItemsQueryVo itemsQueryVo) throws Exception;}
整合service
cn.ssm.xhchen.service
创建Items管理接口ItemsService.java
创建Items管理实现ItemsServiceImpl.java
ItemsService.java
package cn.ssm.xhchen.service;import java.util.List;import cn.ssm.xhchen.po.ItemsCustomer;import cn.ssm.xhchen.po.ItemsQueryVo;/**** ClassName: ItemsService** @Description: Items管理接口* @author XHChen* @date 2018年10月17日 下午8:49:43*/public interface ItemsService {/**** @Description: 商品列表查询* @param @param itemsQueryVo 封装商品信息的类* @param @return* @param @throws Exception* @return List<ItemsCustomer> 数据库返回的值映射到ItemsCustomer* @throws* @author XHChen* @date 2018年10月20日 下午8:23:28*/public List<ItemsCustomer> findItemsList(ItemsQueryVo itemsQueryVo) throws Exception;/**** @Description: 找到修改商品信息* @param @param id 查询商品的id* @param @return* @param @throws Exception* @return ItemsCustomer* @throws* @author XHChen* @date 2018年10月20日 下午8:23:06*/public ItemsCustomer findItemsById(Integer id) throws Exception;/**** @Description: 修改商品信息* @param @param id 修改商品的id* @param @param itemsCustomer 修改商品的信息* @param @throws Exception* @return void* @throws* @author XHChen* @date 2018年10月20日 下午8:23:00*/public void updateItems(Integer id, ItemsCustomer itemsCustomer) throws Exception;}
ItemsServiceImpl.java
package cn.ssm.xhchen.service.impl;import java.util.List;import org.springframework.beans.BeanUtils;import org.springframework.beans.factory.annotation.Autowired;import cn.ssm.xhchen.mapper.ItemsMapper;import cn.ssm.xhchen.mapper.ItemsMapperCustomer;import cn.ssm.xhchen.po.Items;import cn.ssm.xhchen.po.ItemsCustomer;import cn.ssm.xhchen.po.ItemsQueryVo;import cn.ssm.xhchen.service.ItemsService;/**** ClassName: ItemsServiceImpl** @Description: Items管理实现* @author XHChen* @date 2018年10月17日 下午8:50:58*/public class ItemsServiceImpl implements ItemsService {// applicationContext-dao.xml已通过包扫描配置了ItemsMapperCustomer@Autowiredprivate ItemsMapperCustomer itemsMapperCustomer;// 自动注入ItemsMapper接口@Autowiredprivate ItemsMapper itemsMapper;@Override/*** 通过itemsQueryVo查询商品信息*/public List<ItemsCustomer> findItemsList(ItemsQueryVo itemsQueryVo) throws Exception {// 通过ItemsMapperCustomer查询数据库return itemsMapperCustomer.findItemsList(itemsQueryVo);}@Override/*** 根据id查询商品信息*/public ItemsCustomer findItemsById(Integer id) throws Exception {// 根据id查询商品信息Items items = itemsMapper.findItemsById(id);// 创建ItemsCustomer对象ItemsCustomer itemsCustomer = new ItemsCustomer();// 把商品信息items复制到itemsCustomerBeanUtils.copyProperties(items, itemsCustomer);// 返回拓展类ItemsCustomerreturn itemsCustomer;}@Override/*** 修改商品信息*/public void updateItems(Integer id, ItemsCustomer itemsCustomer) throws Exception {// 一堆代码逻辑// ......// 设置修改商品iditemsCustomer.setId(id);// 修改商品信息itemsMapper.updateItems(itemsCustomer);}}
配置service(applicationContext-service.xml)
<?xml version="1.0" encoding="UTF-8"?><beans xmlns="http://www.springframework.org/schema/beans"xmlns:xsi="http://www.w3.org/2001/XMLSchema-instance" xmlns:context="http://www.springframework.org/schema/context"xmlns:aop="http://www.springframework.org/schema/aop" xmlns:tx="http://www.springframework.org/schema/tx"xsi:schemaLocation="http://www.springframework.org/schema/beanshttp://www.springframework.org/schema/beans/spring-beans.xsdhttp://www.springframework.org/schema/txhttp://www.springframework.org/schema/tx/spring-tx.xsdhttp://www.springframework.org/schema/aophttp://www.springframework.org/schema/aop/spring-aop.xsdhttp://www.springframework.org/schema/contexthttp://www.springframework.org/schema/context/spring-context.xsd"><!-- 配置商品管理的service --><bean id="itemsService" class="cn.ssm.xhchen.service.impl.ItemsServiceImpl"></bean></beans>
事务控制(applicationContext-transaction.xml)
<?xml version="1.0" encoding="UTF-8"?><beans xmlns="http://www.springframework.org/schema/beans"xmlns:xsi="http://www.w3.org/2001/XMLSchema-instance" xmlns:context="http://www.springframework.org/schema/context"xmlns:aop="http://www.springframework.org/schema/aop" xmlns:tx="http://www.springframework.org/schema/tx"xsi:schemaLocation="http://www.springframework.org/schema/beanshttp://www.springframework.org/schema/beans/spring-beans.xsdhttp://www.springframework.org/schema/txhttp://www.springframework.org/schema/tx/spring-tx.xsdhttp://www.springframework.org/schema/aophttp://www.springframework.org/schema/aop/spring-aop.xsdhttp://www.springframework.org/schema/contexthttp://www.springframework.org/schema/context/spring-context.xsd"><!-- 配置事务管理器 --><bean id="transactionManager" class="org.springframework.jdbc.datasource.DataSourceTransactionManager"><!-- 链接数据源,applicationContext-dao.xml中已经实现 --><property name="dataSource" ref="dataSource"></property></bean><!-- 通知 --><tx:advice id="txAdvice" transaction-manager="transactionManager"><tx:attributes><tx:method name="save*" isolation="DEFAULT"/><tx:method name="delete*" isolation="DEFAULT"/><tx:method name="insert*" isolation="DEFAULT"/><tx:method name="update*" isolation="DEFAULT"/><tx:method name="find*" propagation="SUPPORTS" read-only="true"/><tx:method name="get*" propagation="SUPPORTS" read-only="true"/><tx:method name="select*" propagation="SUPPORTS" read-only="true"/></tx:attributes></tx:advice><!-- aop --><aop:config><aop:advisor advice-ref="txAdvice" pointcut="execution(* cn.ssm.xhchen.service.impl.*.*(..))"/></aop:config></beans>
SpringMVC注解开发
配置前端控制器
在web.xml下配置前端控制器
<?xml version="1.0" encoding="UTF-8"?><!DOCTYPE web-app PUBLIC "-//Sun Microsystems, Inc.//DTD Web Application 2.3//EN" "http://java.sun.com/dtd/web-app_2_3.dtd"><web-app id="WebApp_ID"><display-name>springmvc_mybatis</display-name><!-- 加载spring容器 param-value:在tomcat项目下的路径 --><context-param><param-name>contextConfigLocation</param-name><param-value>/WEB-INF/classes/spring/applicationContext-*.xml</param-value></context-param><!-- 解决post全局乱码 --><filter><filter-name>CharacterEncodingFilter</filter-name><filter-class>org.springframework.web.filter.CharacterEncodingFilter</filter-class><init-param><param-name>encoding</param-name><param-value>utf-8</param-value></init-param></filter><filter-mapping><filter-name>CharacterEncodingFilter</filter-name><url-pattern>/*</url-pattern></filter-mapping><!-- 配置监听器 --><listener><listener-class>org.springframework.web.context.ContextLoaderListener</listener-class></listener><!-- 配置前端控制器 --><servlet><servlet-name>springmvc</servlet-name><servlet-class>org.springframework.web.servlet.DispatcherServlet</servlet-class><!-- contextConfigLocation配置springmvc加载的配置文件 --><init-param><param-name>contextConfigLocation</param-name><param-value>classpath:spring/springmvc.xml</param-value></init-param></servlet><!-- *.action,访问以.action结尾由DispatcherServlet解析 --><servlet-mapping><servlet-name>springmvc</servlet-name><url-pattern>*.action</url-pattern></servlet-mapping><welcome-file-list><welcome-file>index.html</welcome-file><welcome-file>index.htm</welcome-file><welcome-file>index.jsp</welcome-file><welcome-file>default.html</welcome-file><welcome-file>default.htm</welcome-file><welcome-file>default.jsp</welcome-file></welcome-file-list></web-app>
配置注解处理器适配器
在classpath下的springmvc.xml中配置处理器适配器(之后不再导入约束)
<?xml version="1.0" encoding="UTF-8"?><beans xmlns="http://www.springframework.org/schema/beans"xmlns:context="http://www.springframework.org/schema/context" xmlns:p="http://www.springframework.org/schema/p"xmlns:aop="http://www.springframework.org/schema/aop" xmlns:tx="http://www.springframework.org/schema/tx"xmlns:xsi="http://www.w3.org/2001/XMLSchema-instance" xmlns:mvc="http://www.springframework.org/schema/mvc"xsi:schemaLocation="http://www.springframework.org/schema/beanshttp://www.springframework.org/schema/beans/spring-beans-4.0.xsdhttp://www.springframework.org/schema/mvchttp://www.springframework.org/schema/mvc/spring-mvc-3.0.xsdhttp://www.springframework.org/schema/contexthttp://www.springframework.org/schema/context/spring-context-4.0.xsdhttp://www.springframework.org/schema/aophttp://www.springframework.org/schema/aop/spring-aop-4.0.xsdhttp://www.springframework.org/schema/txhttp://www.springframework.org/schema/tx/spring-tx-4.0.xsdhttp://www.springframework.org/schema/utilhttp://www.springframework.org/schema/util/spring-util-4.0.xsd"><!-- 注解配置处理器适配器 --><bean class="org.springframework.web.servlet.mvc.method.annotation.RequestMappingHandlerAdapter"></bean></beans>
开发注解Handler(不做参数绑定演示)
在cn.ssm.xhchen.controller下创建ItemsController.java,需要实现 controller接口,才能由org.springframework.web.servlet.mvc.RequestMappingHandlerAdapter适配器执行
@controller注解必须要加,标识类是一个Handler处理器。
@Controllerpublic class ItemsController {}
@requestMapping注解必须要加,作用:
· 对url和Handler的方法进行映射(一般url名称与方法名称保持一致)。
@RequestMapping("/queryItems.action")public ModelAndView queryItems() throws Exception {}
· 可以窄化请求映射,设置Handler的根路径,url就是根路径+子路径请求方式
@Controller// 窄化请求映射,对url进行分类管理@RequestMapping("/items")public class ItemsController {}
· 可以限制http请求的方法
// 限制http请求方法,限定表单POST请求// @RequestMapping(value="/queryItems.action",method={RequestMethod.POST})// 限制http请求方法,限定表单POST/GET请求@RequestMapping(value = "/queryItems.action", method = { RequestMethod.GET,RequestMethod.POST })public ModelAndView queryItems() throws Exception {}
映射成功后,springmvc框架生成一个Handler对象,对象中只包括 一个映射成功的method。
ItemsController.java
package cn.ssm.xhchen.controller;import java.util.List;import org.springframework.beans.factory.annotation.Autowired;import org.springframework.stereotype.Controller;import org.springframework.web.bind.annotation.RequestMapping;import org.springframework.web.bind.annotation.RequestMethod;import org.springframework.web.servlet.ModelAndView;import cn.ssm.xhchen.po.ItemsCustomer;import cn.ssm.xhchen.po.ItemsQueryVo;import cn.ssm.xhchen.service.ItemsService;/**** ClassName: ItemsController** @Description: 商品管理控制* @author XHChen* @date 2018年10月17日 下午9:31:52*/@Controller// 窄化请求映射,对url进行分类管理@RequestMapping("/items")public class ItemsController {@Autowiredprivate ItemsService itemsService;/**** @Description: 模糊查询商品信息* @param @return* @param @throws Exception* @return ModelAndView* @throws* @author XHChen* @date 2018年10月20日 下午8:34:57*/// 1.@RequestMapping("/queryItems.action")// 2.限制http请求方法,限定表单POST请求// @RequestMapping(value="/queryItems.action",method={RequestMethod.POST})// 3.限制http请求方法,限定表单POST/GET请求@RequestMapping(value = "/queryItems.action", method = { RequestMethod.GET, RequestMethod.POST })public ModelAndView queryItems() throws Exception {// 此项目不做数据绑定// 创建ItemsCustomer对象ItemsCustomer itemsCustomer = new ItemsCustomer();// 设置查询条件itemsCustomer.setItems_name("苹果");// 创建ItemsQueryVo对象ItemsQueryVo itemsQueryVo = new ItemsQueryVo();// 把itemsCustomer封装到ItemsQueryVo中itemsQueryVo.setItemsCustomer(itemsCustomer);// 调用service方法查询数据库List<ItemsCustomer> itemsList = itemsService.findItemsList(itemsQueryVo);// 返回ModelAndViewModelAndView modelAndView = new ModelAndView();modelAndView.addObject("itemsList", itemsList);// 指定视图// 路径前缀和后缀已由springmvc.xml配置modelAndView.setViewName("items/itemsList");return modelAndView;}/**** @Description: 商品信息修改页面* @param @return 返回ModelAndView* @param @throws Exception* @return ModelAndView* @throws* @author XHChen* @date 2018年10月20日 下午8:46:10*/@RequestMapping("/editItems.action")public ModelAndView editItems() throws Exception {// 通过itemsService获得修改数据,此项目不介绍数据绑定ItemsCustomer itemsCustomer = itemsService.findItemsById(1);System.out.println(itemsCustomer);// 返回ModelAndViewModelAndView modelAndView = new ModelAndView();// 把数据添加到modelAndViewmodelAndView.addObject("itemsCustomer", itemsCustomer);// 指定视图modelAndView.setViewName("items/editItems");return modelAndView;}/**** @Description: 修改商品信息* @param @return* @param @throws Exception* @return ModelAndView* @throws* @author XHChen* @date 2018年10月20日 下午8:51:59*/@RequestMapping("/editItemsSubmit.action")public ModelAndView editItemsSubmit() throws Exception {// 调用itemsService方法修改商品信息,需要将页面数据提交到此方法// ......// 方法没有做参数绑定// itemsService.updateItems(id, itemsCustomer);// 返回ModelAndViewModelAndView modelAndView = new ModelAndView();// 指定视图modelAndView.setViewName("items/itemsList");// 返回指定视图return modelAndView;}}
视图编写
·【WEB-INF/jsp/items】创建名为“itemsList.jsp”的商品列表
<%@ page language="java" import="java.util.*" pageEncoding="utf-8"%><%String path = request.getContextPath();String basePath = request.getScheme() + "://"+ request.getServerName() + ":" + request.getServerPort()+ path + "/";%><%@ taglib uri="http://java.sun.com/jstl/core" prefix="c"%><%@ taglib uri="http://java.sun.com/jstl/fmt" prefix="fmt" %><!DOCTYPE HTML PUBLIC "-//W3C//DTD HTML 4.01 Transitional//EN"><html><head><base href="<%=basePath%>"><title>My JSP 'itemsList.jsp' starting page</title><meta http-equiv="pragma" content="no-cache"><meta http-equiv="cache-control" content="no-cache"><meta http-equiv="expires" content="0"><meta http-equiv="keywords" content="keyword1,keyword2,keyword3"><meta http-equiv="description" content="This is my page"><!--<link rel="stylesheet" type="text/css" href="styles.css">--></head><body><form action="${PageContext.request.ContextPath }/items/queryItems.action" method="post"><table border="1"><tr><td><input type="text" name="itemsCustomer.items_name"></td><td><input type="submit" value="搜索商品"></td></tr></table><h3>商品列表</h3><table border="1" width="100%"><tr><td>商品名称</td><td>商品价格</td><td>生成时间</td><td>商品描述</td><td>修改商品</td><td>删除商品</td></tr><c:forEach items="${itemsList}" var="item"><tr><td>${item.items_name }</td><td>${item.items_price }</td><td><fmt:formatDate value="${item.items_creattime }" pattern="yyyy:MM:dd HH:mm:ss"/></td><td>${item.items_detail }</td><td><ahref="${PageContext.request.ContextPath }/items/editItems.action?id=${item.id}">修改</a></td><td><ahref="${PageContext.request.ContextPath }/items/deleteItems.action?id=${item.id}">删除</a></td></tr></c:forEach></table></form></body></html>
【WEB-INF/jsp/items】创建名为“editItems.jsp”的更新商品列表
<%@ page language="java" import="java.util.*" pageEncoding="utf-8"%><%String path = request.getContextPath();String basePath = request.getScheme() + "://"+ request.getServerName() + ":" + request.getServerPort()+ path + "/";%><%@ taglib uri="http://java.sun.com/jstl/fmt" prefix="fmt" %><!DOCTYPE HTML PUBLIC "-//W3C//DTD HTML 4.01 Transitional//EN"><html><head><base href="<%=basePath%>"><title>My JSP 'editItems.jsp' starting page</title><meta http-equiv="pragma" content="no-cache"><meta http-equiv="cache-control" content="no-cache"><meta http-equiv="expires" content="0"><meta http-equiv="keywords" content="keyword1,keyword2,keyword3"><meta http-equiv="description" content="This is my page"><!--<link rel="stylesheet" type="text/css" href="styles.css">--></head><body><form action="${PageContext.request.ContextPath }/items/editItemsSubmit.action" method="post"><input type="hidden" name="id" value="${itemsCustomer.id }"><h3>修改商品信息</h3><table border="1"><tr><td>商品名称</td><td><input type="text" name="items_name" value="${itemsCustomer.items_name }"></td></tr><tr><td>商品价格</td><td><input type="text" name="items_price" value="${itemsCustomer.items_price }"></td></tr><tr><td>生产时间</td><td><input type="text" name="items_creattime" value="<fmt:formatDate value="${itemsCustomer.items_creattime }" pattern="yyyy:MM:dd HH:mm:ss"/>"/></td></tr><tr><td>商品描述</td><td><input type="text" name="items_detail" value="${itemsCustomer.items_detail }"></td></tr></table><input type="submit" value="提交"><input type="reset" value="重置"></form></body></html>
配置Handler
将编写Handler在spring容器加载。
<!-- 配置Handler --><!-- 扫描解决开发中多个Handler的配置 扫描cotroller,指定cotroller的包 --><context:component-scan base-package="cn.ssm.xhchen.controller"></context:component-scan>
配置注解处理器映射器
在classpath下的springmvc.xml中配置处理器映射器
<!-- 注解配置处理器映射器 --><bean class="org.springframework.web.servlet.mvc.method.annotation.RequestMappingHandlerMapping"></bean>
在这里有必要解释一下,在实际开发中一般用以下配置代替处理器映射器和适配器的配置
(必须引入以下约束)
xmlns:mvc="http://www.springframework.org/schema/mvc"http://www.springframework.org/schema/mvchttp://www.springframework.org/schema/mvc/spring-mvc-3.0.xsd<!-- 实际开发中,代替上边处理器映射器和适配器配置 --><mvc:annotation-driven conversion-service="conversionService"/>
配置视图解析器
在classpath下的springmvc.xml中配置jsp视图解析器
<!-- 配置视图解析器 默认jstl标签 --><bean class="org.springframework.web.servlet.view.InternalResourceViewResolver"><!-- 配置访问jsp路径的前缀 --><property name="prefix" value="/WEB-INF/jsp/"></property><!-- 配置访问jsp路径的后缀 --><property name="suffix" value=".jsp"></property></bean>
在视图解析器配置访问jsp路径的前缀和后缀,Handler指定视图不需要再写前缀和后缀

部署调试
访问:http://localhost:8080/


还没有评论,来说两句吧...