MUI框架-12-使用原生底部选项卡(凸出图标案例)
MUI框架-12-使用原生底部选项卡(凸出图标案例)
今天,用 mui 做 app 时,遇到了可能各位都遇到过的头疼问题:底部中间图标凸起,如下图: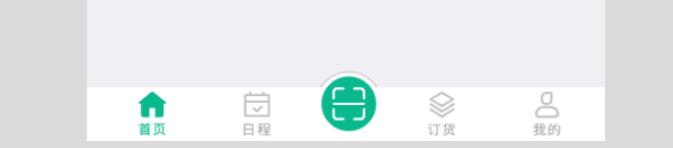
最后有源代码
【提示】:有人问我在 HBuilder 中看不到底部栏,请不要慌,代码没有问题,在模拟器或者真机运行才会有,原生,原生。
1、mainifest.json代码修改如下,主要就是将官方 mui tab 底部凸起案例的字体图标换成了图片:
"launchwebview": {"bottom": "0px","background": "#fff","subNViews": [{"id": "tabBar","styles": {"bottom": "0px","left": "0","height": "50px","width": "100%","backgroundColor": "#fff"},"tags": [{"tag": "img","id": "homeIcon","src": "images/home_nor.png","position": {"top": "4px","left": "10%","width": "25px","height": "40px"}},{"tag": "img","id": "scheduleIcon","src": "images/schedule_nor.png","position": {"top": "4px","left": "30%","width": "25px","height": "40px"}},{"tag": "img","id": "goodsIcon","src": "images/goods_nor.png","position": {"top": "4px","left": "65%","width": "25px","height": "40px"}},{"tag": "img","id": "mineIcon","src": "images/mine_nor.png","position": {"top": "4px","left": "85%","width": "25px","height": "40px"}}]}]}
2、util.js代码修改如下(主要将字体颜色配置都换成了图片,并且将subpages变成了对象数组,增加了id和url字段,这样更加符合实际需求,新增了首页,并且初始化显示第一页):
var util = {options: {ACTIVE_SRC1: "images/home_click.png",NORMAL_SRC1: "images/home_nor.png",ACTIVE_SRC2: "images/schedule_click.png",NORMAL_SRC2: "images/schedule_nor.png",ACTIVE_SRC3: "images/goods_click.png",NORMAL_SRC3: "images/goods_nor.png",ACTIVE_SRC4: "images/mine_click.png",NORMAL_SRC4: "images/mine_nor.png",subpages: [{url : 'pages/home.html',id : 'home'},{url : 'pages/schedule.html',id : 'schedule'},{url : 'pages/goods.html',id : 'goods'},{url : 'pages/mine.html',id : 'mine'},]},/*** 简单封装了绘制原生view控件的方法* 绘制内容支持font(文本,字体图标),图片img , 矩形区域rect*/drawNative: function(id, styles, tags) {var view = new plus.nativeObj.View(id, styles, tags);return view;},/*** 初始化首个tab窗口 和 创建子webview窗口*/initSubpage: function(aniShow) {var subpage_style = {top: 0,bottom: 51},subpages = util.options.subpages,self = plus.webview.currentWebview(),temp = {};//兼容安卓上添加titleNView 和 设置沉浸式模式会遮盖子webview内容if(mui.os.android) {if(plus.navigator.isImmersedStatusbar()) {subpage_style.top += plus.navigator.getStatusbarHeight();}if(self.getTitleNView()) {subpage_style.top += 40;}}// 初始化第一个tab项为首次显示temp[self.id] = "true";mui.extend(aniShow, temp);// 初始化绘制首个tab按钮util.toggleNview(0);//预加载所有子页面for(var i = 0, len = subpages.length; i < len; i++) {if(!plus.webview.getWebviewById(subpages[i].id)) {var sub = plus.webview.create(subpages[i].url, subpages[i].id, subpage_style);//初始化隐藏sub.hide();// append到当前父webviewself.append(sub);}}//初始化显示第一个子页面plus.webview.show(plus.webview.getWebviewById(subpages[0].id));},/*** 点击切换tab窗口*/changeSubpage: function(targetPage, activePage, aniShow) {//若为iOS平台或非首次显示,则直接显示if(mui.os.ios || aniShow[targetPage]) {plus.webview.show(targetPage);} else {//否则,使用fade-in动画,且保存变量var temp = {};temp[targetPage] = "true";mui.extend(aniShow, temp);plus.webview.show(targetPage, "fade-in", 300);}//隐藏当前 除了第一个父窗口if(activePage !== plus.webview.getLaunchWebview()) {plus.webview.hide(activePage);}},/*** 点击重绘底部tab (view控件)*/toggleNview: function(currIndex) {// 重绘当前tag 包括icon和text,所以执行两个重绘操作switch(currIndex){case 0 :util.updateSubNView(0, util.options.ACTIVE_SRC1);util.updateSubNView(1, util.options.NORMAL_SRC2);util.updateSubNView(2, util.options.NORMAL_SRC3);util.updateSubNView(3, util.options.NORMAL_SRC4);break;case 1 :util.updateSubNView(0, util.options.NORMAL_SRC1);util.updateSubNView(1, util.options.ACTIVE_SRC2);util.updateSubNView(2, util.options.NORMAL_SRC3);util.updateSubNView(3, util.options.NORMAL_SRC4);break;case 2 :util.updateSubNView(0, util.options.NORMAL_SRC1);util.updateSubNView(1, util.options.NORMAL_SRC2);util.updateSubNView(2, util.options.ACTIVE_SRC3);util.updateSubNView(3, util.options.NORMAL_SRC4);break;case 3 :util.updateSubNView(0, util.options.NORMAL_SRC1);util.updateSubNView(1, util.options.NORMAL_SRC2);util.updateSubNView(2, util.options.NORMAL_SRC3);util.updateSubNView(3, util.options.ACTIVE_SRC4);break;}},/** 利用 plus.nativeObj.View 提供的 drawBitmap 方法更新 view 控件*/updateSubNView: function(currIndex, src) {var self = plus.webview.currentWebview(),nviewEvent = plus.nativeObj.View.getViewById("tabBar"), // 获取nview控件对象nviewObj = self.getStyle().subNViews[0], // 获取nview对象的属性currTag = nviewObj.tags[currIndex]; // 获取当前需重绘的tagnviewEvent.drawBitmap(src,'',currTag.position, currTag.id);}};
3、index.html代码修改如下(主要将中间凸起的效果有原来的字体图标改成了图片):
<!DOCTYPE html><html><head><meta charset="UTF-8"><meta name="viewport" content="width=device-width,initial-scale=1,minimum-scale=1,maximum-scale=1,user-scalable=no" /><title>首页</title><script src="js/mui.min.js"></script><link href="css/mui.min.css" rel="stylesheet" /><style>html,body {background-color: #efeff4;}.title {margin: 20px 15px 10px;color: #6d6d72;font-size: 15px;padding-bottom: 51px;}</style></head><body><script src="js/util.js"></script><script type="text/javascript">(function() {mui.init({swipeBack: true //启用右滑关闭功能});mui.plusReady(function() {var self = plus.webview.currentWebview(),leftPos = Math.ceil((window.innerWidth - 60) / 2); // 设置凸起大图标为水平居中/*** drawNativeIcon 绘制凸起圆,* 实现原理:* id为bg的tag 创建带边框的圆* id为bg2的tag 创建白色矩形遮住圆下半部分,只显示凸起带边框部分* id为iconBg的红色背景图* id为icon的字体图标* 注意创建先后顺序,创建越晚的层级越高*/var drawNativeIcon = util.drawNative('icon', {bottom: '5px',left: leftPos + 'px',width: '60px',height: '60px'}, [{tag: 'rect',id: 'bg',position: {top: '1px',left: '0px',width: '100%',height: '100%'},rectStyles: {color: '#fff',radius: '50%',borderColor: '#ccc',borderWidth: '1px'}}, {tag: 'rect',id: 'bg2',position: {bottom: '-0.5px',left: '0px',width: '100%',height: '45px'},rectStyles: {color: '#fff'}}, {tag: 'rect',id: 'iconBg',position: {top: '5px',left: '5px',width: '50px',height: '50px'},rectStyles: {color: '#0ab88e',radius: '50%'}}, {tag: 'img',id: 'icon',position: {top: '15px',left: '15px',width: '30px',height: '30px'},src: 'images/icon_scan.png'}]);// 将绘制的凸起 append 到父webview中self.append(drawNativeIcon);//凸起圆的点击事件var active_color = '#fff';drawNativeIcon.addEventListener('click', function(e) {mui.openWindow({id: 'scan',url: 'pages/scan.html'})});// 中间凸起图标绘制及监听点击 完毕// 创建子webview窗口 并初始化var aniShow = {};util.initSubpage(aniShow);//初始化相关参数var nview = plus.nativeObj.View.getViewById('tabBar'),activePage = plus.webview.currentWebview(),targetPage,subpages = util.options.subpages,pageW = window.innerWidth,currIndex = 0;/*** 根据判断view控件点击位置判断切换的tab*/nview.addEventListener('click', function(e) {var clientX = e.clientX;if(clientX >= 0 && clientX <= parseInt(pageW * 0.25)) {currIndex = 0;} else if(clientX > parseInt(pageW * 0.25) && clientX <= parseInt(pageW * 0.45)) {currIndex = 1;} else if(clientX > parseInt(pageW * 0.45) && clientX <= parseInt(pageW * 0.8)) {currIndex = 2;} else {currIndex = 3;}// 匹配对应tab窗口if(plus.webview.getWebviewById(subpages[currIndex].id) == plus.webview.currentWebview()) {return;} else {targetPage = plus.webview.getWebviewById(subpages[currIndex].id);}//底部选项卡切换util.toggleNview(currIndex);// 子页面切换util.changeSubpage(targetPage, activePage, aniShow);//更新当前活跃的页面activePage = targetPage;});});})();</script></body></html>
源码下载地址:
- 地址:https://download.csdn.net/download/qq_40147863/10768519
更多文章:
- 博客园:MUI 框架
- CSDN:MUI 框架


-- volatile关键字解析")


还没有评论,来说两句吧...