Nginx反向代理Docker私有仓库
环境
- 系统:CentOS7
- IP地址:192.168.253.128
- Nginx版本:1.12.2
- Docke版本:18.09.0
安装
第一步:关闭防火墙和selinux
systemctl stop firewalldsetenforce 0
第二步:安装Docker 18.09.0
这里使用yum方式安装,rpm包下载地址为 https://download.docker.com/linux/centos/7/x86_64/stable/Packages/
我已经提前下载好了,这里就直接用了
yum install containerd.io-1.2.0-3.el7.x86_64.rpm \> docker-ce-18.09.0-3.el7.x86_64.rpm \> docker-ce-cli-18.09.0-3.el7.x86_64.rpm -y
第三步:安装Docker私有仓库
yum install -y docker-distribution
第四步:启动Docker与Docker私有仓库
systemctl start dockersystemctl start docker-distribution
先拉取几个基础镜像,等一下用来测试
docker image pull centosdocker image pull busybox
第五步:安装Nginx
Nginx在epel源中,所以先下载epel源,然后再安装nginx
yum install epel-release -yyum install nginx -y
第六步:修改Nginx配置文件并启动nginx
修改配置文件/etc/nginx/nginx.conf 添加下列内容
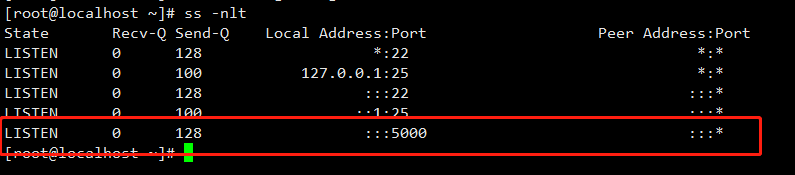
client_max_body_size 0;location / {proxy_pass http://192.168.253.128:5000;proxy_next_upstream error timeout invalid_header http_500 http_502 http_503 http_504;proxy_redirect off;proxy_buffering off;proxy_set_header Host $host;proxy_set_header X-Real-IP $remote_addr;proxy_set_header X-Forwarded-For $proxy_add_x_forwarded_for;}
启动Nginx
systemctl start nginx
第七步:镜像推送到私有的仓库
先给基础镜像打标签
docker image tag docker.io/centos 192.168.253.128:80/centos:v1
推送到代理服务器
[root@localhost ~]# docker image push 192.168.253.128:80/centos:v1The push refers to repository [192.168.253.128:80/centos]Get https://192.168.253.128:80/v2/: http: server gave HTTP response to HTTPS client
这时候出现报错,问题在于推送的协议是http,而本来是要求https协议的。解决方法有2个,将nginx设置ssl连接,或者设置Docker的启动参数,使得允许http协议推送
这里使用第二个方法,设置一下允许http方式推送
(1)修改/etc/docker/daemon.json文件(如果不存在,则创建)
[root@localhost ~]# cat /etc/docker/daemon.json{"insecure-registries" : ["192.168.253.128:80"]}
(2)重启docker
systemctl restart docker
然后再次推送
docker image push 192.168.253.128:80/centos:v1

可以看到成功了
删除本地镜像
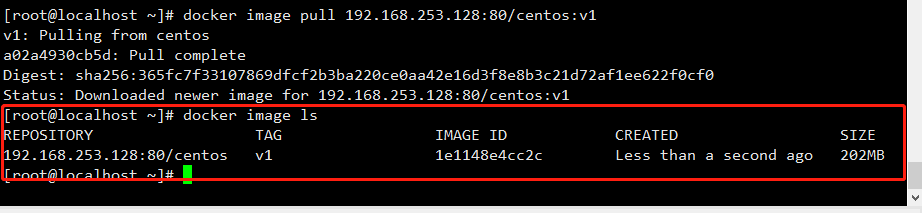
从私有仓库拉取
docker image pull 192.168.253.128:80/centos:v1
参考的官方文档:
https://docs.docker-cn.com/engine/installation/linux/docker-ce/centos/#先决条件
https://docs.docker.com/registry/insecure/#deploy-a-plain-http-registry
https://docs.docker.com/config/daemon/systemd/#httphttps-proxy (如果代理设置失败可以参考这个文档,自己测试的时候发现需要按照这个文档进行proxy相关参数的设置,但是写博客的时候好像不需要也能成功。)


、methods、watch的区别")


还没有评论,来说两句吧...