nacos-springboot配置中心使用
先启动nacos服务
案例如下:
结合springboot,application.properties配置:
nacos.config.server-addr=127.0.0.1:8848
endpoint http://localhost:8080/actuator/nacos-config
health http://localhost:8080/actuator/health
management.endpoints.web.exposure.include=*
management.endpoint.health.show-details=alwayspom配置:
2.0.3.RELEASE
0.2.1
<dependencies><dependency><groupId>org.springframework.boot</groupId><artifactId>spring-boot-starter-web</artifactId><version>${spring-boot.version}</version></dependency><dependency><groupId>org.springframework.boot</groupId><artifactId>spring-boot-starter-actuator</artifactId><version>${spring-boot.version}</version></dependency><dependency><groupId>com.alibaba.boot</groupId><artifactId>nacos-config-spring-boot-starter</artifactId><version>${nacos-config-spring-boot.version}</version></dependency><dependency><groupId>com.alibaba.boot</groupId><artifactId>nacos-config-spring-boot-actuator</artifactId><version>${nacos-config-spring-boot.version}</version></dependency></dependencies>
启动主类:NacosConfigApplication.java
@SpringBootApplication
@NacosPropertySource(dataId = “example”, autoRefreshed = true)
public class NacosConfigApplication {public static void main(String[] args) {SpringApplication.run(NacosConfigApplication.class, args);}
}
测试demo:ConfigController.java
import com.alibaba.nacos.api.annotation.NacosInjected;
import com.alibaba.nacos.api.config.ConfigService;
import com.alibaba.nacos.api.config.annotation.NacosValue;
import com.alibaba.nacos.api.exception.NacosException;
import org.slf4j.Logger;
import org.slf4j.LoggerFactory;
import org.springframework.stereotype.Controller;
import org.springframework.web.bind.annotation.RequestMapping;
import org.springframework.web.bind.annotation.ResponseBody;import static org.springframework.web.bind.annotation.RequestMethod.GET;
@Controller
@RequestMapping(“config”)
public class ConfigController {private static final Logger log = LoggerFactory.getLogger(ConfigController.class);@NacosInjectedConfigService configService;@NacosValue(value = "${useLocalCache:xxx}", autoRefreshed = true)private String useLocalCache;@RequestMapping(value = "/get", method = GET)@ResponseBodypublic String get() {// http://localhost:8080/config/getreturn useLocalCache;}@RequestMapping(value = "/publish", method = GET)@ResponseBodypublic String doPublish() {// http://localhost:8080/config/publishtry {log.info("原始值{}", configService.getConfig("example", "DEFAULT_GROUP", 20000));configService.publishConfig("example", "DEFAULT_GROUP", "useLocalCache=api更改");log.info("更改后的值{}", configService.getConfig("example", "DEFAULT_GROUP", 20000));return "SUCESS";} catch (NacosException e) {e.printStackTrace();return "FALSE";}}
此时我们访问http://localhost:8080/config/get,得到的值是默认值:xxx
- 自定义配置,登陆nacos控制台
 //127.0.0.1:8848/nacos/
在配置列表中,打开dateId为example的配置,编辑。如果没有这个dateId,就点击“+”,自行添加
添加配置:
useLocalCache=ssss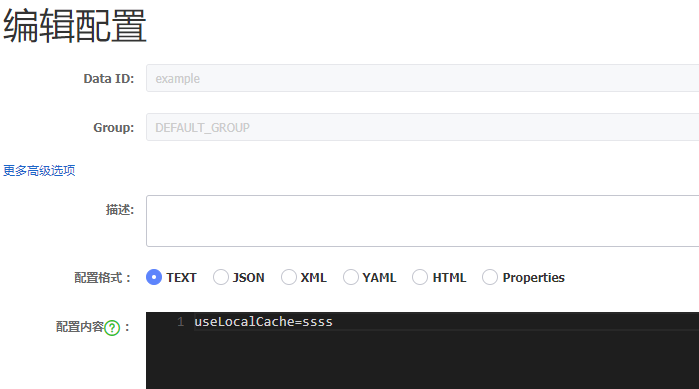
再次访问http://localhost:8080/config/get,得到结果:ssss,配置实时生效。
使用ConfigService,改变控制台的值
代码如上,思路就是使用NacosInjected注解,获取ConfigService,然后利用api更改nacos配置
访问http://localhost:8080/config/publish,刷新控制台,可以看到控制台的值已经变成如下,已经实时更改


")
使用AKShare 做股票数据出来,替换现有每日数据,job相关任务,制作基础镜像使用python3.7-slim-stretch,akshare使用 0.9.65 版本")


还没有评论,来说两句吧...