spring之AOP学习笔记
目录
一、AOP术语
二、代理模式
三、动态代理
四、spring中xml版实现AOP
五、spring中注解版实现AOP
一、AOP术语
连接点(Joinpoint):程序执行的某一个特定位置,如类初始前后,方法的运行前后。而Spring只支持方法的连接点。(拦截一个方法有多个位置,就是有多种选择)
切点(Pointcut):切点可以定位到相应的连接点,一个切点可以定位多个连接点。(定位到已经选择的位置)
增强(Advice):又被称为通知,完成逻辑的增强。(在指定的位置开始做业务逻辑—-做事情)
目标对象(Target):增强逻辑织入的目标类。(在指定位置堵指定的目标对象)
引介(Introduction):特殊的增强,为类添加一些属性和方法。
织入(Weaving): 将增强添加到目标类的具体连接点上的过程。Spring使用动态代理织入。
代理(Proxy):一个类(原类)被织入增强(逻辑)后,就产生一个结果类,称为代理类。
切面(Aspect):由切点和增强组成
Spring AOP->不是标准的完整的AOP
只能在方法的运行前与运行后执行
Spring实现AOP
->JDK本身支持的动态代理(只支持有接口的类)
->CGLIB的动态代理
二、代理模式
代理模式的英文叫做Proxy或Surrogate,中文都可译为”代理“,所谓代理,就是一个人或者一个机构代表另一个人或者另一个机构采取行动。在一些情况下,一个客户不想或者不能够直接引用一个对象,而代理对象可以在客户端和目标对象之间起到中介的作用。
① 抽象主题角色:
声明了真实主题和代理主题的共同接口,这样一来在任何可以使用真实主题的地方都可以是使用代理主题。
② 代理主题(Proxy**)角色:**
代理主题角色内部含有对真实主题的引用,从而可以在任何时候操作真实主题对象;
代理主题角色提供一个与真实主题角色相同的接口,以便可以在任何时候都可以替代真实主题控制对真实主题的引用,负责在需要的时候创建真实主题对象(和删除真实主题对象);
代理角色通常在将客户端调用传递给真实的主题之前或之后(前置增强/通知,后置增强/通知),都要执行某个操作,而不是单纯地将调用传递给真实主题对象。
③ 真实主题角色:
定义了代理角色所代表地真实对象

三、动态代理
新建动态代理类:
package cn.mesmile.dynamic.proxy;import java.lang.reflect.InvocationHandler;import java.lang.reflect.Method;import java.lang.reflect.Proxy;/*** @Created with IDEA* @author: Super Zheng* @Description: 动态代理* @Date:2019/6/6* @Time:17:26*/public class DynamicProxy<T> {/*** @param t 真实主题角色* @return 动态代理角色*/public T getInstance(T t){// 新建事务对象TxManager txManager = new TxManager();/*** ClassLoader loader,类加载器(要操作class字节码文件)* Class<?>[] interfaces,接口(数组)---抽象主题代理角色(数组:代理多个)* InvocationHandler h 处理器*/T proxy = (T) Proxy.newProxyInstance(this.getClass().getClassLoader(), t.getClass().getInterfaces(), new InvocationHandler() {/*** 确定咋们要做的事是什么* @param proxy 代理对象* @param method 执行的方法* @param args 方法中的参数* @return* @throws Throwable*/@Overridepublic Object invoke(Object proxy, Method method, Object[] args) throws Throwable {Object invoke = null;try {// 开始事务txManager.begin();// 执行真实对象的方法invoke = method.invoke(t, args);// 提交事务txManager.commit();} catch (Exception e) {// 回滚事务txManager.rollback();e.printStackTrace();} finally {// 关闭事务txManager.close();}return invoke;}});return proxy;}}
新建接口类:
package cn.mesmile.dynamic.proxy;/*** @Created with IDEA* @author: Super Zheng* @Description: 接口类* @Date:2019/6/6* @Time:17:29*/public interface IUserService {/*** 保存方法*/void save();}
新建实现类:
package cn.mesmile.dynamic.proxy;/*** @Created with IDEA* @author: Super Zheng* @Description: 实现类* @Date:2019/6/6* @Time:17:29*/public class UserServiceImpl implements IUserService {@Overridepublic void save() {System.out.println("执行保存方法");}}
新建模拟事务类:
package cn.mesmile.dynamic.proxy;/*** @Created with IDEA* @author: Super Zheng* @Description: 模拟事务类* @Date:2019/6/6* @Time:17:30*/public class TxManager {public void begin(){System.out.println("开始事务");}public void commit(){System.out.println("提交事务");}public void rollback(){System.out.println("回滚事务");}public void close(){System.out.println("关闭事务");}}
新建测试类:
package cn.mesmile.dynamic.proxy;import org.junit.Test;import java.lang.reflect.InvocationHandler;import java.lang.reflect.InvocationTargetException;import java.lang.reflect.Method;import java.lang.reflect.Proxy;/*** @Created with IDEA* @author: Super Zheng* @Description: 测试类* @Date:2019/6/6* @Time:17:52*/public class ProxyTest {@Testpublic void test() throws Exception{// 新建真实对象IUserService userService = new UserServiceImpl();DynamicProxy<IUserService> dynamicProxy = new DynamicProxy<>();// 传入真实对象,获得代理对象IUserService proxy = dynamicProxy.getInstance(userService);System.out.println(proxy);System.out.println(proxy.getClass());proxy.save();}}
动态代理测试结果:

四、spring中xml版实现AOP
使用springAOP,配置的时候一定要记住三个要素:何时,何地,做什么事
何时:在执行方法之前/之后/有异常…
何地:在哪些包中的哪些类的哪些方法上面执行
做什么事: 在UserServie中执行update方法之前添加日志
1.导入jar包
<!-- https://mvnrepository.com/artifact/org.springframework/spring-context --><dependency><groupId>org.springframework</groupId><artifactId>spring-context</artifactId><version>5.1.1.RELEASE</version></dependency><!-- https://mvnrepository.com/artifact/org.springframework/spring-test --><dependency><groupId>org.springframework</groupId><artifactId>spring-test</artifactId><version>5.1.1.RELEASE</version><scope>test</scope></dependency><dependency><groupId>junit</groupId><artifactId>junit</artifactId><version>4.12</version></dependency><!-- https://mvnrepository.com/artifact/org.aspectj/aspectjweaver --><dependency><groupId>org.aspectj</groupId><artifactId>aspectjweaver</artifactId><version>1.9.1</version></dependency>
2.创建一个接口类

3.创建接口的实现类
4.创建一个模拟的事务类

5.在recourses资源文件夹下创建xml文件,springContext-aop.xml
<?xml version="1.0" encoding="UTF-8"?><beans xmlns="http://www.springframework.org/schema/beans"xmlns:aop="http://www.springframework.org/schema/aop"xmlns:xsi="http://www.w3.org/2001/XMLSchema-instance"xsi:schemaLocation="http://www.springframework.org/schema/beanshttp://www.springframework.org/schema/beans/spring-beans.xsdhttp://www.springframework.org/schema/aophttp://www.springframework.org/schema/aop/spring-aop.xsd"><bean id="studentService" class="cn.mesmile.xml.aop.StudentServiceImpl"></bean><bean id="txManager" class="cn.mesmile.xml.aop.TxManager"></bean><!--何时,何地,做什么事--><aop:config><!--配置:切点确定是哪些类的哪些方法execution(* cn.mesmile.xml.aop.I*Service.*(..))execution:表达式*:任意返回值cn.mesmile.xml.aop 包名*:所有类*:所有方法(..):传入方法的任意参数--><aop:pointcut id="pointcut" expression="execution(* cn.mesmile.xml.aop.I*Service.*(..))"/><!--切面(由切点和增强组成),同时引入需要在切面调用方法的对象--><aop:aspect ref="txManager" ><!--在调用方法之前,调用begin这个方法--><aop:before method="begin" pointcut-ref="pointcut"/><!--在正常执行方法后调用commit方法--><aop:after-returning method="commit" pointcut-ref="pointcut"/><!--在调用方法出现异常后,调用rollback方法 若需要显示异常,则配置throwing,值必须和方法传入的参数一致--><aop:after-throwing method="rollback" pointcut-ref="pointcut" throwing="e"/><!--在调用方法之后,调用close这个方法--><aop:after method="close" pointcut-ref="pointcut"/></aop:aspect></aop:config></beans>
6.测试

xml中aop通知方式:环绕通知

最终测试结果和单独配置增强的效果是一致的;
五、spring中注解版实现AOP
1.新建模拟事务类
@Component@Aspectpublic class TxManager {@Pointcut("execution(* cn.mesmile.aop.I*Service.*(..))")public void pointcut(){}@Before("pointcut()")public void begin(){System.out.println("开始事务");}@AfterReturning("pointcut()")public void commit(){System.out.println("提交事务");}@AfterThrowing(value = "pointcut()",throwing = "e")public void rollback(Throwable e){System.out.println("回滚事务"+e.getMessage());}@After("pointcut()")public void close(){System.out.println("关闭事务");}}
2.新建接口类
public interface IStudentService {/*** 保存方法*/void save();}
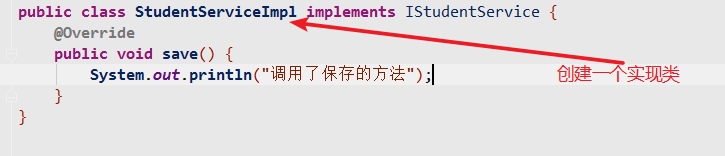
3.新建实现类
@Servicepublic class StudentServiceImpl implements IStudentService {@Overridepublic void save() {System.out.println("调用了保存的方法");}}
4.新建一个spring配置文件springContext-aop.xml
<?xml version="1.0" encoding="UTF-8"?><beans xmlns="http://www.springframework.org/schema/beans"xmlns:aop="http://www.springframework.org/schema/aop"xmlns:xsi="http://www.w3.org/2001/XMLSchema-instance"xmlns:context="http://www.springframework.org/schema/context"xsi:schemaLocation="http://www.springframework.org/schema/beanshttp://www.springframework.org/schema/beans/spring-beans.xsdhttp://www.springframework.org/schema/aophttp://www.springframework.org/schema/aop/spring-aop.xsd http://www.springframework.org/schema/context http://www.springframework.org/schema/context/spring-context.xsd"><!--扫描包--><context:component-scan base-package="cn.mesmile.aop"/><!--让spring aop 支持注解--><aop:aspectj-autoproxy/></beans>
5.测试

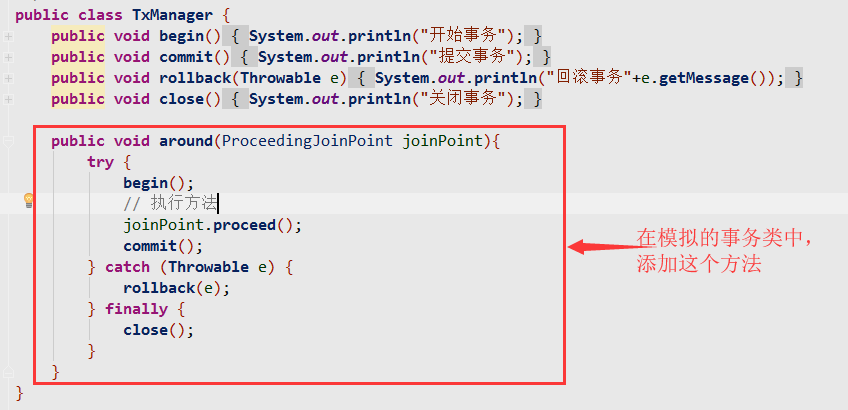
注解的方式二:环绕注解配置
1.修改模拟的事务类,添加一个环绕方法,加上环绕注解,同时将其它通知注解注释
package cn.mesmile.aop;import org.aspectj.lang.ProceedingJoinPoint;import org.aspectj.lang.annotation.*;import org.springframework.stereotype.Component;/*** @Created with IDEA* @author: Super Zheng* @Description: java类作用描述* @Date:2019/6/6* @Time:22:34*/@Component@Aspectpublic class TxManager {@Pointcut("execution(* cn.mesmile.aop.I*Service.*(..))")public void pointcut(){}// @Before("pointcut()")public void begin(){System.out.println("开始事务");}// @AfterReturning("pointcut()")public void commit(){System.out.println("提交事务");}// @AfterThrowing(value = "pointcut()",throwing = "e")public void rollback(Throwable e){System.out.println("回滚事务"+e.getMessage());}// @After("pointcut()")public void close(){System.out.println("关闭事务");}@Around("pointcut()")public void around(ProceedingJoinPoint joinPoint){try {begin();// 执行方法joinPoint.proceed();commit();} catch (Throwable e) {rollback(e);} finally {close();}}}
2.最终测试环绕通知注解结果和单独配置注解增强通知的效果是一致的;


")


还没有评论,来说两句吧...