dubbo入门教程-从零搭建dubbo服务
【原创 转载请注明出处】
本文是学习了dubbo之后自己手动写的,比较通俗,很多都是自己学习之后的理解,写的过程中没有参考任何文章。
另外dubbo也有官方文档,但是比较官方,也可以多看看dubbo的官方中文文档。
代码示例连接:dubbodemo
一、dubbo的相关概念
dubbo是阿里的一个分布式服务开源框架,它的设计理念就是把一个大而全的项目模块化,每个模块都是一个独立的项目。
为什么要把大项目拆分成多个小项目呢?
因为随着项目越做越大,代码、功能越来越多,导致代码的复用性就会降低,项目变得庞大臃肿,维护起来比较麻烦,改一个功能所有的代码都需要重新打包发布,还可能会影响其他模块;对于开发者来说所有的开发者都在同一个项目里开发代码,虽然有版本管理软件(SVN,Git等),但即使这样也会使开发者开发时遇到许多问题。
所以就诞生了分布式,分布式的原则就是将项目拆分若干个小项目,实现模块化,每个项目只关注自己的功能(假如按功能划分模块),需要其他模块的数据时就去调用它,分工更加明确。dubbo就是一个基于spring的分布式框架,可以和spring无缝整合。
那么模块之间该如何调用呢?
我们称服务提供者为服务生产者,服务调用者为服务消费者,他们两个是如何通信呢?消费者如何找到生产者呢?显然是通过网络,通过网络就必须要遵循一定的协议,约定,也就时需要有一个第三者或叫中间人、中介,称为注册中心,他来定义通讯的协议、规则。服务生产者和服务消费者二者必须都来遵循这个规则。
服务生产者在启动程序时把服务发布到注册中心,告诉注册中心他叫啥,他提供的服务的类型,他的IP和端口就行了,而服务消费者在启动程序时也去连接注册中心,告诉注册中心他叫啥,告诉注册中心他想要什么类型的服务。对于服务提供方和服务消费方来说,他们还有可能兼具这两种角色,即既需要提供服务,有需要消费服务。
具体怎么实现调用呢?在项目里的表现如何?
模块之间要想调用,提供服务方需要创建服务接口,打成jar包,发布这个jar包,服务提供者面向接口编程,服务消费者调用服务时也用这个服务接口的jar包,创建服务接口的实例。
为什么要创建服务接口并发布成jar包?因为服务的提供方和服务的调用方都要用到这个接口。服务消费者要使用这个服务,需要获得服务的实例(只关心服务的类型)来调用服务提供的方法,而服务的提供者也只需要实现接口就可以了。
有了协议为什么还用dubbo?
那我们直接遵循协议,去和注册中心打交道不就行了吗,为什么还产生了dubbo呢?
毕竟有需求就有市场,归根结底还是因为我们懒。因为所有的人都要遵循这个协议,怎么连接网络,怎么传参数,格式如何等这些工作都是重复性的,是所有项目共性的,每次都写不就很麻烦吗,所以dubbo来帮你实现,来帮你完成这些共性的、繁琐的工作,你只需要关注业务本身就行了,那些麻烦的协议dubbo来帮你遵循,所以就产生了dubbo,并且可能他做的这些工作比你自己写起来更高效比你写的代码好。
服务的管理
当项目越来越大,模块、服务越来越多,一个项目可能会调用很多服务,或者服务之间相互调用,这个时候你可能就不知道你这个服务调用了哪些服务或都被谁调用了,性能如何等,并且管理起来比较麻烦,别担心,有服务治理中心可以帮你解决这些问题。它是dubbo的一个后台监控系统,叫dubbo-admin,可以下载他的war包运行在web容器里就可以用了。
二、使用dubbo框架来完成一个小demo
我们用idea+spring+maven+zookeeper+JDK 8,来搭建dubbo项目
前提是你安装好zookeeper,idea安装maven插件(也可以用其他IDE,过程类似)。
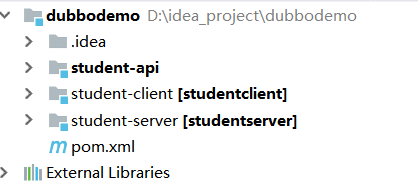
先说一下搭建的整体思路,是在idea里创建一个maven project,然后在这个project里创建三个model,分别是定义api接口的(将来发布到maven仓库),实现api的(服务提供者)以及服务消费者。
1、创建project
在idea里【file】-【new】-【project】
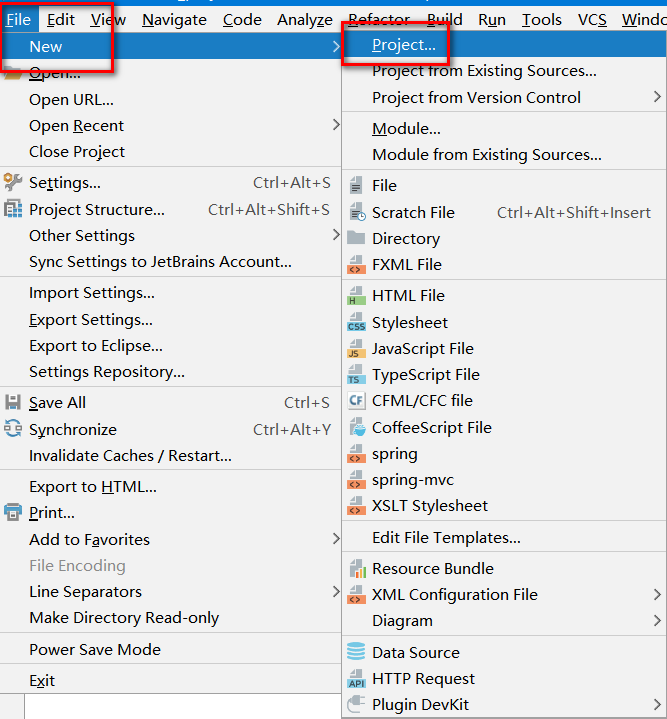
然后按下图选择

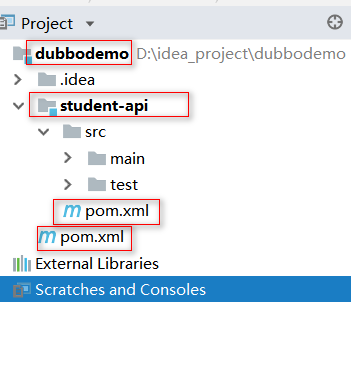
填写完相关信息后一路Next就好了,然后在这个project上右键【new】-【model】,创建为student-api,然后一路next后项目结构就是这样的
2、编写api接口
创建完project和第一个model之后,在student-api编写我们的接口。我们创建一些实体类和接口。
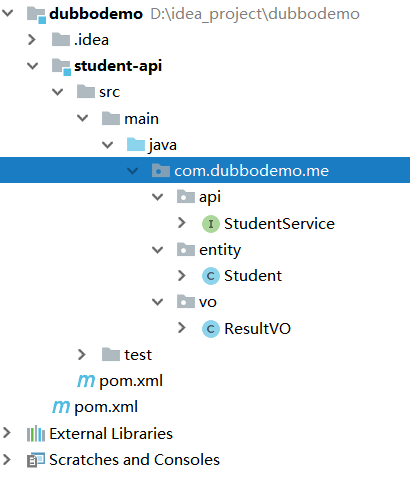
具体代码:


public interface StudentService{ResultVO<Student> getStudentByName(String name);}
StudentService:
public class Student implements Serializable{private String name;private String sex;private int age;public Student() {}public Student(String name, String sex, int age) {this.name = name;this.sex = sex;this.age = age;}public String getName() {return name;}public void setName(String name) {this.name = name;}public String getSex() {return sex;}public void setSex(String sex) {this.sex = sex;}public int getAge() {return age;}public void setAge(int age) {this.age = age;}}
Student
public class ResultVO<T> implements Serializable{private T data;private String msg;private String status;public ResultVO() {}public ResultVO(T data, String msg, String status) {this.data = data;this.msg = msg;this.status = status;}public T getData() {return data;}public void setData(T data) {this.data = data;}public String getMsg() {return msg;}public void setMsg(String msg) {this.msg = msg;}public String getStatus() {return status;}public void setStatus(String status) {this.status = status;}}
ResultVO
3、api打包
我们在第2步写了一个简单的接口,和一些实体类,这一步我们需要将api整个项目打包,安装到本地maven仓库。因为服务提供者和消费者都依赖这个api项目。具体操作如下
选中student-api右键【maven】-【install -e】

这一步操作的前提是,你的IDE安装了maven插件,如果没安装,右键是没有【maven】选项的,具体怎么安装这里不讲。
install -e是执行maven的命令,此操作会将项目打包并安装到maven本地仓库,-e是会在idea控制台打日志。
执行命令后过一会查看控制台
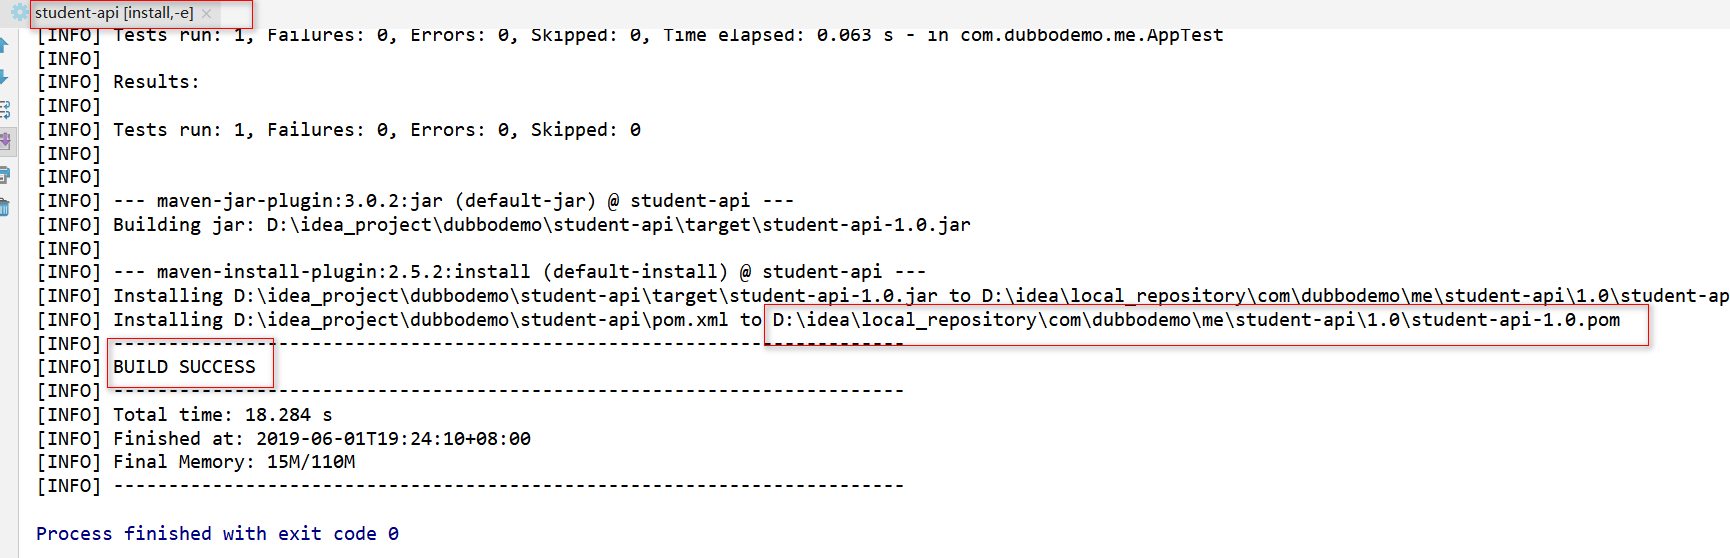
就是成功了,安装目录页告诉我们了。我们去对应目录验证下,已经有了。样我们就可以像以往引用别人的依赖那样引用我们自己的api了

4、创建服务提供者
这个时候我们就可以创建服务提供者了,同样像创建student-api那样创建服务提供者命名为student-server
只不过,在选择时我们将它创建为webapp,因为这是一个spring web项目

5、引入依赖
在project(父项目,即最外层的那个)的pom.xml里引入dubbo和zkClient的依赖,因为服务提供者和消费者都需要这个依赖,所以写在父项目里。
<!--spring web--><dependency><groupId>org.springframework</groupId><artifactId>spring-webmvc</artifactId><version>4.3.13.RELEASE</version></dependency><dependency><groupId>junit</groupId><artifactId>junit</artifactId><version>4.9</version></dependency><!--引入dubbo--><dependency><groupId>com.alibaba</groupId><artifactId>dubbo</artifactId><version>2.5.4</version></dependency><!--引入zookeeper--><dependency><groupId>com.github.sgroschupf</groupId><artifactId>zkclient</artifactId><version>0.1</version><exclusions><exclusion><artifactId>junit</artifactId><groupId>junit</groupId></exclusion><exclusion><artifactId>log4j</artifactId><groupId>log4j</groupId></exclusion></exclusions></dependency><dependency><groupId>log4j</groupId><artifactId>log4j</artifactId><version>1.2.17</version></dependency><!--json数据转换--><dependency><groupId>com.fasterxml.jackson.core</groupId><artifactId>jackson-databind</artifactId><version>2.9.8</version></dependency>
pom依赖
引入student-api的依赖
<dependency><groupId>com.dubbodemo.me</groupId><artifactId>student-api</artifactId><version>1.0</version></dependency>
6、实现服务
在student-server项目里实现StudentService接口
@Servicepublic class StudentServiceImpl implements StudentService{@Overridepublic ResultVO<Student> getStudentByName(String name) {Student student = new Student(name,"m",24);ResultVO<Student> studentResultVO = new ResultVO<Student>(student,"success","1");return studentResultVO;}}
StudentServiceImpl
7、创建消费者
服务提供者已经写好,接下来我们写服务消费者。和student-server创建方式一样,只不过命名为student-client
在这个项目里就不用引入dubbo的依赖了,因为我们已经把依赖放到父项目里了,各个model都能引用
此时项目都创建完了,看看结构
然后我们在student-client里调用服务,我们写一个控制层StudentController.java
@Controllerpublic class StudentController{Logger logger = Logger.getLogger(StudentController.class);@Resourceprivate StudentService studentService;@ResponseBody@RequestMapping("/getData")public ResultVO<Student> getData(String name){ResultVO<Student> studentByName = studentService.getStudentByName(name);Student student = studentByName.getData();logger.info("+++++++++返回码是:"+studentByName.getStatus()+" name:"+student.getName()+" resultSet:"+student.getSex());return studentByName;}}
StudentController
至此,我们的代码已经全部写完了,接下来就是把服务提供者和服务消费者都启动,来验证一下。
8、配置
你会发现直到我们把代码都写完了,还没用到有关dubbo的东西呢,没错,dubbo的关键是配置。
首先需要明确的是,student-server和student-client会以web项目启动,而student-client还要用到Spring MVC。
我们先来配置student-server,在resources下创建ApplicationContext.xml为什么是ApplicationContext.xml?因为服务提供者只用到了spring,现在是提供服务没有mvc)
<?xml version="1.0" encoding="UTF-8"?><beans xmlns="http://www.springframework.org/schema/beans"xmlns:xsi="http://www.w3.org/2001/XMLSchema-instance"xmlns:context="http://www.springframework.org/schema/context"xmlns:dubbo="http://code.alibabatech.com/schema/dubbo"xsi:schemaLocation="http://www.springframework.org/schema/beanshttp://www.springframework.org/schema/beans/spring-beans-4.2.xsdhttp://www.springframework.org/schema/contexthttp://www.springframework.org/schema/context/spring-context-4.2.xsd http://code.alibabatech.com/schema/dubbo http://code.alibabatech.com/schema/dubbo/dubbo.xsd"><!--开启注解--><context:annotation-config/><!--扫描注解--><context:component-scan base-package="com.dubbodemo.me.service"/><!--dubbo可以和spring无缝整合--><!--配置目的:找到注册中心,告诉注册中心,是谁在向它注册,IP是多少,提供服务的端口是多少--><!--1、配置别名,目的是在后台好区分到底是谁, name 可以随便写,最好语义化--><dubbo:application name="student-server"/><!--2、注册服务, zookeeper 注册中心; address 注册中心的地址;protocol 注册中心的协议--><dubbo:registry protocol="zookeeper" address="127.0.0.1:2181"/><!--3、告诉注册中心我要提供的服务 interface 代表发布的服务的类型 ref代表要发布的是哪个服务(具体的实现) timeout超时时间--><dubbo:service interface="com.dubbodemo.me.api.StudentService" ref="studentServiceImpl" timeout="6000"/><!--4、配置服务的端口,因为消费者必须通过IP+端口才能访问我的服务,我们在注册中心注册时注册中心就已经知道我们的IP了,所以现在只需要告诉他端口 端口可以随便写,前提不可被其他程序占用。一个dubbo被发布时必须独占一个端口--><dubbo:protocol name="dubbo" port="12003"/></beans>
ApplicationContext.xml
服务提供者配置完了,我们再来配置消费者,在student-client的resources下创建spring-mvc.xml(为什么是spring-mvc.xml?因为服务消费者我们用的是spring mvc,到时候访问controller验证服务调用)
<?xml version="1.0" encoding="UTF-8"?><beans xmlns="http://www.springframework.org/schema/beans"xmlns:mvc="http://www.springframework.org/schema/mvc" xmlns:xsi="http://www.w3.org/2001/XMLSchema-instance"xmlns:p="http://www.springframework.org/schema/p" xmlns:context="http://www.springframework.org/schema/context"xmlns:dubbo="http://code.alibabatech.com/schema/dubbo"xsi:schemaLocation="http://www.springframework.org/schema/beanshttp://www.springframework.org/schema/beans/spring-beans-4.2.xsdhttp://www.springframework.org/schema/contexthttp://www.springframework.org/schema/context/spring-context-4.2.xsdhttp://www.springframework.org/schema/mvc http://www.springframework.org/schema/mvc/spring-mvc-4.2.xsd http://code.alibabatech.com/schema/dubbo http://code.alibabatech.com/schema/dubbo/dubbo.xsd"><!--开启注解--><context:annotation-config/><!--扫描路径--><context:component-scan base-package="com.dubbodemo.me.controller"/><!--1、配置别名,目的是在后台好区分到底是谁, name 可以随便写,最好语义化--><dubbo:application name="student-client"/><!--2找到注册中心--><dubbo:registry address="127.0.0.1:2181" protocol="zookeeper" /><!--3告诉注册中心你要什么 id可以随便写--><dubbo:reference interface="com.dubbodemo.me.api.StudentService" id="studentServiceImpl"/><!--因为我是消费者,不提供服务,所以不用配置端口 当我也是服务提供者时需要配置--><!--json转换 我们将实体类直接返回 它会帮我们转成json--><mvc:annotation-driven /><mvc:annotation-driven><mvc:message-converters><bean class="org.springframework.http.converter.StringHttpMessageConverter"/><bean class="org.springframework.http.converter.json.MappingJackson2HttpMessageConverter"><property name="objectMapper"><bean class="com.fasterxml.jackson.databind.ObjectMapper"><property name="dateFormat"><bean class="java.text.SimpleDateFormat"><constructor-arg type="java.lang.String" value="yyyy-MM-dd" /></bean></property></bean></property></bean></mvc:message-converters></mvc:annotation-driven></beans>
spring-mvc.xml
student-server的web.xml配置:读取spring配置文件,加载spring
<?xml version="1.0" encoding="UTF-8"?><web-app xmlns="http://xmlns.jcp.org/xml/ns/javaee"xmlns:xsi="http://www.w3.org/2001/XMLSchema-instance"xsi:schemaLocation="http://xmlns.jcp.org/xml/ns/javaee http://xmlns.jcp.org/xml/ns/javaee/web-app_4_0.xsd"version="4.0"><filter><filter-name>encodingFilter</filter-name><filter-class>org.springframework.web.filter.CharacterEncodingFilter</filter-class><!-- <async-supported>true</async-supported> --><init-param><param-name>encoding</param-name><param-value>UTF-8</param-value></init-param><init-param><param-name>forceEncoding</param-name><param-value>true</param-value></init-param></filter><filter-mapping><filter-name>encodingFilter</filter-name><url-pattern>/*</url-pattern></filter-mapping><context-param><param-name>contextConfigLocation</param-name><param-value>classpath:ApplicationContext.xml</param-value></context-param><listener><listener-class>org.springframework.web.context.ContextLoaderListener</listener-class></listener></web-app>
web.xml
student-client的web.xml配置: 读取spring配置文件,加载spring mvc模块
<?xml version="1.0" encoding="UTF-8"?><web-app xmlns="http://xmlns.jcp.org/xml/ns/javaee"xmlns:xsi="http://www.w3.org/2001/XMLSchema-instance"xsi:schemaLocation="http://xmlns.jcp.org/xml/ns/javaee http://xmlns.jcp.org/xml/ns/javaee/web-app_4_0.xsd"version="4.0"><filter><filter-name>encodingFilter</filter-name><filter-class>org.springframework.web.filter.CharacterEncodingFilter</filter-class><!-- <async-supported>true</async-supported> --><init-param><param-name>encoding</param-name><param-value>UTF-8</param-value></init-param><init-param><param-name>forceEncoding</param-name><param-value>true</param-value></init-param></filter><filter-mapping><filter-name>encodingFilter</filter-name><url-pattern>/*</url-pattern></filter-mapping><servlet><servlet-name>springMVC</servlet-name><servlet-class>org.springframework.web.servlet.DispatcherServlet</servlet-class><init-param><param-name>contextConfigLocation</param-name><param-value>classpath:spring-mvc.xml</param-value></init-param><!--启动项目时就创建这个servlet对象,这个参数必须在init-param之后出现--><load-on-startup>2</load-on-startup></servlet><servlet-mapping><servlet-name>springMVC</servlet-name><url-pattern>/</url-pattern></servlet-mapping></web-app>
web.xml
9、验证
验证之前,我们先启动zookeeper
然后再依次启动student-server项目和student-client项目
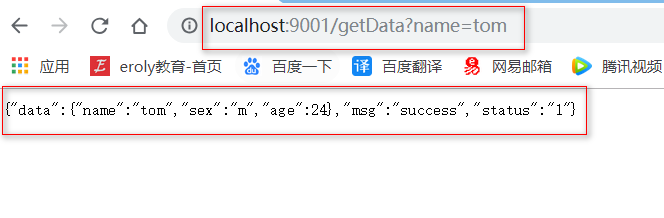
启动完成后,访问student-client的接口localhost:9001/getData?name=tom
控制台日志

调用成功了。本教程源码已经上传到GitHub上了,传送门
题外话:为什么两个web项目的web.xml配置不一样?
student-client里的controller是交给SpringMVC来处理,并不是spring容器。若交给spring容器来处理,代表项目一启动就要创建出来controller,这个时候可能还没有链接网络(没连zookeeper)可能还拿不到远程对象,就会注入失败,所以不能交给spring容器来处理。
转载于 //www.cnblogs.com/ibigboy/p/10954791.html


")


还没有评论,来说两句吧...