spring security——用户认证流程(二)
一、用户认证逻辑
在自定义用户认证逻辑中我们需要完成的内容有:
- 处理用户信息获取逻辑
- 处理用户校验逻辑
- 处理密码加密解密
1、处理用户信息获取逻辑(UserDetailsService)
org.springframework.security.core.userdetails.UserDetailsService
UserDetailsService接口用于加载用户特定的数据,它在整个框架中作为用户DAO使用,是验证提供者使用的策略。 该接口只需要一个只读方法,这简化了对新的数据访问策略的支持。实现一个自定义的UserDetailsService
// 自定义数据源来获取数据// 这里只要是存在一个自定义的 UserDetailsService ,那么security将会使用该实例进行配置@Componentpublic class MyUserDetailsService implements UserDetailsService {Logger logger = LoggerFactory.getLogger(getClass());// 可以从任何地方获取数据@Overridepublic UserDetails loadUserByUsername(String username) throws UsernameNotFoundException {// 根据用户名查找用户信息logger.info("登录用户名", username);// 写死一个密码,赋予一个admin权限return new User(username, "123456",AuthorityUtils.commaSeparatedStringToAuthorityList("admin"));}}
这样就能让自定义的UserdetailsService生效了。但是在浏览器中登录的时候,后台报错了
java.lang.IllegalArgumentException: There is no PasswordEncoder mapped for the id "null"
这个异常是spring security5+后密码策略变更了。必须使用 PasswordEncoder 方式,也就是你存储密码的时候需要使用{noop}123456这样的方式。这个在官网文档中有讲到,花括号里面的是encoder id ,这个支持的全部列表在以下的方法中定义
org.springframework.security.crypto.factory.PasswordEncoderFactories#createDelegatingPasswordEncoder
noop 对应的处理类是org.springframework.security.crypto.password.NoOpPasswordEncoder,只用于测试,因为没有做任何加密功能。
2、处理用户校验逻辑(UserDetails)
自定义的其他逻辑是在 org.springframework.security.core.userdetails.User 中提供的,只要在登录的时候把user中提供的信息返回即可达到支持的业务逻辑,下面列出支持的业务场景:
- isEnabled 账户是否启用
- isAccountNonExpired 账户没有过期
- isCredentialsNonExpired 身份认证是否是有效的
- isAccountNonLocked 账户没有被锁定
对于 isAccountNonLocked 和 isEnabled 没有做业务处理,只是抛出了对于的异常信息;
// 这里的几个布尔值的含义对应上面列出来的顺序User admin = new User(username, "{noop}123456",true, true, true, false,AuthorityUtils.commaSeparatedStringToAuthorityList("admin"));
3、处理密码加密解密(PasswordEncoder)
密码加密解密是使用了下面这个类org.springframework.security.crypto.password.PasswordEncoder
配置只需要提供一个实例即可,会自动使用该实例
@Configurationpublic class BrowserSecurityConfig extends WebSecurityConfigurerAdapter {@Beanpublic PasswordEncoder passwordEncoder() {return new BCryptPasswordEncoder();}
在UserDetailsService中需要模拟存入数据库中的密码就是加密后的字符串
@Componentpublic class MyUserDetailsService implements UserDetailsService {Logger logger = LoggerFactory.getLogger(getClass());@Autowiredprivate PasswordEncoder passwordEncoder;@Overridepublic UserDetails loadUserByUsername(String username) throws UsernameNotFoundException {logger.info("登录用户名:{}", username);String password = passwordEncoder.encode("123456");logger.info("数据库密码{}", password);User admin = new User(username,// "{noop}123456",password,true, true, true, true,AuthorityUtils.commaSeparatedStringToAuthorityList("admin"));}}
其框架会把提交的密码使用我们定义的passwordEncode加密后调用org.springframework.security.crypto.password.PasswordEncoder#matches方法,与 返回的User中的密码进行比对。配对正常就验证通过。
二、自定义登录
上面使用spring security默认的认证流程。处理了自定义的用户数据,密码加密等。但是在实际开发中,肯定是要使用自己开发的页面、登录成功失败的业务处理等。
1、自定义登录页面
我们在自定义的WebSecurityConfig中修改配置如下:protected void configure(HttpSecurity http) throws Exception {http// 定义表单登录 - 身份认证的方式.formLogin().loginPage("/tin-signIn.html").and().authorizeRequests()// 放行这个路径.antMatchers("/tin-signIn.html").permitAll()}
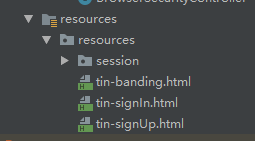
如果不对该静态文件放行的话,将会无限跳转,造成错误:”localhost 将您重定向的次数过多”。关于html存放资源文件夹下的哪一个目录,这个有点懵,开始放在static下面访问不到,最后放到resources下面才对(因为我的项目没有整合Thymeleaf,spring boot的默认静态文件路径应该是下面的)
html内容如下
<body><h2>标准登录页面</h2><form action="/authentication/form" method="post"><table><tr><td>用户名:</td><td><input type="text" name="username"></td></tr><tr><td>密码:</td><td><input type="password" name="password"></td></tr><tr><td colspan="2"><button type="submit">登录</button></td></tr></table></form></body>
注意这里的路径:acrion=”/authentication/form”,路径是自定义的,而UsernamePasswordAuthenticationFilter 默认是处理/login路径的登录请求
public UsernamePasswordAuthenticationFilter() {super(new AntPathRequestMatcher("/login", "POST"));}
这里我们自定义如下:
.formLogin().loginPage("/tin-signIn.html")// 处理登录请求路径,像是对security默认/login路径的重命名.loginProcessingUrl("/authentication/form").and().authorizeRequests().antMatchers("/tin-signIn.html").permitAll().and().csrf().disable();//不加出现_csrf的错误情况,跳回登录页面
2、处理不同类型的请求
上面虽然配置了自定义的路径,但是都统一跳转到了静态页面,那么要怎么实现 根据请求来分发是返回html内容?还是返回json内容呢?在前后分离的情况下,都用ajax来请求,肯定不能返回html了。

思路是上面图中这样。那么很简单只要把登录地址换成自定义的就好了。
.formLogin()//.loginPage("/tin-signIn.html")// 更换成自定义的一个真实存在的处理器地址.loginPage("/authentication/require")
编写处理请求的处理器
@RestController@Slf4jpublic class BrowserSecurityController {// 封装了引发跳转请求的工具类,看实现类应该是从session中获取的private RequestCache requestCache = new HttpSessionRequestCache();// spring的工具类:封装了所有跳转行为策略类private RedirectStrategy redirectStrategy = new DefaultRedirectStrategy();/*** 当需要身份认证时跳转到这里*/@RequestMapping("/authentication/require")@ResponseStatus(code = HttpStatus.UNAUTHORIZED)public SimpleResponse requirAuthentication(HttpServletRequest request, HttpServletResponse response) throws IOException {SavedRequest savedRequest = requestCache.getRequest(request, response);// 如果有引发认证的请求// spring 在跳转前应该会把信息存放在某个地方?if (savedRequest != null) {String targetUrl = savedRequest.getRedirectUrl();logger.info("引发跳转的请求:" + targetUrl);// 如果是html请求,则跳转到登录页if (StringUtils.endsWithIgnoreCase(targetUrl, ".html")) {redirectStrategy.sendRedirect(request, response, "/tin-signIn.html");}}// 否则都返回需要认证的json串return new SimpleResponse("访问的服务需要身份认证,请引导用户到登录页");}}
SimpleResponse 类只是一个返回结果的信息类。
3、登录成功处理
security 默认的登录成功处理是跳转到需要授权之前访问的url。而在一些场景下:比如前后分离,登录是通过ajax访问,没有办法处理301跳转。而是登录成功则返回相关的数据即可。自定义入口还是在表单登录处配置的http// 定义表单登录 - 身份认证的方式.formLogin().loginPage("/authentication/require").loginProcessingUrl("/authentication/form").successHandler(myAuthenticationSuccessHandler)
myAuthenticationSuccessHandler 的编写如下:
/*** formLogin().successHandler() 中需要的处理器类型*/@Component("myAuthenticationSuccessHandler")public class MyAuthenticationSuccessHandler implements AuthenticationSuccessHandler {private org.slf4j.Logger logger = LoggerFactory.getLogger(getClass());// spring 是使用jackson来进行处理返回数据的,所以这里可以得到他的实例@Autowiredprivate com.fasterxml.jackson.databind.ObjectMapper objectMapper;/*** authentication 封装了所有的认证信息*/@Overridepublic void onAuthenticationSuccess(HttpServletRequest request, HttpServletResponse response, Authentication authentication) throws IOException, ServletException {logger.info("登录成功");response.setContentType("application/json;charset=UTF-8");response.getWriter().write(objectMapper.writeValueAsString(authentication));}}
查看输出的authentication
{"authorities": [{"authority": "admin"}],"details": {"remoteAddress": "0:0:0:0:0:0:0:1","sessionId": "FE0F33577E7E5D89AF15FCCD6FE5A4B3"},"authenticated": true,"principal": {"password": null,"username": "admin","authorities": [{"authority": "admin"}],"accountNonExpired": true,"accountNonLocked": true,"credentialsNonExpired": true,"enabled": true},"credentials": null,"name": "admin"}
如果我们想在ajax访问时返回JSON数据,在普通处理下跳转到之前访问的url该怎么办?
@Component("myAuthenticationSuccessHandler")public class MyAuthenticationSuccessHandler extends SavedRequestAwareAuthenticationSuccessHandler {private org.slf4j.Logger logger = LoggerFactory.getLogger(getClass());// com.fasterxml.jackson.databind.// spring 是使用jackson来进行处理返回数据的// 所以这里可以得到他的实例@Autowiredprivate com.fasterxml.jackson.databind.ObjectMapper objectMapper;@Autowiredprivate SecurityProperties securityProperties;/*** @param authentication 封装了所有的认证信息*/@Overridepublic void onAuthenticationSuccess(HttpServletRequest request, HttpServletResponse response, Authentication authentication) throws IOException, ServletException {logger.info("登录成功");if (LoginResponseType.JSON.equals(securityProperties.getBrowser().getLoginType())) {response.setContentType("application/json;charset=UTF-8");response.getWriter().write(objectMapper.writeValueAsString(authentication));} else {// 把本类实现父类改成 AuthenticationSuccessHandler 的子类 SavedRequestAwareAuthenticationSuccessHandler// 之前说spring默认成功是跳转到登录前的url地址// 就是使用的这个类来处理的super.onAuthenticationSuccess(request, response, authentication);}}}
这样登录成功的就ok了。对于失败的来说是一样的,继承的父类改成spring默认的处理器
org.springframework.security.web.authentication.SimpleUrlAuthenticationFailureHandler
下面简单写一下失败处理器,其实和成功处理器一样
@Component("myAuthenticationFailureHandler")@Slf4jpublic class MyAuthenticationFailureHandler extends SimpleUrlAuthenticationFailureHandler {@Autowiredprivate SecurityProperties securityProperties;@Overridepublic void onAuthenticationFailure(HttpServletRequest request, HttpServletResponse response, AuthenticationException exception) throws IOException, ServletException {log.info("用户信息校验失败:" + exception.getMessage());if(LoginResponseType.JSON.equals(securityProperties.getBrowser().getLoginType())){//response.setStatus(HttpStatus.INTERNAL_SERVER_ERROR.value());response.setContentType("application/json;charset=UTF-8");response.getWriter().write(JsonUtils.objectToJson(RestResult.build(CodeMsg.USER_LOGIN_FAILURE)));}else {super.onAuthenticationFailure(request, response, exception);}}}
三、认证流程详解
上面讲的都是实现spring给出的扩展钩子。比如:自定义登录页,自定义登录成功处理等。但是是很碎片化的,在脑海中链接不起来,下面我们就来梳理一下用户认证流程的源码。

下面我们就跟着这个流程和之前配置的地方,去一步一步的看源码
- AuthenticationManager 管理所有的Provider,并选择适合的进行验证
- AuthenticationProvider 验证提供者,可以自己写provider处理自己的业务场景逻辑
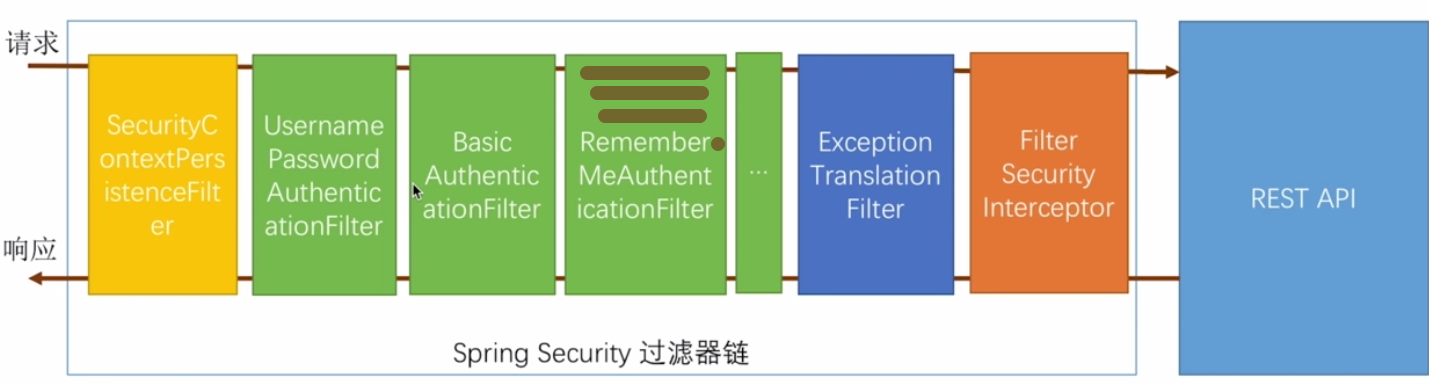
1、认证结果如何在多个请求之间共享
在认证成功的情况下,SecurityContext 默策略是一个org.springframework.security.core.context.ThreadLocalSecurityContextHolderStrategy 对象,内部使用\`ThreadLocal<SecurityContext>\`来存储org.springframework.security.web.authentication.AbstractAuthenticationProcessingFilter#successfulAuthenticationSecurityContextHolder.getContext().setAuthentication(authResult);
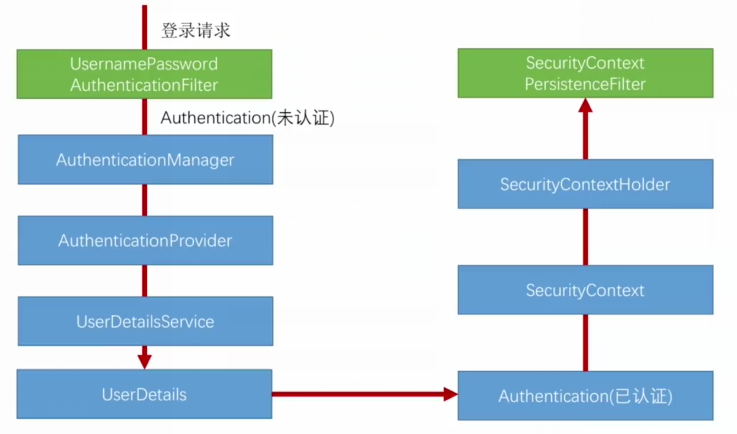
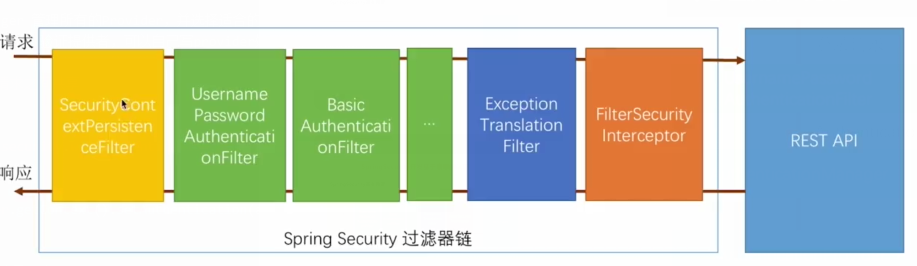
上面的源码也就是上图右边部分,SecurityContext会在同一个线程中可以通过这个context来获取到的。然后SecurityContextPersistenceFilter 所在的位置如下图
2、获取认证用户信息
这里我们在UserController中写获取用户信息的api。在前面分析了源码,所以这里可以使用SecurityContextHolder获取到当前的认证用户信息@GetMapping("/me")public Authentication getCurrentUser() {Authentication authentication = SecurityContextHolder.getContext().getAuthentication();return authentication;}// 这样写 spring 会自动注入@GetMapping("/me")public Authentication getCurrentUser(Authentication authentication) {return authentication;}
输出
{"authorities": [{"authority": "admin"}],"details": {"remoteAddress": "0:0:0:0:0:0:0:1","sessionId": "CB434B240B0B1810ED922C9D877F5842"},"authenticated": true,"principal": {"password": null,"username": "test001","authorities": [{"authority": "admin"}],"accountNonExpired": true,"accountNonLocked": true,"credentialsNonExpired": true,"enabled": true},"credentials": null,"name": "test001"}
注意看,password是不会返回来的!如果上面的信息太多了,也可以使用参数注解@AuthenticationPrincipal UserDetails获取User的信息。比如
public RestResult validatePassword(@AuthenticationPrincipal UserExt user, String password) {return userService.validatePassword(user, password);}
四、添加记住我功能
1、基本原理
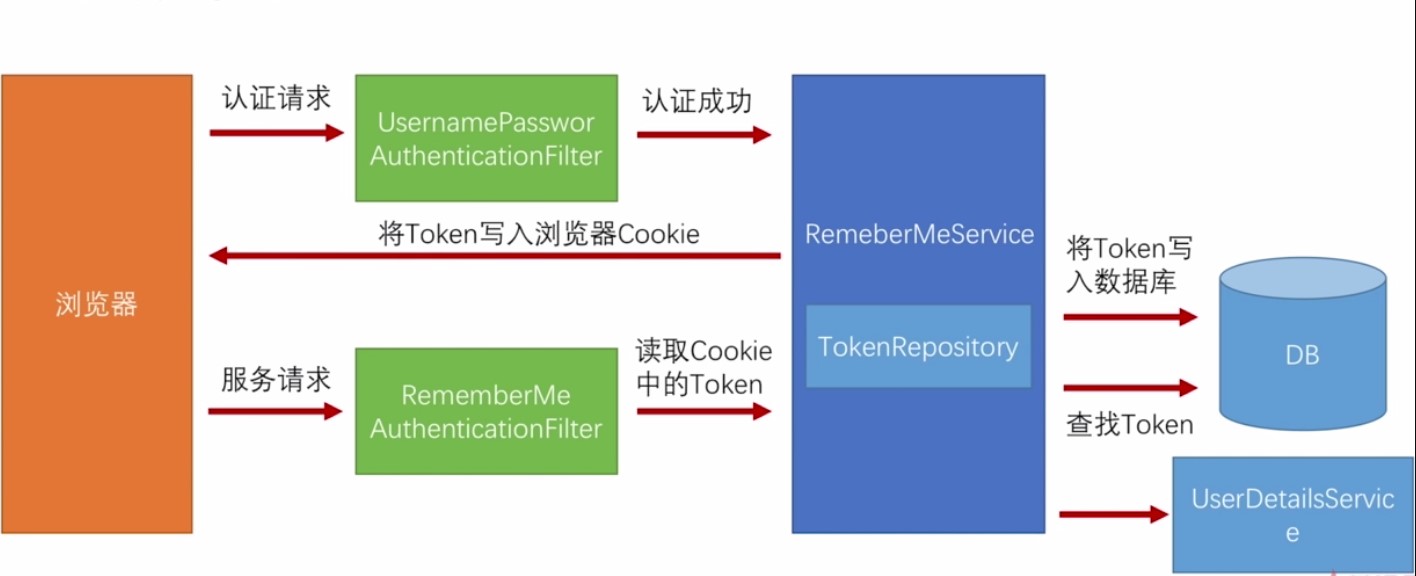
在security中认证过滤链中的org.springframework.security.web.authentication.rememberme.RememberMeAuthenticationFilter 过滤器来实现的。
当没有其他的认证过滤器处理的时候,记住我这个过滤器就尝试工作。
2、实现记住我的功能
首先给默认登录页面增加选项<!--名称是固定的--><input type="checkbox" value="true" name="remember-me">记住我
nam的名称是以下类中被定义
org.springframework.security.config.annotation.web.configurers.RememberMeConfigurerprivate static final String DEFAULT_REMEMBER_ME_NAME = "remember-me";
然后在SecurityConfig 中进行配置
public class BrowserSecurityConfig extends WebSecurityConfigurerAdapter {// 数据源是需要在使用处配置数据源的信息@Autowiredprivate DataSource dataSource;@Autowiredprivate PersistentTokenRepository persistentTokenRepository;// 之前已经写好的 MyUserDetailsService,@Autowiredprivate UserDetailsService userDetailsService;@Beanpublic PersistentTokenRepository persistentTokenRepository() {// org.springframework.security.config.annotation.web.configurers.RememberMeConfigurer.tokenRepositoryJdbcTokenRepositoryImpl jdbcTokenRepository = new JdbcTokenRepositoryImpl();jdbcTokenRepository.setDataSource(dataSource);// 该对象里面有定义创建表的语句,可以设置让该类来创建表// 但是该功能只用使用一次,如果数据库已经存在表则会报错// jdbcTokenRepository.setCreateTableOnStartup(true);return jdbcTokenRepository;}@Overrideprotected void configure(HttpSecurity http) throws Exception {http// 定义表单登录 - 身份认证的方式.formLogin().loginPage("/authentication/require").loginProcessingUrl("/authentication/form").and()// 从这里开始配置记住我的功能.rememberMe().tokenRepository(persistentTokenRepository)// 新增过期配置,单位秒,默认配置写的60秒.tokenValiditySeconds(60 * 5)// userDetailsService 是必须的。不然就报错.userDetailsService(userDetailsService)
从数据库获取到记住我的token后,验证成功,则通过userDetailsService获取用户信息,然后在框架中写入认证信息,完成登录。
3、测试
访问/user 肯定被拦截,无权限访问。访问标准登录页:/tin-signIn.html 记住勾选记住我的选项。退出浏览器或则重启系统,直接访问 /user(此时会明显的感觉到系统运行缓慢,这是因为需要从数据库获取信息)。在登录成功的时候会往数据库插入一条数据INSERT INTO `tin-demo`.`persistent_logins` (`username`, `series`, `token`, `last_used`) VALUES('admin', 'eBbVlKvXSseasbH6yVGozQ==', '72sHS9ifyza2yTN3h0Kq7A==', '2018-08-04 14:05:31');
登录一次则会插入一条,那什么时候被删除呢?在源码中看到:
- 当携带的cookie和数据库中最后一次不匹配的时候,会删除所有与该用户相关的记录
- 当使用logout功能退出的时候
所以该地方可能会有一些小小的问题,但是可以自己去解决这个数据过多的情况,增加定时任务多长时间清理一次等方法。
4、源码解析
登录在验证成功之后会调用该方法org.springframework.security.web.authentication.AbstractAuthenticationProcessingFilter\#successfulAuthentication。然后委托了org.springframework.security.web.authentication.rememberme.PersistentTokenBasedRememberMeServices\#onLoginSuccessprotected void onLoginSuccess(HttpServletRequest request,HttpServletResponse response, Authentication successfulAuthentication) {String username = successfulAuthentication.getName();logger.debug("Creating new persistent login for user " + username);PersistentRememberMeToken persistentToken = new PersistentRememberMeToken(username, generateSeriesData(), generateTokenData(), new Date());try {tokenRepository.createNewToken(persistentToken);addCookie(persistentToken, request, response);}catch (Exception e) {logger.error("Failed to save persistent token ", e);}}
携带cookie访问的时候会触发这个方法org.springframework.security.web.authentication.rememberme.PersistentTokenBasedRememberMeServices#processAutoLoginCookie,里面有验证过期等的逻辑。
对于看本文比较困难的同学可以移步:https://www.lanqiao.cn/courses/3013
邀请码:STyLDQzM
其实内容和博客差不多,只不过更详细(就是一步一步的来,所有步骤有详细过程记录和截图,按照课程步骤最终能完整的操作完整个项目过程,适合小白),版本上也有所升级,还有就是有问题可以直接沟通,谢谢支持!


")


还没有评论,来说两句吧...