1、HTML标记语言
HTML的全称是 Hyper Text Markup Language,即超文本标记语言。HTML是一种在互联网上常见的网页制作标记性语言,HTML用于描述超文本中内容的显示方式。使用 HTML 可以实现在网页中定义一个标题、文本或者表格等。严格的说,HTML 并不能算作是一种程序设计语言,因为它缺少了程序设计语言所应有的特征。HTML是通过浏览器的翻译,将网页中的内容呈现给用户的。
1.1 创建第一个HTML文件
编写HTML文件可以通过两种方式:一种是手工编写HTML代码,另一种是借助一些开发软件。在 Windows 操作系统中,最简单的文本编辑软件就是记事本。
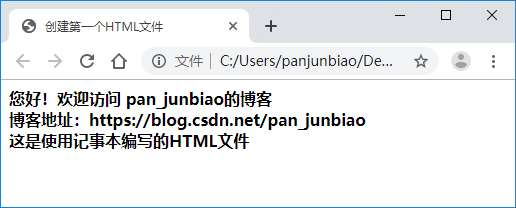
示例:使用记事本创建一个HTML文件。
(1)创建一个记事本文件。
(2)打开记事本文件,输入以下HTML代码:
<html><head> <title>创建第一个HTML文件</title></head><body> <b>您好!欢迎访问 pan_junbiao的博客</b><br> <b>博客地址:https://blog.csdn.net/pan_junbiao</b><br> <b>这是使用记事本编写的HTML文件</b></body></html>
(3)修改记事本文件名称,将文件的后缀名修改为 .html,如:01.html。
(4)运行文件,执行结果如下:
1.2 HTML文档结构
HTML 文档由4个主要标记组成,这4个标记是、、
和<body>。它们构成了HTML页面最基本的元素。</p>
<table><br> <thead><br> <tr><br> <th style="width:114px;">标记</th><br> <th style="width:685px;">说明</th><br> </tr><br> </thead><br> <tbody><br> <tr><br> <td style="width:114px;"><html>标记</td><br> <td style="width:685px;"><html>标记是 HTML 文件的开头。所有HTML文件都是以<html>标记开头,以</html>标记结束。HTML 页面的所有标记都要放置在<html>与</html>标记中,<html>标记并没有实质性的功能,但却是HTML文件不可缺少的内容。</td><br> </tr><br> <tr><br> <td style="width:114px;"><head>标记</td><br> <td style="width:685px;"><head>标记是 HTML 文件的头标记,作用是放置HTML文件的信息。如定义 CSS 样式代码可放置在<head>与</head>标记中。</td><br> </tr><br> <tr><br> <td style="width:114px;"><title>标记</td><br> <td style="width:685px;"><title>标记文标题标记。可将网页的标题定义在<title>与</title>标记中。</td><br> </tr><br> <tr><br> <td style="width:114px;"><body>标记</td><br> <td style="width:685px;"><body>标记是 HTML 页面的主体标记。页面中的所有内容都定义在<body>标记中。<body>标记也是成对使用的,以<body>标记开头,以</body>标记结束。<body>标记本身也具有控制页面的一些特性,例如控制页面的背景图片和颜色等。</td><br> </tr><br> </tbody><br></table>
<p><strong>说明:</strong>HTML标记是不区分大小写的。</p>
<h2 id="h2-1-3-meta-"><a name="1.3 <meta>标记" class="reference-link"></a><span class="header-link octicon octicon-link"></span>1.3 <meta>标记</h2><p><meta>标记可提供有关网页的信息(meta-information),<meta>标记出现在网页的标题部分。<meta>标记提供的信息包括作者姓名、公司名称和联系信息等。许多搜索引擎都要使用此信息。META标签使用属性/值的组合。</p>
<h2 id="h2-1-3-1-author-"><a name="1.3.1 设置网站的作者(author)" class="reference-link"></a><span class="header-link octicon octicon-link"></span>1.3.1 设置网站的作者(author)</h2><p><strong>示例:</strong>在页面中将“pan_junbiao的博客”指定为作者。</p>
<pre><code><meta name="author" content="pan_junbiao的博客">
</code></pre><h3 id="h3-1-3-2-keywords-"><a name="1.3.2 设置网站的关键字(keywords)" class="reference-link"></a><span class="header-link octicon octicon-link"></span>1.3.2 设置网站的关键字(keywords)</h3><p>“keywords” 是一个经常被用到的名称。它为文档定义了一组关键字。某些搜索引擎在遇到这些关键字时,会用这些关键字对文档进行分类。</p>
<p><strong>示例:</strong>设置网站的关键字。</p>
<pre><code><meta name="keywords" content="Java,C#,Oracle,MySQL">
</code></pre><h3 id="h3-1-3-3-expires-"><a name="1.3.3 网页过期(expires)" class="reference-link"></a><span class="header-link octicon octicon-link"></span>1.3.3 网页过期(expires)</h3><p><strong>示例:</strong>设置网页过期。</p>
<pre><code><meta http-equiv="expires" content="Wed, 26 Feb 2019 08:21:57 GMT">
</code></pre><h3 id="h3-1-3-4-refresh-"><a name="1.3.4 自动刷新(refresh)" class="reference-link"></a><span class="header-link octicon octicon-link"></span>1.3.4 自动刷新(refresh)</h3><p><strong>示例:</strong>设置网页自动刷新。</p>
<pre><code><meta http-equiv="refresh" content="30">代表每隔30秒自动刷新本页面
<meta http-equiv="refresh" content="5; url=https://blog.csdn.net/pan_junbiao">代表过5秒自动跳转到新的url网址
</code></pre><h2 id="h2-1-3-5-"><a name="1.3.5 解决页面中文乱码" class="reference-link"></a><span class="header-link octicon octicon-link"></span>1.3.5 解决页面中文乱码</h2><pre><code><meta charset="UTF-8">
</code></pre><h2 id="h2-2-html-"><a name="2、HTML常用标记" class="reference-link"></a><span class="header-link octicon octicon-link"></span>2、HTML常用标记</h2><p>HTML中提供了很多标记,可以用来设计页面中的文字、图片,定义超链接等。这些标记的使用可以使页面更加的生动,下面为大家介绍HTML中的常用标记。</p>
<h2 id="h2-2-1-"><a name="2.1 换行标记" class="reference-link"></a><span class="header-link octicon octicon-link"></span>2.1 换行标记</h2><p>在HTML语言中,换行标记为<br>。与前面介绍的HTML标记不同,换行标记是一个单独标记,不是成对出现的。</p>
<p><strong>示例:</strong>创建HTML页面,在页面中使用换行标记。</p>
<pre><code><html>
<head>
<title>应用换行标记实现页面文字换行</title>
</head>
<body>
<b>您好!欢迎访问 pan_junbiao的博客</b><br>
<b>博客地址:https://blog.csdn.net/pan_junbiao</b><br>
所有的努力都不会完全白费,你付出多少时间和精力,都是在对未来的积累。<br>
世界上什么都不公平,唯独时间最公平,你是懒惰还是努力,时间都会给出结果。
</body>
</html>
</code></pre><p><strong>执行结果:</strong></p>
<p><img src="https://image.dandelioncloud.cn/images/20210724/f07fcd1831624d9bba3f4345a51ee926.png" alt="watermark_type_ZmFuZ3poZW5naGVpdGk_shadow_10_text_aHR0cHM6Ly9ibG9nLmNzZG4ubmV0L3Bhbl9qdW5iaWFv_size_16_color_FFFFFF_t_70 1"></p>
<h2 id="h2-2-2-"><a name="2.2 段落标记" class="reference-link"></a><span class="header-link octicon octicon-link"></span>2.2 段落标记</h2><p>HTML中的段落标记也是一个很重要的标记,段落标记以<p>标记开头,以</p>标记结束。段落标记在段前和段后各添加一个空行,而定义在段落标记中的内容,不受该标记的影响。</p>
<h2 id="h2-2-3-"><a name="2.3 标题标记" class="reference-link"></a><span class="header-link octicon octicon-link"></span>2.3 标题标记</h2><p>要在HTML页面中创建不同级别的标题,可以使用HTML语言中的标题标记。在HTML标记中,设定了6个标题标记,分别为<h1>至<h6>,其中<h1>代表1级标题,<h2>代表2级标题,<h6>代表6级标题等。数字越小,表示级别越高,文字的字体也就越大。</p>
<p><strong>示例:</strong>在HTML页面中使用标题标记。</p>
<pre><code><html>
<head>
<title>标题标记</title>
</head>
<body>
<h1>您好,欢迎访问 pan_junbiao的博客</h1>
<h2>您好,欢迎访问 pan_junbiao的博客</h2>
<h3>您好,欢迎访问 pan_junbiao的博客</h3>
<h4>您好,欢迎访问 pan_junbiao的博客</h4>
<h5>您好,欢迎访问 pan_junbiao的博客</h5>
<h6>您好,欢迎访问 pan_junbiao的博客</h6>
</body>
</html>
</code></pre><p><strong>执行结果:</strong></p>
<p><img src="https://image.dandelioncloud.cn/images/20210724/18aa8a7edac34572a122788745e798ee.png" alt="watermark_type_ZmFuZ3poZW5naGVpdGk_shadow_10_text_aHR0cHM6Ly9ibG9nLmNzZG4ubmV0L3Bhbl9qdW5iaWFv_size_16_color_FFFFFF_t_70 2"></p>
<h2 id="h2-2-4-strong-strong-"><a name="2.4 <strong>文本格式化标记</strong>" class="reference-link"></a><span class="header-link octicon octicon-link"></span>2.4 <strong>文本格式化标记</strong></h2><table><br> <thead><br> <tr><br> <th>标签</th><br> <th>示例</th><br> </tr><br> </thead><br> <tbody><br> <tr><br> <td><B>标签</td><br> <td><B>该文本将以粗体显示</B></td><br> </tr><br> <tr><br> <td><I>标签</td><br> <td><I>该文本将以斜体显示</I></td><br> </tr><br> <tr><br> <td><U>标签</td><br> <td><U>该文本将显示为带有下划线</U></td><br> </tr><br> <tr><br> <td><SUB>标签</td><br> <td><SUB>该文本的显示高度将低于前后的文本</SUB></td><br> </tr><br> <tr><br> <td><SUP>标签</td><br> <td><SUP>该文本的显示高度将高于周围的文本</SUP></td><br> </tr><br> </tbody><br></table>
<p><strong>示例:</strong>在HTML页面中使用文本格式化标记。</p>
<pre><code><html>
<head>
<title>文本格式化标记</title>
</head>
<body>
<B>您好,欢迎访问 pan_junbiao的博客!</B><br>
<I>您好,欢迎访问 pan_junbiao的博客!</I><br>
<U>您好,欢迎访问 pan_junbiao的博客!</U><br>
<SUB>您好,欢迎访问 pan_junbiao的博客!</SUB>博客地址:https://blog.csdn.net/pan_junbiao<br>
<SUP>您好,欢迎访问 pan_junbiao的博客!</SUP>博客地址:https://blog.csdn.net/pan_junbiao<br>
</body>
</html>
</code></pre><p><strong>执行结果:</strong></p>
<p><strong><img src="https://image.dandelioncloud.cn/images/20210724/00ca08f3d2074d05b4a5b12ccb52f9c6.png" alt="watermark_type_ZmFuZ3poZW5naGVpdGk_shadow_10_text_aHR0cHM6Ly9ibG9nLmNzZG4ubmV0L3Bhbl9qdW5iaWFv_size_16_color_FFFFFF_t_70 3"></strong></p>
<h2 id="h2-2-5-"><a name="2.5 居中标记" class="reference-link"></a><span class="header-link octicon octicon-link"></span>2.5 居中标记</h2><p>HTML页面中的内容有一定的布局方式,默认的布局方式是从左到右依次排序。如果要想让页面中的内容在页面的居中位置显示,可以使用HTML中的<center>标记。<center>居中标记以<center>标记开头,以</center>标记结尾。标记之中的内容为居中显示。HTML5 不支持 <center> 标签。请用 CSS 代替。</p>
<h2 id="h2-2-6-"><a name="2.6 文字列表标记" class="reference-link"></a><span class="header-link octicon octicon-link"></span>2.6 文字列表标记</h2><p>HTML语言中提供了文字列表标记,文字列表标记可以将文字以列表的形式依次排列。通过这种形式可以更加的方便网页的访问者。HTML中的列表标记主要有无序的列表和有序的列表两种。</p>
<h3 id="h3-2-6-1-"><a name="2.6.1 无序列表" class="reference-link"></a><span class="header-link octicon octicon-link"></span>2.6.1 无序列表</h3><p>无序列表是在每个列表项的前面添加一个圆点符号。通过符号<ul>可以创建一组无序列表,其中每个列表项以<li>表示。</p>
<p><strong>示例:</strong>使用无序列表对页面中的文字进行排序。</p>
<pre><code><html>
<head>
<title>无序列表标记</title>
</head>
<body>
编程词典有以下几个品种
<p>
<ul>
<li>Java编程词典</li>
<li>VB编程词典</li>
<li>VC编程词典</li>
<li>.net编程词典</li>
<li>C#编程词典</li>
</ul>
</body>
</html>
</code></pre><p><strong>执行结果:</strong></p>
<p><strong><img src="https://image.dandelioncloud.cn/images/20210724/d7616f1e12f44bfbbabcf0efbcad6f99.png" alt="watermark_type_ZmFuZ3poZW5naGVpdGk_shadow_10_text_aHR0cHM6Ly9ibG9nLmNzZG4ubmV0L3Bhbl9qdW5iaWFv_size_16_color_FFFFFF_t_70 4"></strong></p>
<h3 id="h3-2-6-2-"><a name="2.6.2 有序列表" class="reference-link"></a><span class="header-link octicon octicon-link"></span>2.6.2 有序列表</h3><p>有序列表和无序列表的区别是,使用有序列表标记可以将列表项进行排号。有序列表的标记为<ol>,每一个列表项前使用<li>。有序列表中项目项是有一定的顺序的。</p>
<p><strong>示例:</strong>使用有序列表对页面中的文字进行排序。</p>
<pre><code><html>
<head>
<title>有序列表标记</title>
</head>
<body>
编程词典有以下几个品种
<p>
<ol>
<li>Java编程词典</li>
<li>VB编程词典</li>
<li>VC编程词典</li>
<li>.net编程词典</li>
<li>C#编程词典</li>
</ol>
</body>
</html>
</code></pre><p><strong>执行结果:</strong></p>
<p><strong><img src="https://image.dandelioncloud.cn/images/20210724/d7c4a017e9664c4bb209c50eca1dcb39.png" alt="watermark_type_ZmFuZ3poZW5naGVpdGk_shadow_10_text_aHR0cHM6Ly9ibG9nLmNzZG4ubmV0L3Bhbl9qdW5iaWFv_size_16_color_FFFFFF_t_70 5"></strong></p>
<h2 id="h2-2-7-"><a name="2.7 表格标记" class="reference-link"></a><span class="header-link octicon octicon-link"></span>2.7 表格标记</h2><p>表格是网页中十分重要的组成元素。表格用来存储数据,包含标题、表头、行和单元格。在HTML语言中,表格标记使用符号<table>表示。定义表格光使用<table>是不够的,还需要定义表格中的行、列、标题等内容。</p>
<table><br> <thead><br> <tr><br> <th style="width:140px;">标记</th><br> <th style="width:659px;">说明</th><br> </tr><br> </thead><br> <tbody><br> <tr><br> <td style="width:140px;">表格标记<table></td><br> <td style="width:659px;"><table></table>标记表示整个表格。<table>标记中有很多属性,例如 width 属性用来设置表格的宽度,border 属性用来设置表格的边框,align 属性用来设置表格的对其方式,bgcolor 属性用来设置表格的背景色等。</td><br> </tr><br> <tr><br> <td style="width:140px;">标题标记<caption></td><br> <td style="width:659px;">标题标记以<caption>开头,以</caption>结束,标题标记也有一些属性,例如:align、valign 等。</td><br> </tr><br> <tr><br> <td style="width:140px;">表格行标记<tr></td><br> <td style="width:659px;">一组<tr>标记表示表格中的一行。<tr>标记要嵌套在<table>标记中使用,该标记也具有 algin、background 等属性。</td><br> </tr><br> <tr><br> <td style="width:140px;">表头标记<th></td><br> <td style="width:659px;">表头标记以<th>开头,以</th>结束,也可以通过 algin、background、colspan、valign 等属性来设置表头。</td><br> </tr><br> <tr><br> <td style="width:140px;">单元格标记<td></td><br> <td style="width:659px;">单元格标记<td>又称为列标记,一个<tr>标记中可以嵌套若干个<td>标记。该标记也具有 algin、background、valign 等属性。</td><br> </tr><br> </tbody><br></table>
<h3 id="h3-2-7-1-"><a name="2.7.1 显示表格边框" class="reference-link"></a><span class="header-link octicon octicon-link"></span>2.7.1 显示表格边框</h3><p><strong>方法一:</strong>在<table>标记中添加属性:border=”1” cellspacing=”0”,如下:</p>
<pre><code><table border="1" cellspacing="0">
</table>
</code></pre><p><strong>说明:</strong></p>
<p>border=”1”表示设置表格边框1px;</p>
<p>cellspacing=”0”表示设置表格边框间距为0,即无边距。</p>
<p><strong>方法二:</strong>使用CSS样式。</p>
<pre><code>table { border-collapse: collapse;}
table,table tr th, table tr td { border:1px solid #000000; }
</code></pre><h3 id="h3-2-7-2-"><a name="2.7.2 单元格合并" class="reference-link"></a><span class="header-link octicon octicon-link"></span>2.7.2 单元格合并</h3><p>colspan 是列合并,rowspan是行合并。</p>
<p><strong>示例:</strong>在页面中定义学生成绩表,并在表格中显示边框,同时使用单元格合并。</p>
<pre><code><html>
<head>
<title>表格标记</title>
<style>
table { border-collapse: collapse;}
table,table tr th, table tr td { border:1px solid #000000; }
</style>
</head>
<body>
<table align="center">
<caption>学生考试成绩单</caption>
<tr>
<th align="center" valign="middle">姓名</th>
<th align="center" valign="middle">语文</th>
<th align="center" valign="middle">数学</th>
<th align="center" valign="middle">英语</th>
</tr>
<tr>
<td align="center" valign="middle">张三</td>
<td align="center" valign="middle">89</td>
<td align="center" valign="middle">92</td>
<td align="center" valign="middle">87</td>
</tr>
<tr>
<td align="center" valign="middle">李四</td>
<td align="center" valign="middle">93</td>
<td align="center" valign="middle">86</td>
<td align="center" valign="middle">80</td>
</tr>
<tr>
<td align="center" valign="middle">王五</td>
<td align="center" valign="middle">85</td>
<td align="center" valign="middle">86</td>
<td align="center" valign="middle">90</td>
</tr>
<tr>
<th rowspan="2" align="center" valign="middle">博客信息</th>
<td colspan="3" align="center" valign="middle">您好,欢迎访问 pan_junbiao的博客</td>
</tr>
<tr>
<td colspan="3" align="center" valign="middle">博客地址:https://blog.csdn.net/pan_junbiao</td>
</tr>
</table>
</body>
</code></pre><p><strong>执行结果:</strong></p>
<p><img src="https://image.dandelioncloud.cn/images/20210724/ddac5c1913b6413bb6d5588888fb54ba.png" alt="watermark_type_ZmFuZ3poZW5naGVpdGk_shadow_10_text_aHR0cHM6Ly9ibG9nLmNzZG4ubmV0L3Bhbl9qdW5iaWFv_size_16_color_FFFFFF_t_70 6"></p>
<h2 id="h2-2-8-hr-"><a name="2.8 <hr>标记" class="reference-link"></a><span class="header-link octicon octicon-link"></span>2.8 <hr>标记</h2><p><hr>(水平线)标记用于在页面上绘制水平线。</p>
<p><strong><hr>标签属性:</strong></p>
<table><br> <thead><br> <tr><br> <th>属性</th><br> <th>说明</th><br> </tr><br> </thead><br> <tbody><br> <tr><br> <td>align</td><br> <td>指定水平线的位置。</td><br> </tr><br> <tr><br> <td>width</td><br> <td>指定水平线的长度。</td><br> </tr><br> <tr><br> <td>size</td><br> <td>指定水平线的宽度,以像素为单位。</td><br> </tr><br> <tr><br> <td> noshade</td><br> <td>指定水平线以纯色而不是以阴影进行显示。</td><br> </tr><br> </tbody><br></table>
<p><strong>示例:</strong>在页面中显示水平线。</p>
<pre><code><hr noshade size="5" align="center" width="50%"/>
<hr size="15" align="left" width="80%"/>
</code></pre><h2 id="h2-2-9-html-"><a name="2.9 在HTML中使用特殊符字符" class="reference-link"></a><span class="header-link octicon octicon-link"></span>2.9 在HTML中使用特殊符字符</h2><p>字符实体由3部分组成:&号、 实体名称和分号(;)。</p>
<p>如:空格: 版权号: ©</p>
<h1 id="h1-3-html-"><a name="3、HTML表单标记" class="reference-link"></a><span class="header-link octicon octicon-link"></span>3、HTML表单标记</h1><p>对于经常上网的人来说,对网站中的登录页面肯定不会感到陌生。在登录页面中,网站会提供给用户用户名文本框与密码文本框,以供访客输入信息。这里的用户名文本框与密码文本框就属于HTML中的表单元素。表单在HTML页面中起着非常重要的作用,是用户与网页交互信息的重要手段。</p>
<h2 id="h2-3-1-form-"><a name="3.1 <form>表单标记" class="reference-link"></a><span class="header-link octicon octicon-link"></span>3.1 <form>表单标记</h2><p>表单标记以<form>标记开头,以</form>标记结尾。在表单标记中可以定义处理表单数据程序的URL地址等信息。</p>
<p><strong><form>标记的语法:</strong></p>
<pre><code><form action="url" method="get | post" name="formName" οnsubmit="" target="">
</form>
</code></pre><p><strong><form>标记的属性:</strong></p>
<table><br> <thead><br> <tr><br> <th style="width:84px;">属性</th><br> <th>说明</th><br> </tr><br> </thead><br> <tbody><br> <tr><br> <td style="width:84px;">action</td><br> <td>该属性用来指定处理表单数据程序的URL地址。</td><br> </tr><br> <tr><br> <td style="width:84px;">method</td><br> <td>该属性用来指定数据传送到服务器的方式。它有两种属性值,分别为 get 和 post。get 属性值表示将输入的数据追加在 action 指定的地址后面,并传送到服务器。当属性值为 post 时,会将输入的数据按照 HTTP 协议中的 post 传输方式传送到服务器。</td><br> </tr><br> <tr><br> <td style="width:84px;">name</td><br> <td>该属性指定表单的名称,程序员可以自定义其值。</td><br> </tr><br> <tr><br> <td style="width:84px;">onsubmit</td><br> <td>该属性用于指定当前用户单击提交按钮时触发的事件。</td><br> </tr><br> <tr><br> <td style="width:84px;">target</td><br> <td>该属性指定输入数据结果显示在哪个窗口中,其属性值可以设置为_blank、_self、_parent 和 _top。其中,_blank 表示在新窗口中打开目标文件;_self 表示在同一个窗口中打开,该项一般不用设置;_parent 表示在上一级窗口中打开,一般使用框架页时经常使用;_top 表示在浏览器的整个窗口中打开,忽略任何框架。</td><br> </tr><br> </tbody><br></table>
<p><strong>示例:</strong>创建表单,设置表单名称为 myForm,传送方式为 post,当用户提交表单时,提交至 action.html 页面进行处理。</p>
<pre><code><form id="form1" name="myForm" method="post" action="action.html" target="_blank">
</form>
</code></pre><p><form>表单标记的详细使用,请浏览本博客的文章:HTML中Form表单的使用</p>
<h2 id="h2-3-2-input-"><a name="3.2 <input>表单输入标记" class="reference-link"></a><span class="header-link octicon octicon-link"></span>3.2 <input>表单输入标记</h2><p>表单输入标记是使用最频繁的表单标记,通过这个标记可以在向页面中添加单行文本、多行文本、按钮等。</p>
<p><strong><input>标记的语法:</strong></p>
<pre><code><input type="image" disabled="disabled" checked="checked" width="digit" height="digit" maxlength="digit"
readonly="readonly" size="digit" src="uri" usemap="uri" alt="" name="" value="" />
</code></pre><p><strong><input>标记的属性:</strong></p>
<table><br> <thead><br> <tr><br> <th style="width:115px;">属性</th><br> <th style="width:684px;">描述</th><br> </tr><br> </thead><br> <tbody><br> <tr><br> <td style="width:115px;">type</td><br> <td style="width:684px;">用于指定添加的是哪种类型的输入字段,共有10个可选值。</td><br> </tr><br> <tr><br> <td style="width:115px;">disabled</td><br> <td style="width:684px;">用于指定输入字段不可用,即字体变成灰色。其属性值可以为空值,也可以指定为 disabled。</td><br> </tr><br> <tr><br> <td style="width:115px;">checked</td><br> <td style="width:684px;">用于指定输入字段是否处于被选中状态,用于 type 属性值为 radio 和 checkbox 的情况下。其属性值可以为空值,也可以指定为 checked。</td><br> </tr><br> <tr><br> <td style="width:115px;">width</td><br> <td style="width:684px;">用于指定输入字段的宽度,用于 type 属性值为 image 的情况下。</td><br> </tr><br> <tr><br> <td style="width:115px;">height</td><br> <td style="width:684px;">用于指定输入字段的高度,用于 type 属性值为 image 的情况下。</td><br> </tr><br> <tr><br> <td style="width:115px;">maxlength</td><br> <td style="width:684px;">用于指定输入字段可输入文字的个数,用于 type 属性值为 text 和 password 的情况下,默认没有字数限制。</td><br> </tr><br> <tr><br> <td style="width:115px;">readonly</td><br> <td style="width:684px;">用于指定输入字段是否为只读。其属性值可以为空值,也可以指定为 readonly。</td><br> </tr><br> <tr><br> <td style="width:115px;">size</td><br> <td style="width:684px;">用于指定输入字段的宽度,当 type 属性为 text 和 password 时,以文字个数为单位,当 type 属性为其他值时,以像素为单位。</td><br> </tr><br> <tr><br> <td style="width:115px;">src</td><br> <td style="width:684px;">用于指定图片的来源,只有当 type 属性值 image 时有效。</td><br> </tr><br> <tr><br> <td style="width:115px;">usemap</td><br> <td style="width:684px;">为图片设置热点地图,只有当 type 属性值 image 时有效。属性值为 URI,URI格式为“#+<map>标记的 name 属性值”。例如,<map>标记的 name 属性为 Map,该URI为 #Map。</td><br> </tr><br> <tr><br> <td style="width:115px;">alt</td><br> <td style="width:684px;">用于指定当图片无法显示时显示的文字,只有当 type 属性值 image 时有效。</td><br> </tr><br> <tr><br> <td style="width:115px;">name</td><br> <td style="width:684px;">用于指定输入字段的名称。</td><br> </tr><br> <tr><br> <td style="width:115px;">value</td><br> <td style="width:684px;"> <p>用于指定输入字段默认的数据值,当 type 属性为 checkbox 和 radio 时,不可省略此属性;为其他值时,可以省略。当 type 属性为 button、reset 和 submit 时,指定的是按钮上的显示文字; 当 type 属性为 checkbox 和 radio 时,指定的是数据项选定的值。</p> </td><br> </tr><br> </tbody><br></table>
<p>type属性是<input>标记中非常重要的内容,决定了输入数据的类型。</p>
<p><strong>type属性的属性值:</strong></p>
<table><br> <thead><br> <tr><br> <th>可选值</th><br> <th>描述</th><br> <th>可选值</th><br> <th>描述</th><br> </tr><br> </thead><br> <tbody><br> <tr><br> <td>text</td><br> <td>文本框</td><br> <td>submit</td><br> <td>提交按钮</td><br> </tr><br> <tr><br> <td>password</td><br> <td>密码域</td><br> <td>reset</td><br> <td>重置按钮</td><br> </tr><br> <tr><br> <td>file</td><br> <td>文件域</td><br> <td>button</td><br> <td>普通按钮</td><br> </tr><br> <tr><br> <td>radio</td><br> <td>单选按钮</td><br> <td>hidden</td><br> <td>隐藏域</td><br> </tr><br> <tr><br> <td>checkbox</td><br> <td>复选框</td><br> <td>image</td><br> <td>图像域</td><br> </tr><br> </tbody><br></table>
<p><strong>示例:</strong>在HTML页面中使用各种表单标记。</p>
<pre><code><html>
<head>
<title>表单标记</title>
<style>
.txtBox{
padding: 3px;
width: 300px;
font-size: 16px;
}
</style>
</head>
<body>
<form action="" method="post" name="myform">
<table align="center">
<caption>用户注册</caption>
<tr>
<th>博客信息:</th>
<td>
<input class="txtBox" type="text" id="txtBlogInfo" name="blogInfo" value="您好,欢迎访问 pan_junbiao的博客!" />
</td>
</tr>
<tr>
<th>博客地址:</th>
<td>
<input class="txtBox" type="text" id="txtBlogUrl" name="blogUrl" value="https://blog.csdn.net/pan_junbiao"/>
</td>
</tr>
<tr>
<th>性别:</th>
<td>
<input id="male" name="sex" type="radio" value="1" checked="checked"/>
<label for="male">男</label>
<input id="female" name="sex" type="radio" value="2"/>
<label for="female">女</label>
<input id="secrecy" name="sex" type="radio" value="3"/>
<label for="secrecy">保密</label>
</td>
</tr>
<tr>
<th>兴趣爱好:</th>
<td>
<input id="lq" name="hobby" type="checkbox" value="篮球" checked="checked">
<label for="lq">篮球</label>
<input id="zq" name="hobby" type="checkbox" value="足球" checked="checked">
<label for="zq">足球</label>
<input id="ymq" name="hobby" type="checkbox" value="羽毛球">
<label for="ymq">羽毛球</label>
<input id="ppq" name="hobby" type="checkbox" value="乒乓球">
<label for="ppq">乒乓球</label>
<input id="yy" name="hobby" type="checkbox" value="游泳">
<label for="yy">游泳</label>
</td>
</tr>
<!-- 以下是提交、取消按钮 -->
<tr>
<td colspan="2" style="text-align: center;">
<input type="submit" value="提交"/>
<input type="reset" value="重置" />
</td>
</tr>
</table>
</form>
</body>
</html>
</code></pre><p><strong>执行结果:</strong></p>
<p><img src="https://image.dandelioncloud.cn/images/20210724/81228442b05e40ff9ccd53c700aa5dc8.png" alt="watermark_type_ZmFuZ3poZW5naGVpdGk_shadow_10_text_aHR0cHM6Ly9ibG9nLmNzZG4ubmV0L3Bhbl9qdW5iaWFv_size_16_color_FFFFFF_t_70 7"></p>
<h2 id="h2-3-3-select-"><a name="3.3 <select>下拉列表标记" class="reference-link"></a><span class="header-link octicon octicon-link"></span>3.3 <select>下拉列表标记</h2><select>标记可以在页面中创建下拉列表框,此时的下拉列表框是一个空的列表,要使用<option>标记向列表中添加内容。<br><br><strong><select>标记的语法:</strong><br><br> <select name="name" size="digit" multiple="multiple" disabled="disabled"><br> <option value="" selected>选择项1</option><br> <option value="">选择项2</option><br> <option value="">选择项3</option><br> </select>
<p><strong><select>标记的属性:</strong></p>
<table><br> <thead><br> <tr><br> <th>属性</th><br> <th>描述</th><br> </tr><br> </thead><br> <tbody><br> <tr><br> <td>name</td><br> <td>用于指定列表框的名称。</td><br> </tr><br> <tr><br> <td>size</td><br> <td>用于指定列表框中显示选项的数量,超出该数量的选项可以通过滚动条查看。</td><br> </tr><br> <tr><br> <td>disabled</td><br> <td>用于指定当前列表框不可使用(变成灰色)。</td><br> </tr><br> <tr><br> <td>multiple</td><br> <td>用于让多行列表框支持多选。</td><br> </tr><br> </tbody><br></table>
<p><strong>示例:</strong>在页面中应用<select>标记和<option>标记添加下拉列表框和多行下拉列表框。</p>
<pre><code><html>
<head>
<title>下拉列表标记</title>
</head>
<body>
下拉列表框:
<select name="select1">
<option>pan_junbiao的博客</option>
<option>KevinPan</option>
<option>吖标</option>
</select>
多行列表框(不可多选):
<select name="select2" size="2">
<option>pan_junbiao的博客</option>
<option>KevinPan</option>
<option>吖标</option>
</select>
多行列表框(可多选):
<select name="select2" size="3" multiple>
<option>pan_junbiao的博客</option>
<option>KevinPan</option>
<option>吖标</option>
</select>
</body>
</html>
</code></pre><p><strong>执行结果:</strong></p>
<p><strong><img src="https://image.dandelioncloud.cn/images/20210724/7bb82ccaae544b2386fdb20409043276.png" alt="watermark_type_ZmFuZ3poZW5naGVpdGk_shadow_10_text_aHR0cHM6Ly9ibG9nLmNzZG4ubmV0L3Bhbl9qdW5iaWFv_size_16_color_FFFFFF_t_70 8"></strong></p>
<h2 id="h2-3-4-textarea-"><a name="3.4 <textarea>多行文本标记" class="reference-link"></a><span class="header-link octicon octicon-link"></span>3.4 <textarea>多行文本标记</h2><textarea>为多行文本标记,与单行文本相比,多行文本可输入更多的内容。<br><br><strong><textarea>标记的语法:</strong><br><br> <textarea cols="digit" rows="digit" name="name" disabled="disabled" readonly="readonly" wrap="value"><br> 文本内容<br> </textarea>
<p><strong><select>标记的属性:</strong></p>
<table><br> <thead><br> <tr><br> <th>属性</th><br> <th>描述</th><br> </tr><br> </thead><br> <tbody><br> <tr><br> <td>cols</td><br> <td>用于指定多行文本框显示的列数(宽度)。</td><br> </tr><br> <tr><br> <td>rows</td><br> <td>用于指定多行文本框显示的行数(高度)。</td><br> </tr><br> <tr><br> <td>name</td><br> <td>用于指定多行文本框的名称,当表单提交后,在服务器端获取表单数据时应用。</td><br> </tr><br> <tr><br> <td>disabled</td><br> <td>用于指定多行文本框不可使用(变成灰色)。</td><br> </tr><br> <tr><br> <td>readonly</td><br> <td>用于指定多行文本框为只读。</td><br> </tr><br> <tr><br> <td>wrap</td><br> <td>用于设置多行文本框中的文字是否自动换行。</td><br> </tr><br> </tbody><br></table>
<p><strong>wrap属性的可选值:</strong></p>
<table><br> <thead><br> <tr><br> <th style="width:97px;">可选值</th><br> <th>描述</th><br> </tr><br> </thead><br> <tbody><br> <tr><br> <td style="width:97px;">hard</td><br> <td>默认值,表示自动换行,如果文字超过 cols 属性所指的列数就自动换行,并且提交到服务器时换行符同时被提交。</td><br> </tr><br> <tr><br> <td style="width:97px;">soft</td><br> <td>表示自动换行,如果文字超过 cols 属性所指的列数就自动换行,但提交到服务器时换行符不被提交。</td><br> </tr><br> <tr><br> <td style="width:97px;">off</td><br> <td>表示不自动换行,如果想让文字换行,只能按下 Enter 键强制换行。</td><br> </tr><br> </tbody><br></table>
<p><strong>示例:</strong>使用多行文本框,显示文字信息。</p>
<pre><code><html>
<head>
<title>多行文本框</title>
</head>
<body>
<textarea name="content" cols="50" rows="5" wrap="hard">
您好,欢迎访问 pan_junbiao的博客!
博客地址:https://blog.csdn.net/pan_junbiao
岁月从来不曾静好,只是有人在替你背负枷锁,含泪前行。也许是父母,也许是朋友,也许是陌生人,无论是谁,请记得常怀感恩之心。
</textarea>
</body>
</html>
</code></pre><p><strong>执行结果:</strong></p>
<p><strong><img src="https://image.dandelioncloud.cn/images/20210724/1a18f0f76314495eb77fb87732994ceb.png" alt="watermark_type_ZmFuZ3poZW5naGVpdGk_shadow_10_text_aHR0cHM6Ly9ibG9nLmNzZG4ubmV0L3Bhbl9qdW5iaWFv_size_16_color_FFFFFF_t_70 9"></strong></p>
<h1 id="h1-4-"><a name="4、超链接与图片标记" class="reference-link"></a><span class="header-link octicon octicon-link"></span>4、超链接与图片标记</h1><p>HTML 语言的标记有很多,本文只介绍一些常用标记。除了上面介绍的常用标记外,还有两个标记需要介绍,即超链接标记和图标标记。</p>
<h2 id="h2-4-1-"><a name="4.1 超链接标记" class="reference-link"></a><span class="header-link octicon octicon-link"></span>4.1 超链接标记</h2><p>超链接标记是页面中非常重要的元素,在网站中实现从一个页面跳转到另一个页面,这个功能就是通过超链接标记<a>来完成。</p>
<p><strong><a>标记的语法:</strong></p>
<pre><code><a href="uri" title="提示文字"></a>
</code></pre><p><strong><a>标记的属性:</strong></p>
<table><br> <thead><br> <tr><br> <th>属性</th><br> <th>描述</th><br> </tr><br> </thead><br> <tbody><br> <tr><br> <td>href</td><br> <td>用来设置链接到哪个页面中。</td><br> </tr><br> <tr><br> <td>title</td><br> <td>用来设置光标聚焦时显示的提示文字。</td><br> </tr><br> </tbody><br></table>
<p><strong><a>标记不显示下划线(只有当光标聚焦时才显示下划线)</strong></p>
<pre><code>a {
text-decoration: none;
color: #454545;
vertical-align: baseline;
cursor: pointer;
}
a:hover {
text-decoration: underline;
color: #000;
}
</code></pre><h2 id="h2-4-2-"><a name="4.2 图标标记" class="reference-link"></a><span class="header-link octicon octicon-link"></span>4.2 图标标记</h2><p>在浏览网站中通常会看到各式各样的漂亮的图片,在页面中添加的图片是通过<img>标记来实现的。</p>
<p><strong><img>标记的语法:</strong></p>
<pre><code><img src="uri" width="value" height="value" border="value" alt="提示文字">
</code></pre><p><strong><img>标记的属性:</strong></p>
<table><br> <thead><br> <tr><br> <th style="width:113px;">属性</th><br> <th style="width:686px;">描述</th><br> </tr><br> </thead><br> <tbody><br> <tr><br> <td style="width:113px;">src</td><br> <td style="width:686px;">用于指定图片的来源。</td><br> </tr><br> <tr><br> <td style="width:113px;">width</td><br> <td style="width:686px;">用于指定图片的宽度。</td><br> </tr><br> <tr><br> <td style="width:113px;">height</td><br> <td style="width:686px;">用于指定图片的高度。</td><br> </tr><br> <tr><br> <td style="width:113px;">border</td><br> <td style="width:686px;">用于指定图片外边框的宽度,默认值为0。</td><br> </tr><br> <tr><br> <td style="width:113px;">alt</td><br> <td style="width:686px;">用于指定当图片无法显示时显示的文字。</td><br> </tr><br> </tbody><br></table>
<p><strong>示例:</strong>在页面中添加图片与超链接。</p>
<pre><code><html>
<head>
<title>图片与超链接</title>
</head>
<body>
<img src="images/logo.png" alt="pan_junbiao的博客" /><br>
<a href="https://blog.csdn.net/pan_junbiao" title="pan_junbiao的博客">您好,欢迎访问 pan_junbiao的博客!</a>
</body>
</html>
</code></pre><p><strong>执行结果:</strong></p>
<p><strong><img src="https://image.dandelioncloud.cn/images/20210724/1975d5698c384331b8e068d6f9249aaf.png" alt="watermark_type_ZmFuZ3poZW5naGVpdGk_shadow_10_text_aHR0cHM6Ly9ibG9nLmNzZG4ubmV0L3Bhbl9qdW5iaWFv_size_16_color_FFFFFF_t_70 10"></strong></p>


还没有评论,来说两句吧...