Spring中ApplicationListener -【Spring底层原理】
目录
一、概述
二、实例分析
三、源码分析
四、总结
一、概述
在前面讲到了bean的拓展,这篇文章将讲述事件的拓展
ApplicationListener 是用来监听容器中发生的事件,只要事件发生,就会触发监听器的回调,完成事件驱动模型的开发
这里通过两个问题来进行概述,什么是事件?spring是如何实现的?
【1】什么是事件
事件是可以被控件识别的操作,如按下确定按钮,选择某个单选按钮或者复选框。每一种控件有自己可以识别的事件,如窗体的加载、单击、双击等事件,编辑框(文本框)的文本改变事,等等。事件有系统事件和用户事件。系统事件由系统激发,如时间每隔24小时,银行储户的存款日期增加一天。用户事件由用户激发,如用户点击按钮,在文本框中显示特定的文本。事件驱动控件执行某项功能。
【2】如何实现
Spring对事件机制也提供了支持,一个事件被发布后,被对应的监听器监听到,执行对应方法。并且Spring内已经提供了许多事件,ApplicationEvent可以说是Spring事件的顶级父类。ApplicationListener 是监听器的顶级接口,事件被触发后,onApplicationEvent方法就会执行
如果我们要写监听器,就要写这个监听器接口的实现类,ApplicationEvent泛型就是我们要监听的类,所以我们要监听或者是发布,都是ApplicationEvent及其下面的子事件,通过查看ApplicationEvent类,我们发现有以下子事件:
- ContextClosedEvent:关闭容器发布这个事件
- ContextRefreshedEvent:容器刷新完成发布这个事件(所有bean都进行了实例化,完成了创建)
- ContextStoppedEvent:容器停止时发布这个事件
- ContextStartedEvent:容器开始执行时发布这个事件
实现步骤:
- 写一个监听器(ApplicationListener 实现类)来监听某个事件(ApplicationEvent及其子类)
- 把监听器加到容器中
- 只要容器中有相关事件的发布,我们就能监听到这个事件,监听的便是上面说到的子事件
- 自定义发布一个事件:applicationContext.publishEvent()
二、实例分析
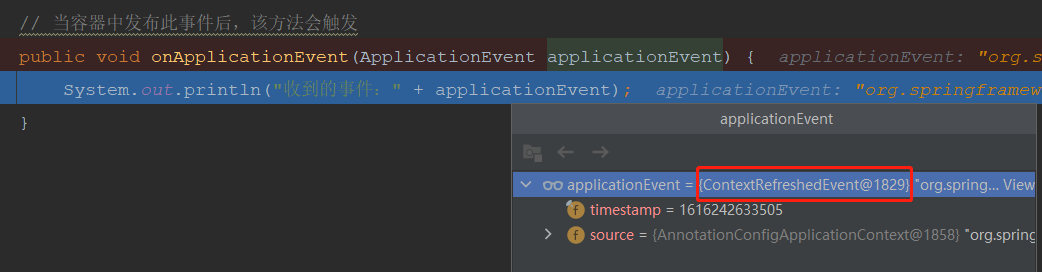
// 启动测试类@Testpublic void TestMain(){AnnotationConfigApplicationContext applicationContext = new AnnotationConfigApplicationContext(AppConfig.class);// 自己发布一个事件applicationContext.publishEvent(new ApplicationEvent("自己发布的事件") {});applicationContext.close();}// ApplicationListener实现类@Componentpublic class MyApplicationListener implements ApplicationListener<ApplicationEvent> {// 当容器中发布此事件后,该方法会触发public void onApplicationEvent(ApplicationEvent applicationEvent) {System.out.println("收到的事件:" + applicationEvent);}}// 配置类@Configuration@ComponentScan("listener")public class AppConfig {}
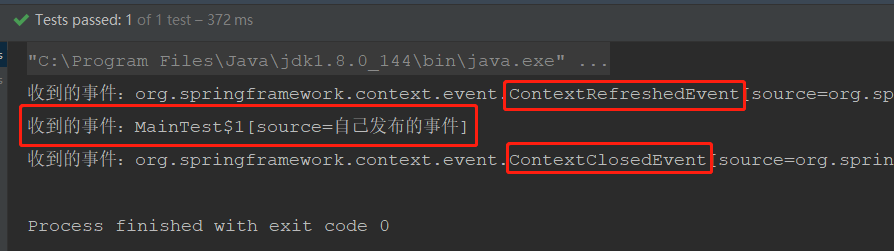
运行启动类,输出结果如下,以下三点说一下:
- 容器启动时,会执行容器刷新完成事件,也就是ContextRefreshedEvent
- 容器关闭时,会执行容器关闭事件,也就是ContextClosedEvent
- 在启动类中,通过publishEvent来发布事件,执行这个方法的时候,ApplicationListener 就能监听到这个事件,就会回调onApplicationEvent执行
三、源码分析
在上面的案例中,收到了三个事件,分别是:ContextRefreshedEvent、ContextClosedEvent以及自己定义的MainTest$1[source=自己发布的事件],这几个事件在底层是如何收到的呢?,我们就通过源码来进行分析,在回掉方法onApplicationEvent打上断点,通过Debug查看源码:
【1】事件发布
通过Debug,我们可以看到,最先收到ContextRefreshedEvent事件,下面咱们就根据方法调用栈分析ContextRefreshedEvent如何发布的
容器创建对象,调用refresh()方法——>finishRefresh()方法——>publishEvent()方法,调用getApplicationEventMulticaster()方法获取事件的多播器,也就是派发器
protected void publishEvent(Object event, @Nullable ResolvableType eventType) {Assert.notNull(event, "Event must not be null");Object applicationEvent;if (event instanceof ApplicationEvent) {applicationEvent = (ApplicationEvent)event;} else {applicationEvent = new PayloadApplicationEvent(this, event);if (eventType == null) {eventType = ((PayloadApplicationEvent)applicationEvent).getResolvableType();}}if (this.earlyApplicationEvents != null) {this.earlyApplicationEvents.add(applicationEvent);} else {// 获取事件的多播器,也就是派发器this.getApplicationEventMulticaster().multicastEvent((ApplicationEvent)applicationEvent, eventType);}if (this.parent != null) {if (this.parent instanceof AbstractApplicationContext) {((AbstractApplicationContext)this.parent).publishEvent(event, eventType);} else {this.parent.publishEvent(event);}}}
调用multicastEvent进行事件的派发
- 获取所有ApplicationListener进行遍历
- 判断是否可以用executor异步执行,可以的话使用executor进行异步派发,派发的时候我们可以自定义是同步还是异步
否则同步执行派发
public void multicastEvent(ApplicationEvent event, @Nullable ResolvableType eventType) {
ResolvableType type = eventType != null ? eventType : this.resolveDefaultEventType(event);Executor executor = this.getTaskExecutor();Iterator var5 = this.getApplicationListeners(event, type).iterator();while(var5.hasNext()) {// 获取ApplicationListener进行遍历ApplicationListener<?> listener = (ApplicationListener)var5.next();// 判断是否可以用executor异步执行,可以的话使用executor进行异步派发if (executor != null) {executor.execute(() -> {this.invokeListener(listener, event);});} else {// 否则同步执行this.invokeListener(listener, event);}}
}
执行invokeListener方法,拿到listener回调onApplicationEvent方法
private void doInvokeListener(ApplicationListener listener, ApplicationEvent event) {try {// 执行invokeListener方法,拿到listener回调onApplicationEvent方法listener.onApplicationEvent(event);} catch (ClassCastException var6) {String msg = var6.getMessage();if (msg != null && !this.matchesClassCastMessage(msg, event.getClass())) {throw var6;}Log logger = LogFactory.getLog(this.getClass());if (logger.isTraceEnabled()) {logger.trace("Non-matching event type for listener: " + listener, var6);}}}
【2】获取事件派发器getApplicationEventMulticaster
容器创建对象,调用refresh()方法——>initApplicationEventMulticaster()方法,初始化ApplicationEventMulticaster
- 先从容器中找是否有ID为“applicationEventMulticaster”的组件
- 有,则通过getBean的方式获取到该组件
- 如果没有,则创建一个简单的ApplicationEventMulticaster
将创建的注册到容器的单实例bean中,这样我们就可以在其他组件要派发事件,自动注入这个applicationEventMulticaster
protected void initApplicationEventMulticaster() {
ConfigurableListableBeanFactory beanFactory = this.getBeanFactory();// 从bean工厂中找是否有ID为“applicationEventMulticaster”的组件if (beanFactory.containsLocalBean("applicationEventMulticaster")) {// 获取到该组件this.applicationEventMulticaster = (ApplicationEventMulticaster)beanFactory.getBean("applicationEventMulticaster", ApplicationEventMulticaster.class);if (this.logger.isTraceEnabled()) {this.logger.trace("Using ApplicationEventMulticaster [" + this.applicationEventMulticaster + "]");}} else {// 如果没有则自己创建一个简单的ApplicationEventMulticasterthis.applicationEventMulticaster = new SimpleApplicationEventMulticaster(beanFactory);// 将创建的注册到容器的单实例bean中beanFactory.registerSingleton("applicationEventMulticaster", this.applicationEventMulticaster);if (this.logger.isTraceEnabled()) {this.logger.trace("No 'applicationEventMulticaster' bean, using [" + this.applicationEventMulticaster.getClass().getSimpleName() + "]");}}
}
【3】容器中有哪些监听器
容器创建对象,调用refresh()方法——>registerListeners()方法,注册监听器
- getApplicationListeners:获取所有Listener
- 从容器中拿到所有ApplicationListener类型的Listener组件
把组件添加到getApplicationEventMulticaster派发器中,注册到派发器中
protected void registerListeners() {
// 获取所有ListenerIterator var1 = this.getApplicationListeners().iterator();while(var1.hasNext()) {ApplicationListener<?> listener = (ApplicationListener)var1.next();this.getApplicationEventMulticaster().addApplicationListener(listener);}// 从容器中拿到所有ApplicationListener类型的Listener组件String[] listenerBeanNames = this.getBeanNamesForType(ApplicationListener.class, true, false);String[] var7 = listenerBeanNames;int var3 = listenerBeanNames.length;for(int var4 = 0; var4 < var3; ++var4) {String listenerBeanName = var7[var4];// 把组件添加到getApplicationEventMulticaster派发器中,注册到派发器中this.getApplicationEventMulticaster().addApplicationListenerBean(listenerBeanName);}Set<ApplicationEvent> earlyEventsToProcess = this.earlyApplicationEvents;this.earlyApplicationEvents = null;if (!CollectionUtils.isEmpty(earlyEventsToProcess)) {Iterator var9 = earlyEventsToProcess.iterator();while(var9.hasNext()) {ApplicationEvent earlyEvent = (ApplicationEvent)var9.next();this.getApplicationEventMulticaster().multicastEvent(earlyEvent);}}
}
四、总结
事件发布流程:
- refresh():容器创建对象
- finishRefresh():容器完成刷新
publishEvent(new ContextRefreshedEvent()):发布事件,将容器刷新完成事件作为参数执行
- getApplicationEventMulticaster():获取到事件的多播器(派发器),就是把事件发送到多个监听器让他们同时感知
- multicastEvent:派发事件
通过循环获取到所有的ApplicationListener并进行判断
- 如果有executor,可以支持使用executor进行异步派发
- 否则,同步的方式直接执行listener方法,拿到listener回调onApplicationEvent方法


 图")


还没有评论,来说两句吧...