如何在iview中使用rander函数渲染Select组件和input组件
转自:http://blog.csdn.net/dead\_rabbit6\_0/article/details/79239206
仅用于学习,违者必究!!!
iview的新手文档写的并不怎么样,把锅都推给了vue,这一天的工作卡在了在Table中加入Select的问题上,再次记录学习过程:
首先对Render进行分析,在iview官方的文档中,找到了table插入Button的例子:
[javascript] view plain copy
- {
- title: ‘Action’,
- key: ‘action’,
- width: 150,
- align: ‘center’,
- render: (h, params) => {
- return h(‘div’, [
- h(‘Button’, {
- props: {
- type: ‘primary’,
- size: ‘small’
- },
- style: {
- marginRight: ‘5px’
- },
- on: {
- click: () => {
- this.show(params.index)
- }
- }
- }, ‘View’),
- h(‘Button’, {
- props: {
- type: ‘error’,
- size: ‘small’
- },
- on: {
- click: () => {
- this.remove(params.index)
- }
- }
- }, ‘Delete’)
- ]);
- }
这是Table的表头定义中的一段,意思是创建两个按钮,一个名为View,一个名为Delete,在疑惑h是什么的时候,看到网上一哥们的回答顿时茅厕顿开,问题地址,render参数中h可以看做是 createElement。可以看出上面的例子大概表现为一个div中包含两个Button,又根据生成Button的结构可以把这段代码简化一下,写为:
[javascript] view plain copy
- render: (h, params) => {
- return h(‘Button’, {
- props: {
- type: ‘primary’,
- size: ‘small’
- },
- style: {
- marginRight: ‘5px’
- },
- on: {
- click: () => {
- this.show(params.index)
- }
- }
- }, ‘View’),
- );
- }
在学vue的时候,有看到父组件和子组件之间的交互使用了props,我们在iview的文档中,看到Button的API包括type、size,由此可知,props可以直接声明子组件的API值内容,on中写的自然就是它的触发事件了。
好,现在开始写Table组件中的Select组件:
[javascript] view plain copy
- render: (h, params) => {
- return h(‘Select’, {
- props:{
- value: this.data[params.index].volumeType,
- },
- on: {
- ‘on-change’:(event) => {
- this.data[params.index].volumeType = event;
- }
- },
- },
- [
- h(‘Option’,{
- props: {
- value: ‘1’
- }
- },’option1’),
- h(‘Option’,{
- props: {
- value: ‘2’
- }
- },’option2’)
- ]
- );
- },
可以看到效果: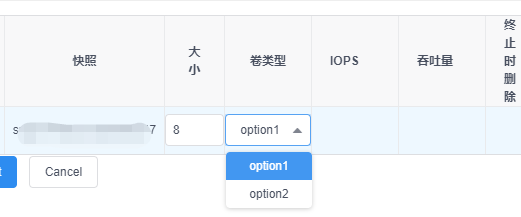
好,现在我们实现了基本的渲染。现在我们实现动态改变option的内容,与组件的data结合起来,毕竟当数据量大的时候,总不能一个一个的写上去。
观察render的第三个参数为一个对象数组,我们可不可以使用便利数据数组的方式生成呢?(废话)
直接上代码,在数组的地方写入:
[javascript] view plain copy
- this.volumeTypes.map(function(type){
- return h(‘Option’, {
- props: {value: type}
- }, type);
- })
其中,this.volumeTypes就是我们的列数据,当然,这是最基本的绑定的写法,如果想使用对象数组,自行研究,很easy的~
这是我们的最终结果:
[javascript] view plain copy
- {
- title: ‘卷类型’,
- key: ‘volumeType’,
- align: ‘center’,
- render: (h, params) => {
- return h(‘Select’, {
- props:{
- value: this.data[params.index].volumeType,
- },
- on: {
- ‘on-change’:(event) => {
- this.data[params.index].volumeType = event;
- }
- },
- },
- this.volumeTypes.map(function(type){
- return h(‘Option’, {
- props: {value: type}
- }, type);
- })
- );
- },
- },
****************************************************************************************************
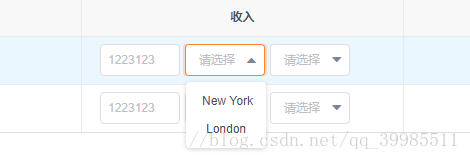
以下是本人的代码,仅供参考
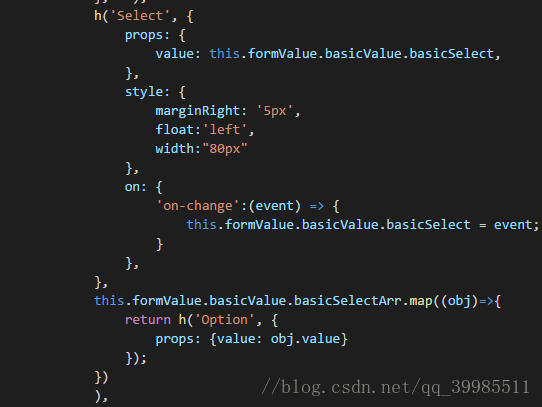
效果如下:
渲染input组件:
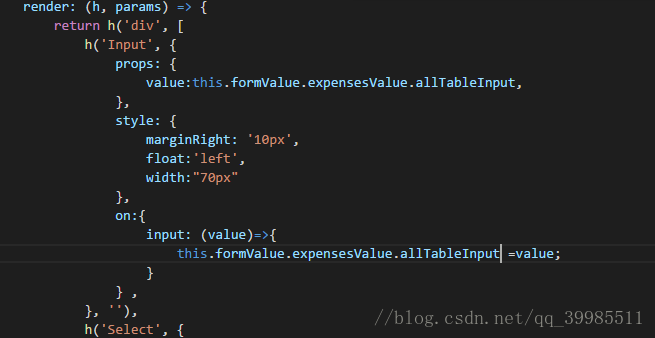


还没有评论,来说两句吧...