SpringBootAdmin集成Turbine、使用Spring Boot Security添加安全验证
SpringBootAdmin集成Turbine
Hystrix Dashboard是一个监控熔断器状况的组件,而Turbine是一个可以聚合多个HystrixDashboard的组件。在Spring Boot Admin 中,可以很方便地集成Turbine组件。集成Turbine组件非常简单,只需要引入相关的依赖并做简单的配置即可。
首先需要两个Eureka Client 工程,在这两个Eureka Client的工程中实现Hystrix熔断器和Hystrix Dashboard组件。然后,需要一个Turbine工程,在这个工程中聚合两个Eureka Client的Hystrix DashBoard。最后,在Spring Boot AdminServer中集成Turbine组件,这样就可以将Turbine界面显示的信息整合在Spring Boot AdminServer中,方便统一查看和管理。
改造Eureka Client
eureka-client-one工程需要集成Hystrix和Hystrix DashBoard 组件。在eureka-client-one工程的pom文件引入Hystrix的起步依赖spring-cloud-starter-hystrix和Hystrix Dashboard的起步依赖spring- cloud-starter-hystrixdashboard,代码如下:
<dependency><groupId>org.springframework.cloud</groupId><artifactId>spring-cloud-starter-hystrix-dashboard</artifactId></dependency><dependency><groupId>org.springframework.cloud</groupId><artifactId>spring-cloud-starter-hystrix</artifactId></dependency>
在程序启动类EurekaClientOneApplication加上@EnableHystrix注解,开启Hystrix 的功能,加L@EnableHystrixDashboard注解,开启熔断器监控Hystrix Dashboard 的功能,代码清单如下:
@SpringBootApplication@EnableEurekaClient@EnableHystrix@EnableHystrixDashboardpublic class EurekaClientOneApplication {public static void main(String[] args) {SpringApplication.run(EurekaClientOneApplication.class, args);}}
写一个API接口“hi”,在方法上加上@HystrixCommand注解,该注解用于创建一个熔断器,并指明fallbackMethod (回退方法)为“hiError” 方法。在hiError()方法中,直接返回一个字符串,代码如下:
@RestControllerpublic class HiController {@Value("${server.port}")String port;@GetMapping("/hi")@HystrixCommand(fallbackMethod = "hiError")public String home(@RequestParam String name) {return "hi " + name + ",i am lucy and from port:" + port;}public String hiError(String name) {return "hi, " + name + ",sorry, error!";}}
这样eukre-client-one就被改造成了-一个具有熔断器功能的Eureka Client,并且在API接口“/hi”使用到了熔断器。
另行构建Eureka Client:
在主Maven目录下创建另外一个Eureka Client 的Module工程,该工程取名为eureka-client-two。它的依赖同eureka-client-one,并且同样也对外也暴露一个 API接口“/hi”,在这个API接口中也使用到了熔断器。
eureka-client-two 工程与eureka-client-one工程的代码类似,与eureka-client-one工程不同的是,需要在eureka-client-two工程的配置文件application.yml中指明程序的名称为eureka-client-two,程序的端口号为8763,日志输出路径为“logs/eureka-client-two.log”。eureka-client-two 工程的配置文件application.yml代码清单如下:
server:port: 8763spring:application:name: eureka-client-twoeureka:client:service-url:defaultZone: http://localhost:8761/eureka/logging:file: "logs/eureka-client-two.log"management:security:enabled: false
构建Turbine工程:
在主maven工程下创建一个 Module工程,取名为turbine-service。turbine-service 工程提供了Turbine组件的功能,聚合了eureka-client-one和eureka-client-two工程的Hystrix Dashboard组件。
turbine-service 工程的pom文件继承主Maven工程的 pom 文件,引入了Turbine功能依赖,包括spring-cloud-starter-turbine和spring-cloud-netlix-turbine,并引入了Actuator 的起步依赖spring-boot-starter-actuator和Jolokia的依赖jolokia-core。turbine-service 工程的pom文件代码清单如下:
<dependencies><dependency><groupId>org.springframework.cloud</groupId><artifactId>spring-cloud-starter-turbine</artifactId></dependency><dependency><groupId>org.springframework.cloud</groupId><artifactId>spring-cloud-netflix-turbine</artifactId></dependency><dependency><groupId>org.springframework.boot</groupId><artifactId>spring-boot-starter-actuator</artifactId></dependency><dependency><groupId>org.jolokia</groupId><artifactId>jolokia-core</artifactId></dependency></dependencies>
在turbine-service工程的配置文件application.yml中做程序的相关的配置,包括配置程序的名称为service-turbine, 端口号为8769, 服务注册地址为http://localhost:8761/eureka/。
该工程聚合监控了eureka-client-one 和eureka-client-two工程的Hystrix Dashboard,集群配置采用默认。配置文件application.yml的代码清单如下:
server:port: 8769spring:application:name: service-turbineturbine:aggregator:clusterConfig: defaultapp-config: eureka-client-one,eureka-client-twocluster-name-expression: new String("default")management:security:enabled: falseeureka:client:service-url:defaultZone: http://localhost:8761/eureka/
在程序的入口类TurbineServiceApplication加上@EnableTurbine注解,开启Turbine 的功能,代码如下:
@EnableTurbine@SpringBootApplicationpublic class TurbineServiceApplication {public static void main(String[] args) {SpringApplication.run(TurbineServiceApplication.class, args);}}
在Admin Server中集成Turbine:
最后需要在Spring Boot Admin Server中集成Turbine。在admin-server工程的pom文件引入相关依赖,需要引入以下4个依赖,代码清单如下:
<dependency><groupId>de.codecentric</groupId><artifactId>spring-boot-admin-server-ui-turbine</artifactId><version>1.5.1</version></dependency><dependency><groupId>de.codecentric</groupId><artifactId>spring-boot-admin-server-ui-hystrix</artifactId><version>1.5.1</version></dependency><dependency><groupId>org.springframework.cloud</groupId><artifactId>spring-cloud-starter-turbine</artifactId></dependency><dependency><groupId>org.springframework.cloud</groupId><artifactId>spring-cloud-starter-hystrix-dashboard</artifactId></dependency><dependency><groupId>org.springframework.cloud</groupId><artifactId>spring-cloud-starter-hystrix</artifactId></dependency>
在admin-server 工程的配置文件application.yml 中配置Turbine,通过spring.boot.admin.turbine.clusters来配置集群的情况,本案例的集群情况使用默认的即可。通过spring.boot.admin.turbine.location来配置Turbine的服务名,本案例Turbine的服务名为service-turbine, 代码清单如下:
server:port: 5000spring:application:name: service-adminboot:admin:routes:endpoints: env,metrics,dump,jolokia,info,configprops,trace,logfile,refresh,flyway,liquibase,heapdump,loggers,auditevents,hystrix.streamturbine:clusters: defaultlocation: service-turbinemanagement:security:enabled: falselogging:file: "logs/boot-admin-sample.log"
在程序的启动类AdminServerApplication加上@EnableTurbine注解开启Turbine功能,加上@EnableHystrixDashboard注解开启Hystrix Dashboard 的功能,加上@EnableHystrix注解开启Hystrix功能。代码清单如下:
@SpringBootApplication@EnableAdminServer@EnableTurbine@EnableHystrix@EnableHystrixDashboardpublic class AdminServerApplication {public static void main(String[] args) {SpringApplication.run(AdminServerApplication.class, args);}}
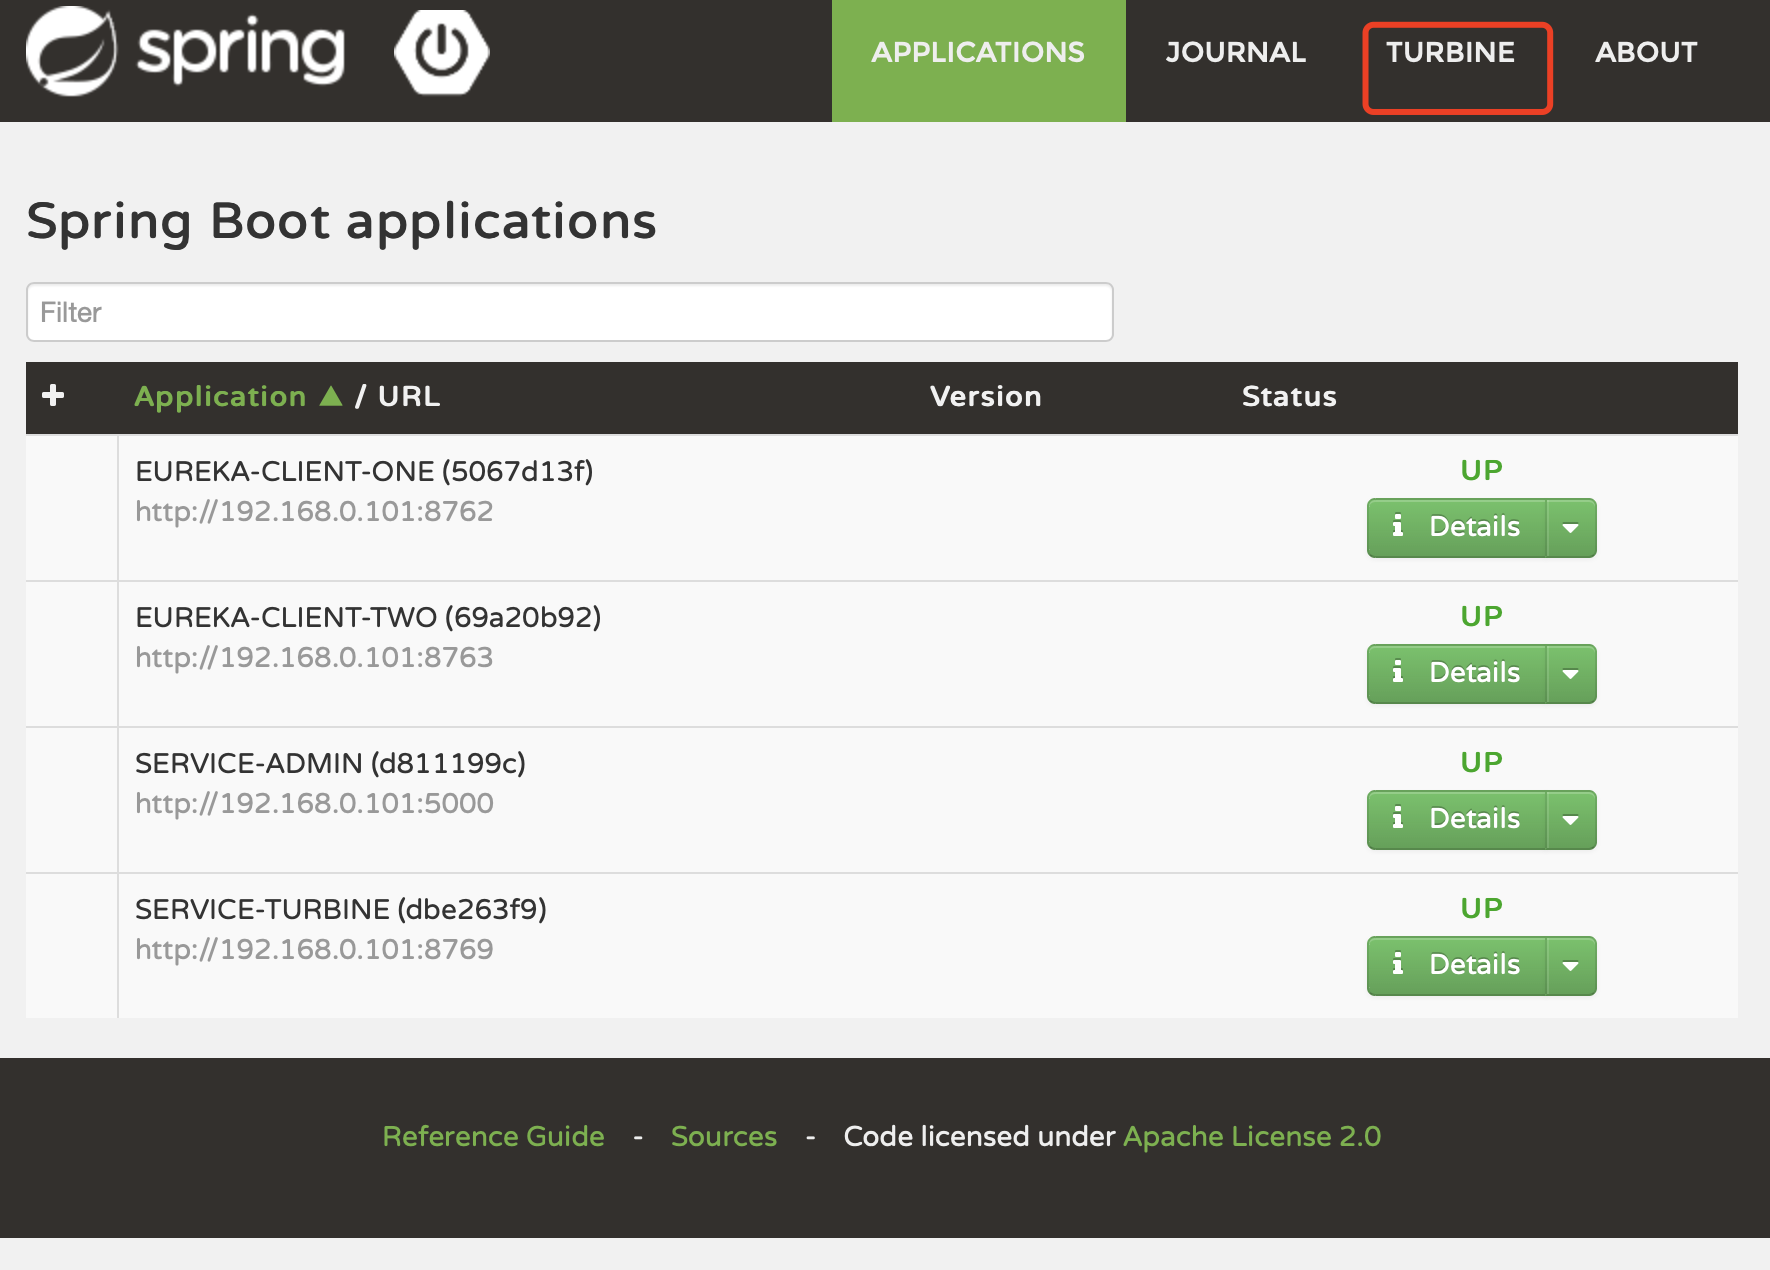
依次启动工程 eureka-server、eureka-client-one 、eureka-client-two 、turbine-service 和admin-server这5个工程,在浏览器上访问admin-server的主页htp://ocalalhost:5000,浏览器显示如图所示。这个界面与12.1 节中案例的界面相比多了一一个“TURBINE”的选项按钮。
依次请求http://localhost:8762/hi?name=forezp 和http://localhost:8763/hi?name=forezp, 这两个API接口带有熔断器的功能。

请求完毕大约1分钟后,admin-server的主页的Turbine页面显示如下图所示。注意:如果浏览器的“TURBINE”选项按钮没有显示出来,可以尝试清空浏览器缓存再访问。

在SpringBootAdmin中添加安全登录界面
SpringBootAdmin提供了非常良好的组件化界面,例如在上一节就很方便地集成了Turbine的界面。在生产环境中,不希望通过网址直接访问Spring Boot Admin Server的主页界面,因为这个界面包含了太多的服务信息,必须对这个界面的访问进行安全验证。
SpringBootAdmin提供了登录界面的组件,并且和Spring Boot Security 相结合,需要用户登录才能访问Spring Boot Admin Server的界面。
下面来进行具体的案例讲解,本节的案例在上一节的案例基础之上进行改造。在admin-server工程的pom文件加上相关的依赖,包括登录界面组件的依赖spring-boot-admin-server-ui-login,以及Spring Boot Security的起步依赖spring-boot-starter-security,代码清单如下:
<dependency><groupId>de.codecentric</groupId><artifactId>spring-boot-admin-server-ui-login</artifactId><version>1.5.0</version></dependency><dependency><groupId>org.springframework.boot</groupId><artifactId>spring-boot-starter-security</artifactId></dependency>
在工程的配置文件application.yml中做以下的配置,创建一个security的user用户,它的用户名为admin,密码为123456通过eureka.instance.metadate-map 配置带上该security的user用户的信息,因为在工程的pom文件加上Spring Boot Security 的起步依赖以后,该项目的所有资源(包括静态资源html、css, 以及API接口等)都是受保护的,需要加上该管理员信息进行安全验证才能访问,代码如下:
security:user:name: adminpassword: 123456eureka:instance:metadata-map:user.name: adminuser.password: 123456
然后,在程序中配置Spring Boot Security, 写SecurityConfig 的配置类,该配置类继承WebSecurityConfigurerAdapter,并复写了configure(HttpSecurity http)方法。
在该方法下做了各种配置,例如配置了登录界面为“/login.htm1”, 登出界面为“/logout”。这些页面以及静态资:
@Configurationpublic class SecurityConfig extends WebSecurityConfigurerAdapter {@Overrideprotected void configure(HttpSecurity http) throws Exception {http.formLogin().loginPage("/login.html").loginProcessingUrl("/login").permitAll();http.logout().logoutUrl("/logout");http.csrf().disable();http.authorizeRequests().antMatchers("/login.html", "/**/**.css", "/img/**", "/third-party/**").permitAll();http.authorizeRequests().antMatchers("/**").authenticated();http.httpBasic();}
重新启动admin-server工程,在浏览器中访问http://localhost:5000/,浏览器显示的界面如下图所示。
在界面上输入用户名为amidn,密码为123456,单击”Login”按钮,登录成功就会跳转到Spring Boot Admin的主页。


和readObject()方法实现了对象的串、反串行化")


还没有评论,来说两句吧...