封装一个基础的vue-router
前言
主要知识点:
- 路由原理
- Hash与History
- 实现路由
一、一个vue路由的工作原理
前端路由与后端路由的区别:
后端路由:
输入url>请求发送到服务器>服务器解析请求的路径>拿取对应的页面>返回回去
前端路由:
输入url>js解析地址>找到对应的地址的页面>执行页面生成的js>看到页面
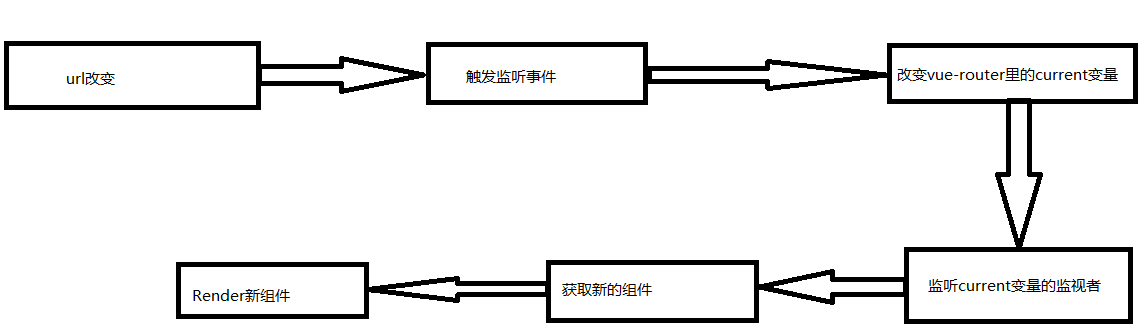
vue-router工作流程
二、Hash与history的使用
hash:
- #号后的就是hash的内容
- 可以通过location.hash拿到
- 可以通过onhashchange监听hash的改变
- 可以在#号后面加路径不会向服务器请求
history:
- history即正常的路径
- location.pathname
- 可以用onpopstate监听history变化
三、Vue插件基础知识
如:vue-router、vuex、element-ui都是插件
插件基础点:
- Vue.use去使用一个插件,并且去执行install方法
- Vue.mixin往vue的全局混入自定义的操作
- 可以通过this.$options拿到new Vue时的参数
示例:
以下都是在main.js执行
1、初始Vue.use()
Vue.use({console.log('use') //会打印出use})
2、install属性
let a = function() {console.log(a)}//或 let a ={}a.install=function(){console.log('install')}Vue.use(a) // 会打印install,而不会打印a。// 如果你给他一个方法,他就执行这个方法,// 但是无论你给他的任何东西,只要给他一个install属性,他就会执行install。
3、Vue.mixin()
let a = function() {console.log(a)}//或 let a ={}a.install=function(vue){// Vue.mixin 全局混入自定义操作。上面的vue是作为参数传进来的,而不是import Vue from 'vue'中的Vuevue.mixin({data () {return {c:123456 // 在其他页面this.c}},methods:{globalMethods(){console.log('我是全局方法') // 在其它页面this.globalMethods()}},created() {console.log(this)}})}Vue.use(a)
4、Vue工具类(Vue.util)
vue 工具类: defineReactive、extend、mergeOptions、warn
let obj = {key:'KEY'}setTimeout(function () {obj.key='KEY2' // 3s改变{ {this.obj1.key}}},3000)let a = function() {console.log(a)}//或 let a ={}a.install=function(vue){console.log(vue.util) // vue 工具类: defineReactive、extend、mergeOptions、warnvue.util.defineReactive(obj,'key') // 监听。源码使用的是Object.defineProperty()vue.mixin({beforeCreate(){this.obj1=obj //在其他页面{ {this.obj1.key}},值为KEY。}})}
vue.extend() 与 vue.util.extend() 区别:
vue.extend() // 单元测试const home = Vue.extend(home)// 新建这个组件的构造函数,也就是组件的thisconst vm = new home().$mount()vue.util.extend() // 浅拷贝对象
四、 封装基础vue-router
准备完了前面几个知识点,我们下面来整代码,需要注意的是,下面只是个基础的vue-router,只可以页面切换。本篇只是为了熟悉源码,不为实际需要。
在src文件夹下新建一个文件夹myrouter,里面再新建一个index.js文件。
在原来的router文件夹里的index.js中把原来引入router的路径换为import VueRouter from '../myrouter'
编辑myrouter文件夹下的index.js
// 记录history对象class HistoryRoute{constructor(){// 要监听的路径this.current=null;}}// vuerouter本身class vueRouter{constructor(options){this.mode=options.mode||'hash'; //配置模式this.routes=options.routes||[]; // routes路由表this.routesMap=this.createMap(this.routes); // 调用 createMap,参数是路由表routesthis.history=new HistoryRoute;// 实例化historythis.init(); // 初始化}init(){if(this.mode=='hash'){ // 判断是否是hash模式location.hash?'':location.hash='/'; // 自动加#号。如果有hash返回空字符串。否则返回/window.addEventListener('load',()=>{ // 监听页面加载完成this.history.current=location.hash.slice(1); //拿到hash值,把#去掉。赋给实例化的history的current路径。})window.addEventListener('hashchange',()=>{ // 监听hash改变this.history.current=location.hash.slice(1);})}}// 路径对应组件。新组合一个对象。如:{'/':Home},也就是映射。createMap(routes){return routes.reduce((memo,current)=>{ // current 就是路由表routesmemo[current.path]=current.component;return memo},{ })}}vueRouter.install=function(Vue){// 写插件要注意判断插件是否注册if(vueRouter.install.installed)returnvueRouter.install.installed=true;// 向vue里面混入操作Vue.mixin({beforeCreate(){if(this.$options&&this.$options.router){ // 在App.vue文件里如果有router选项的话this._root=this; // 这里的this指向当前Vue实例,缓存下自身。this._router=this.$options.router; // 挂载下选项里传进来的router.Vue.util.defineReactive(this,'current',this._router.history); //监听this.current,并且传入第三个参数。相当于children。}else{this._root=this.$parent._root; //如果没有就向上查找一级,直到查到App.vue里new Vue({router})为止。}// 这个方法只是说明this.$router只读,私有变量思想Object.defineProperty(this,"$router",{ //this指当前组件实例get(){return this._root._router; // 返回挂载后的router}})}})// 定义组件Vue.component('router-view',{render(h){let current=this._self._root._router.history.current;// 拿到当前存进去的router实例里的currentlet routerMap=this._self._root._router.routesMap;//拿到当前存进去的router实例里的routesMapreturn h(routerMap[current]); // 拿到routerMap,调用h方法。渲染routerMap对应关系。放到router-view组件里面。}})}// 暴露vuerouterexport default vueRouter;
结语
前端的路上我们一起前行。


")


还没有评论,来说两句吧...